


Run your hand across a five-year-old kitchen counter and you can feel where the regret lives.
A dull cloud in front of the sink. A crumb ledge nobody can scrub clean. A hairline crack at the overhang where somebody’s kid leaned too hard on a Tuesday.
Countertops fail differently than flooring or cabinets. They fail in the exact spot you look at eighty times a day.
The people who install these surfaces for a living pick very differently than the showroom suggests. They know which materials look incredible for eighteen months and then quietly turn into a chore.
Here are 31 countertop choices that go sour fast — and what the pros put in their own kitchens instead.
1. Polished Carrara Marble on the Main Island

Etching isn’t staining. That’s the part nobody explains at the slab yard.
A splash of lemon juice or a dribble of red wine vinegar chemically dissolves the calcite at the surface, leaving a dull matte scar in the polish. Sealer does nothing to prevent it — sealer blocks absorption, and etching is surface damage. The fix is mechanical: re-honing and re-polishing that section with diamond pads, which is exactly as involved as it sounds.
Within five years a working island in polished Carrara looks like a topographic map of everything anyone ever spilled.
Pros love marble. They just put it where it can’t lose — a baking station, a butler’s pantry, a powder room vanity. On the island where dinner actually happens, they run quartzite or soapstone and sleep fine.
2. Builder-Grade Post-Form Laminate With the Rolled Edge

You know it on sight: the rolled front nose, the coved integral backsplash, the whole top stamped out in one continuous curve.
The look is the smaller problem. The real failure is structural, and it always starts in the same two places.
Water finds the front seam where the laminate wraps the nose, and it finds the raw particleboard edge inside the sink cutout. Fabricators are supposed to seal that cutout with silicone or varnish. On spec-house work, plenty don’t.
Particleboard swells roughly fifteen to twenty percent in thickness once it wets through, and the swelling is permanent — the fibers don’t shrink back when they dry. First you notice the laminate lifting a hair at the sink rim. Then a soft spot under your palm. Then a visible hump running along the front edge, and the seam opens into a dark line you can catch a fingernail in.
That’s a three-to-five year clock in a family kitchen with a dishwasher next to the sink.
Skip the post-form. Flat-lay laminate with a hardwood or aluminum applied edge sheds water at the seam instead of wicking it, and it doesn’t read rental. Better still: a 2cm granite or quartzite remnant now runs close to the same money on a standard galley run, and remnant yards are full of them.
3. Bright-White Quartz in a Sun-Soaked Window Run

Engineered quartz is about 90% ground stone and 10% polymer resin. The resin is the weak link.
UV exposure oxidizes it, and oxidized resin goes yellow. On a south-facing window run you’ll see it first as a faint warm cast, then as a defined stripe where the sun lands and the sink base doesn’t. Most manufacturer warranties exclude outdoor or direct-sun installation for exactly this reason, so the claim goes nowhere.
The same resin scorches. A 400-degree pan sets a permanent brown halo in about four seconds, and there’s no sanding it out — you’d be cutting into the color layer.
For sunny runs, sunrooms, and outdoor kitchens, pros spec granite or full-body porcelain. Both are UV-stable by nature, not by additive.
4. Tiled Countertops With Grout Lines

Ask designers which kitchen trend homeowners regret most and tiled counters come up again and again — The Kitchn has polled them on it directly.
Grout stains no matter how well you seal it. Tomato, turmeric, coffee, red wine. And lippage — the tiny height difference between adjacent tiles — catches knife tips and makes a cutting board rock.
Nothing sits flat. Not a mixing bowl, not a rolling pin, not a laptop.
You can have the charm without the misery. Run the tile up the backsplash where it never gets wet with anything but steam, and give yourself a continuous work surface underneath.
5. The Ogee Edge Profile

An edge profile dates a kitchen faster than the stone does.
The ogee’s S-curve is a grease trap. Crumbs pack into the cove, cleaning rag skips right over it, and after a couple of years there’s a dark shadow line running the whole perimeter.
Then there’s the thin upper lip. It’s the first thing a dropped cast-iron skillet finds, and the chip at the dishwasher corner is nearly impossible to repair invisibly.
Eased. Pencil. A mitered square. Those three cover almost every kitchen worth photographing.
6. Poured-in-Place Concrete Counters

Ask the contractors who pour them and a lot of them will tell you it’s the material they most regret installing — Apartment Therapy collected those verdicts and they aren’t gentle.
Start with the cracking, because homeowners consistently misread it. Concrete shrinks as it cures — roughly 1/16 inch per 10 feet of run — and it keeps moving with temperature and humidity for months after the pour. Hairline cracks are not a defect. They’re the material doing what concrete has always done, in sidewalks and foundations and bridge decks. The difference is that in those applications, nobody’s staring at it over a cup of coffee.
A good fabricator reinforces with rebar or fiber mesh and places control joints so cracks land where they’re expected. That controls the map. It doesn’t eliminate it.
Then there’s the sealing. Concrete is porous, so the sealer is the actual countertop — everything else is substrate. Topical film sealers scratch and wear through at the prep zone. Penetrating sealers let oil and wine through over time. Either way you’re resealing every one to two years, and an olive oil bottle left standing overnight leaves a dark ghost that won’t come out.
Heat is the other surprise. The concrete doesn’t care, but the sealer absolutely does — a hot pan will cloud or blister the film.
Want the gray matte look without the maintenance calendar? Honed granite, soapstone, or a concrete-look porcelain slab gets you there and asks nothing of you. If the DIY itch is the real motivation, channel it into something that isn’t your primary work surface — a concrete countertop on an outdoor bar is where this material genuinely shines.
7. Butcher Block Wrapped Around an Undermount Sink

Wood and an undermount sink rim is the single worst pairing in a kitchen. Not because wood is fragile — because of where the water goes.
Here’s how it plays out.
Year one: everything looks perfect. The silicone bead at the sink rim is tight, the oil finish beads water, you’re posting photos.
Year two: the silicone starts to release at the corners where movement is greatest. Wood expands and contracts across its width with seasonal humidity — a 25-inch-deep top can move 1/8 inch or more between February and August — and silicone doesn’t stretch forever. A hairline gap opens.
Year three: water wicks into exposed end grain at the cutout. End grain absorbs moisture something like ten to fifteen times faster than face grain. The wood swells around the sink, the finish clouds, and a gray-black discoloration creeps out from the rim. That black is usually tannin reacting with iron, or the beginning of mold in wood that never fully dries.
Year four: the swelling is permanent, the joint between staves opens, and sanding it back means dropping the sink, resurfacing, refinishing, and re-bedding — a weekend at minimum and often a new top.
Pros love wood counters. They just keep them out of the wet zone entirely. Put stone or quartz around the sink and run a butcher block section on the island or a dedicated baking run where a spill gets wiped in ten seconds. If wood must meet a sink, use a top-mount with a rim that covers the cutout edge, and re-oil the area every two months. Not annually. Every two months.
8. A Drop-In Sink With a Rim Sitting on Stone

You paid for a stone slab and then set a rimmed sink on top of it. The upgrade just canceled itself out.
That quarter-inch lip is a permanent dam. Crumbs pile behind it, water pools in front of it, and the caulk line around the rim turns gray within a year no matter how often you scrub.
Undermount costs maybe $150 more in fabrication. Or flush-set an apron front and get a real design moment out of it.
9. Speckled ‘Tuscan’ Granite — Uba Tuba, Santa Cecilia, Venetian Gold

Between roughly 1998 and 2008, these three slabs went into an enormous share of American kitchens. The busy gold-and-brown fleck, the ogee edge, the 4-inch splash — it’s a time stamp.
And the stone itself is excellent. Granite is harder than quartz, handles heat without a trivet, and Uba Tuba in particular is dense enough to laugh at a dropped knife.
That’s why pros often keep it. Paint the oak cabinets, swap the hardware, change the backsplash to something quiet, and the granite reads neutral instead of dated.
If it has to go, replace it with low-movement stone — a quiet gray, a soft speckle. Busy patterns are what age.
10. Matte Black and Honed Jet-Black Surfaces

Gorgeous in the showroom, under showroom lighting, on a slab nobody has touched.
In a real kitchen, honed black records everything. Fingerprints, water spots, the oil off a bag of groceries. The matte micro-texture that makes it look so soft also grabs cleaner residue and holds it as a chalky white haze that regular wiping just redistributes.
Owners end up buffing with a microfiber and a little mineral oil weekly. That’s a hobby, not a countertop.
Leathered mid-tone finishes hide the same marks. So does a black with subtle gray flecking — the visual noise breaks up the smudge pattern before your eye locks onto it.
11. The DIY Epoxy Pour-On ‘Faux Marble’ Countertop

Every one of those satisfying pour videos was filmed within 48 hours of the pour. None of them were filmed at month twenty.
Pour-on epoxy stays comparatively soft — you can dent it with a thumbnail on a hot day. It ambers under UV, so the crisp white goes butterscotch near any window. And a hot pan sets a permanent opaque white ring, because the heat clouds the resin from within.
Worst part: no spot repair. You can’t sand and re-pour a patch, because the new epoxy won’t blend into the cured film. Fixing one ring means recoating the whole surface.
Treat it as a two-year stopgap if you’re between renovations. Budget for a real top. Epoxy belongs on signs and inlay work, not on the surface where you set a skillet.
12. The Full Bullnose Edge

A fully rounded edge has no bottom lip for water to break off of.
Spill something and it follows the curve right down the cabinet face. Over years that’s a swollen toe kick and a stained drawer front.
It also reads 1997 from across the room.
An eased edge or a half-bevel gives you a crisp underside drip line. That tiny detail keeps water off your cabinets for the life of the kitchen.
13. Cultured Marble Vanity Tops With the Integrated Bowl

Cultured marble is crushed limestone in polyester resin with a sprayed gel coat on top. The gel coat is maybe 20 mils thick, and it is the entire product.
Once it yellows from UV or oxidized cleaners, dulls from abrasive scrubbing, or crazes into a spiderweb of hairlines around the bowl, there’s nothing underneath to refinish to. You’re looking at raw filler.
Refinishing kits exist. They’re paint, and they last about two years.
Quartz or porcelain vanity top with an undermount ceramic bowl. Costs more up front, outlives three cultured marble tops.
14. The Waterfall Island

Two exposed mitered corners, running vertically, at shin height, in the busiest traffic lane in the house — made from the most expensive material in the house.
A miter is a 45-degree edge glued to another 45-degree edge. The stone at that joint is knife-thin. A vacuum cleaner, a bar stool leg, a kid’s scooter — any of it chips the corner, and a chip there cannot be repaired invisibly.
Then the vein match. Done right, the pattern flows over the corner and down the leg, which requires cutting the waterfall panel from the piece directly adjacent on the same slab. When a fabricator pulls the leg from a remnant to save yield, the veins hit the corner and go somewhere else entirely.
Pros keep the seated overhang and put the money into a thicker top — a 6cm mitered apron reads more expensive than a waterfall and can’t get kicked.
15. Stainless Steel Counters in a Home Kitchen

Commercial kitchens use stainless because it sanitizes fast and gets replaced on a schedule. Nobody in a restaurant is admiring it.
In a home, 16-gauge stainless picks up a permanent swirl of fine scratches within a few months. That’s not damage — it’s what the material does — but it’s jarring when you paid for a mirror surface.
It dents where you set a heavy Dutch oven. It’s loud. And it reads cold under warm kitchen lighting in a way that photographs beautifully and lives poorly.
One stainless prep section next to the range, integrated into a stone run. All the function, none of the clatter.
16. Peel-and-Stick Marble Film and Countertop Paint Kits

Adhesive film starts lifting at the two places heat and water live: the sink rim and the range edge. Usually within a single season.
Paint kits fare a little better on a rental timeline, but the topcoat softens under a hot pan and wears through at the spot where you actually chop.
Both leave adhesive residue or a scuffed substrate the next person has to deal with.
A flat-lay laminate remnant top — fabricated, delivered, installed — often runs a few hundred dollars on a small kitchen and lasts a decade. Do that instead.
17. ‘Quartzite’ That’s Actually Soft Dolomitic Marble

This one costs people real money because it happens at the contract stage.
Super White, Fantasy Brown, and anything labeled “Calacatta quartzite” are frequently dolomitic marble sold under a quartzite name. True quartzite is metamorphosed sandstone — it rates about 7 on the Mohs scale and shrugs off acid. Dolomitic marble sits around 3.5 to 4 and etches exactly like Carrara.
Two tests, both free, both done at the slab yard before anything is signed. Drag a steel knife blade across the polished face in an inconspicuous spot — real quartzite scratches the steel, not the reverse. Then put a drop of lemon juice on it and wait five minutes. If there’s a dull spot, it’s marble.
Any yard that refuses both tests is telling you the answer.
18. The Two-Level Raised Breakfast Bar

The four-inch step that defined every kitchen built between 1995 and 2008.
It swallows usable prep depth on the working side, blocks the sightline from the kitchen into the family room that the open plan was supposed to create, and requires an extra run of stone plus supports.
It’s the loudest 2002 tell in the room. Louder than the granite.
One flat level, with an overhang sized for actual stools and supported properly underneath. Cheaper to fabricate, too.
19. Solid Surface With the Integrated Sink Bowl

Corian and its cousins get an unfair beating, mostly from owners who never learned the material’s one real trick.
Yes, it scratches. Yes, a hot pan will scorch it, and the work zone goes dull matte within a couple of years while the rest of the run stays glossy.
But solid surface is homogeneous all the way through. A random orbital sander and a progression through 220, 320, and 400 grit brings it back to new, seams and all. Almost nobody is told this at the sale.
Pros still spec it — for seamless bath tops, healthcare work, and accessible design where the integrated bowl and coved corners genuinely matter. Just not for a hot, hard-working kitchen where nobody’s going to sand anything.
20. A 2cm Slab With a Laminated Build-Up Edge

This is the classic value-engineering move on a stone quote: buy the thin slab, then glue a strip of the same stone under the front edge to fake 4cm thickness.
Two things go wrong. The glue line at the seam is a capillary channel — grease and coffee wick in and it darkens into a visible dark stripe along the entire front edge within a few years.
And the applied strip is only held on by adhesive. At an outside corner, where someone bumps it with a hip a thousand times, it eventually pops loose.
Full 3cm stock costs maybe 15-20% more in material and needs no build-up at all. If you want the chunky look, pay for a properly mitered edge from a fabricator who does them regularly — a good miter is nearly invisible.
21. Recycled Glass Composite Counters

The 2008-2015 green-building wave produced some genuinely beautiful slabs. Cobalt and amber shards suspended in white — showroom knockouts.
Cement-bound versions craze as the matrix cures and moves, and they stain like concrete because they are concrete. Resin-bound versions hold up better but chip at the glass shards, where the bond between matrix and glass is the weak point. Those chips catch light and can’t be filled.
And the palette is stamped 2011 in a way that granite never quite is.
Terrazzo-look porcelain does the confetti thing now, in through-body material with no sealing. Or if you want the real handmade version, build a terrazzo top from broken marble tile for a bar or a small vanity where the stakes are low.
22. A Seam Running Through the Sink Cutout

The strip of stone in front of an undermount sink is usually 3 to 4 inches wide. It’s the weakest rail in the entire top, and it’s the one place people lean their whole body weight while scrubbing a roasting pan.
Put a seam through it and you’ve built in a fracture point. It won’t fail on day one. It’ll fail on a Thanksgiving when someone sets a full stockpot on the edge.
Competent fabricators place seams at a cooktop cutout or an inside corner, where the stone isn’t carrying a load, and they rod-reinforce the sink rail with steel epoxied into a routed channel underneath.
Ask for the seam diagram before fabrication starts. A shop that won’t produce one is a shop making it up at install.
23. Limestone and Travertine Countertops
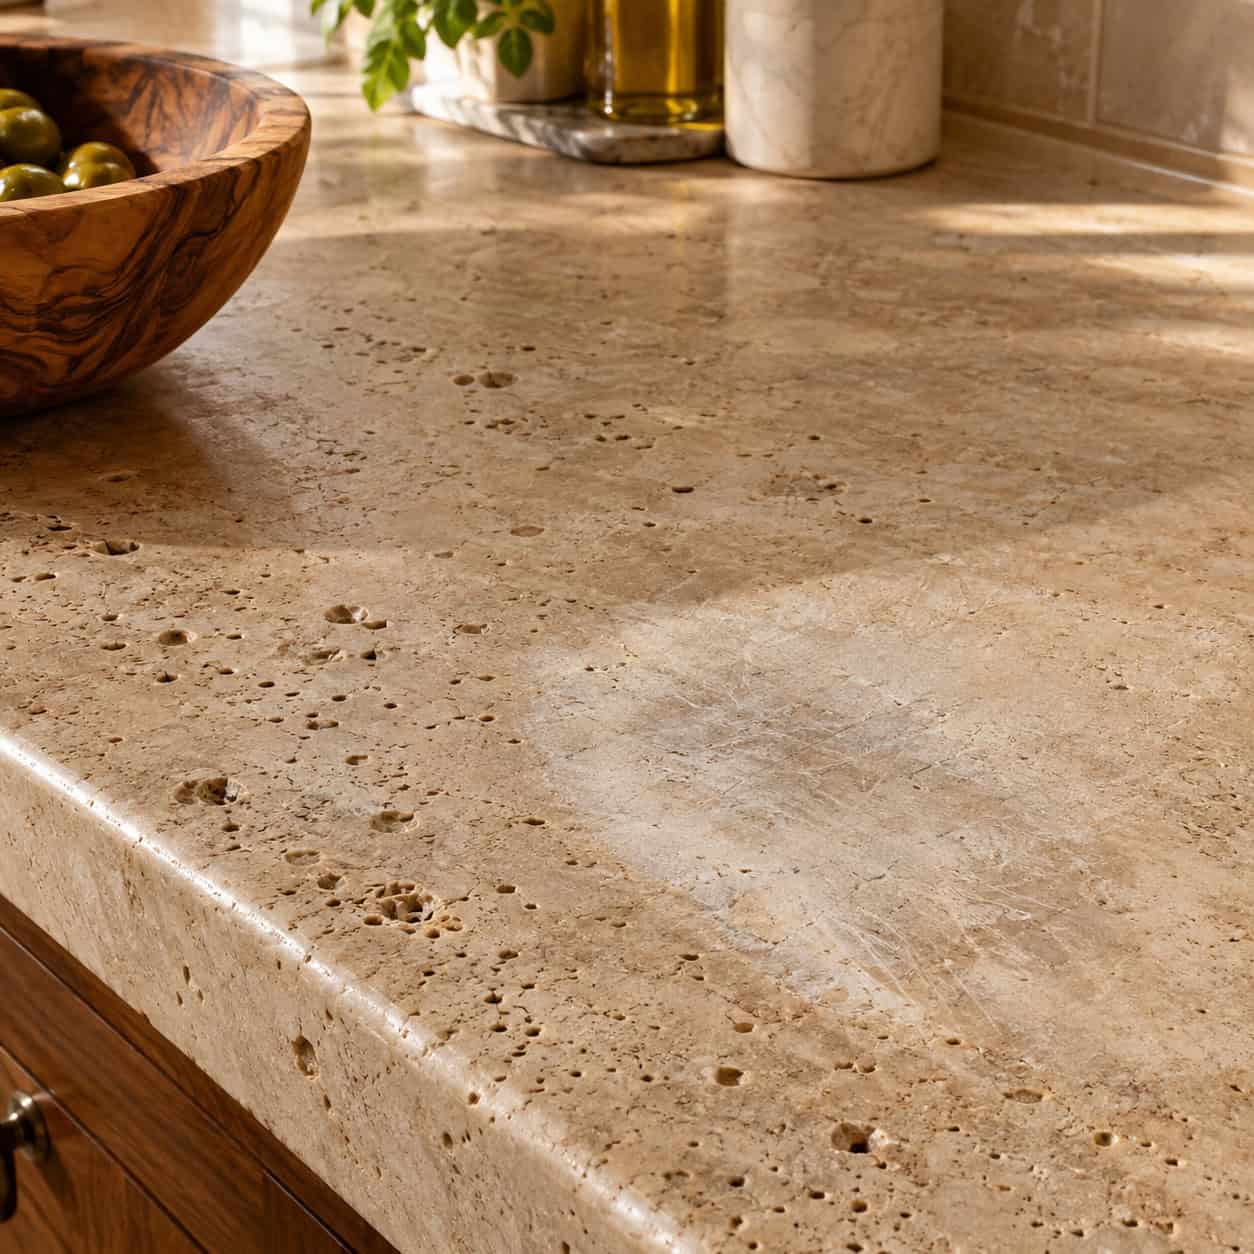
Softer and more porous than marble, which is saying something.
Travertine has natural voids — the holes are the whole character of the stone — and filled travertine loses its fill over time, leaving pinholes that collect food. Limestone dishes out under a cutting board from plain abrasion. Both etch from hard tap water alone, no acid required.
Five years of daily use and the sink area is visibly lower than the rest of the run.
Pros use it constantly — on floors, fireplace surrounds, patios, and powder room vanities that see a hand wash a day. Never on a prep surface.
24. The 4-Inch Stone Backsplash Rail

The stubby splash is a fabricator’s convenience, not a design choice. It uses up offcut material and saves a tile install.
What you get is a caulk line at counter height that yellows, shrinks, and pulls away from the wall — and then a second horizontal line four inches up where you’re forced to start paint or tile. Two lines where there should be zero.
Full-height slab is the premium answer and it’s seamless behind the range. Tile straight down to the counter is the value answer and it looks intentional.
Either beats the lip.
25. Thin Porcelain and Ultra-Compact Slabs With Mitered Edges

Sintered porcelain is close to bulletproof across the face — it won’t stain, won’t etch, won’t scorch, and a knife can’t scratch it.
The edges are another story. At 6mm or 12mm, a mitered corner is brittle, and a solid impact chips it.
The bigger issue is what’s underneath. Most porcelain slabs are printed — a decorated surface layer over a plain white body. Chip the edge and a bright white crescent appears that can’t be color-matched, ever.
Insist on through-body or full-body material where the pattern runs the whole thickness. And hire a fabricator with real sintered-stone experience and the right diamond tooling, because this material punishes the guy learning on your kitchen.
26. Zinc, Copper, and Pewter Counters

Soft metals patina by design. That’s the pitch, and it’s honest — every glass ring, handprint, and drop of lemon juice etches into the surface as a permanent mark.
At six months it looks like a Parisian bistro. By year three it looks like a chaotic mess of overlapping circles, and there’s no reset short of sanding the whole sheet and re-patinating it.
Zinc also reacts with acidic food directly, so citrus and tomato leave bright bare spots.
Put it on a wet bar, a coffee station, or a small island top where the patina reads as deliberate and the surface area is small enough to maintain. Not on a 12-foot main run.
27. An Unsupported Island Overhang

This is the one that ends in an insurance claim.
Stone is enormously strong in compression and weak in tension. When someone sits at an overhang and leans their forearms on the outer edge, the underside of that cantilever goes into tension — and that’s where a slab cracks. Cleanly. All the way across.
The rule of thumb the industry works from: 3cm granite or quartz can cantilever roughly 10 to 12 inches unsupported. Two-centimeter material gets about 6 inches. Marble and dolomitic stone, less. Anything past that needs steel, not wood corbels an inch below the surface doing nothing.
The right hardware isn’t exotic. Flat steel bar — typically 1/4 inch by 3 inches — let into a routed channel in the cabinet top so it sits flush and runs at least two-thirds of the way out into the overhang. Or steel countertop support brackets from companies like Federal Brace, The Original Granite Bracket, or Centerline Brackets, which make hidden L-plates rated for specific spans. Supports every 24 to 36 inches along the run.
All of it has to be installed before the stone lands. Retrofitting support under a finished top means dropping the slab, and dropping a slab is how slabs break.
One more thing installers see constantly: a 15-inch overhang designed for stools, with no steel, because the cabinet maker assumed the stone guy was handling it and the stone guy assumed the cabinet maker did. Ask both, in writing, before anyone shows up. This is the same gap that shows up in a lot of features homeowners regret most — nobody owned the detail.
28. Imported Quartz With a Repeating Printed Vein

Budget Calacatta look-alikes are made from a patterned mold or a printed layer, which means the pattern repeats.
On a 4-foot vanity you’ll never notice. On a 10-foot island you will — and once you’ve seen the same vein cluster twice, you can’t unsee it. The whole top starts reading like wallpaper.
Real stone can’t repeat. That’s the entire argument for it.
If you’re going engineered, go look at the actual slabs — not a sample, the slabs your top will be cut from — and lay them out end to end the way they’ll be installed. Any repeat shows up in thirty seconds.
29. High-Silica Engineered Stone

On 1 July 2024, Australia became the first country in the world to ban the manufacture, supply, processing, and installation of engineered stone benchtops, with an import prohibition following. The reason was silicosis among the workers who cut it.
Be precise about the risk, because the headlines weren’t. An installed quartz countertop in your kitchen is inert. It does not release silica dust. There is no homeowner exposure from a slab sitting on your cabinets — you cannot get silicosis from wiping down your counter.
The hazard is in the fabrication shop. Conventional engineered stone runs 70 to 95 percent crystalline silica, far higher than granite’s 25 to 45 percent. When that’s dry-cut, ground, or polished, it throws respirable crystalline silica dust fine enough to lodge in lung tissue. Australian regulators documented accelerated silicosis in fabricators in their thirties, some progressing to lung transplant. The Australian Department of Employment and Workplace Relations lays out the scope of the ban plainly.
In the U.S., OSHA’s respirable crystalline silica standard sets a permissible exposure limit of 50 micrograms per cubic meter over an eight-hour shift, and enforcement in stone fabrication has stepped up sharply. California issued emergency standards for engineered stone fabrication in late 2023.
So why does this belong on a regret list? Availability and repair. Manufacturers are shifting toward low-silica formulations — Caesarstone, Cosentino, and others now sell lines under 40 percent, some under 10 percent. Porcelain is absorbing the demand. If you install a high-silica product today, matching it for a repair or an addition in eight years may be genuinely difficult.
Ask for the silica content before you buy. It’s on the safety data sheet, and any reputable supplier will hand it over. Then ask your fabricator whether they wet-cut with vacuum extraction — the answer tells you a lot about the shop.
30. Soapstone Bought Expecting It to Stay Perfect

Soapstone will scratch. A dropped can dings it, a knife leaves a line, and the surface darkens unevenly wherever oil touches it.
Which is precisely why pros keep putting it in their own kitchens.
It’s the one countertop that heals. A scratch comes out with 120-grit paper and a block in about a minute. A wipe of mineral oil evens the tone. The stone is chemically inert — acid does nothing to it — and it’s been sitting under Bunsen burners in high school chemistry labs for a hundred years for exactly that reason.
The material isn’t the problem here. The expectation is.
Almost every regret on this list traces back to the same mistake: buying a work surface and hoping it would stay new.
31. Picking Stone From a 4-Inch Sample Chip

Fabricators will tell you this causes more countertop disappointment than any material failure on this list.
A 4-inch chip shows you a color. It cannot show you movement, scale, vein direction, or how a dramatic pattern reads across 30 square feet. Stone with a bold diagonal vein looks like a quiet gray sample and installs like a lightning strike.
Go to the yard. Walk the racks. Tag the specific slabs — by number, on a signed layout — and photograph them with the bundle tag visible.
Then ask to see the digital layout before cutting, so you know where the veins land on the island and where the seam falls. Ten minutes of that saves the one regret you can’t sand out.
Almost none of these materials are bad. Marble is beautiful, concrete is honest, butcher block is warm, and epoxy has its place.
They go wrong when they’re put somewhere they can’t win — wood at a sink, resin in the sun, a thin cantilever holding up a grown adult’s weight.
Match the material to the job, ask the fabricator the awkward questions before anything gets cut, and accept that a surface you cook on every day is going to show that you cook.
The best countertops in America aren’t the ones that stayed perfect. They’re the ones that earned their marks.