Jeff and Jon from TodaysCraftsmen shared the woodworking tip featured in this video.
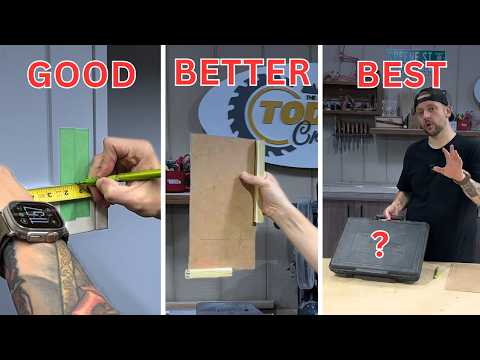
The duo demonstrates three different approaches to drilling and installing cabinet knobs and handles, ranging from basic hand layout techniques to precision jigs.
Watch the full video and subscribe to TodaysCraftsmen:

The Beginner Method: Tape and Pencil Layout
The simplest approach involves using basic measuring tools to mark hole locations directly on the cabinet door. Jeff demonstrates using a tape measure, pencil, and combination square to find the intersection point where the hardware should be installed.
The process starts by identifying the bottom rail line and carrying it across the door stile to find the center point. Using masking tape protects the door surface during drilling. A center punch or awl creates a small dimple to prevent the drill bit from wandering when starting the hole.
While this method works well for installing one or two handles, it becomes time-consuming for larger projects. The technique also requires careful attention to prevent tear-out when the drill bit exits the back of the door.
The Intermediate Approach: Shop-Made Jig
Jeff constructs a simple jig using hardboard and plywood scraps to speed up the installation process. The jig features a centered groove that allows it to work on doors with hinges on either side, eliminating the need for separate left and right-handed versions.
The construction involves cutting small blocks and attaching them with super glue to create reference points against the door edges. A single hole drilled at the correct location serves as the drilling guide for consistent hardware placement across multiple doors.
This method significantly improves speed and consistency compared to individual layout work. The jig can be made quickly and stored for future cabinet projects, making it valuable for contractors and serious woodworkers.
The Professional Solution: Precision Hardware Jig
The True Position Tools jig represents the most sophisticated approach, featuring aluminum construction with adjustable stops and hardened bushings. Jeff and Jon demonstrate how the tool’s imperial and metric scales allow for precise positioning of hardware on both doors and drawers.
Setting up the jig involves adjusting two stops: one for centering on the door stile and another for positioning the correct distance from the bottom edge. The hardened bushing eliminates the need to remove the jig during drilling, maintaining perfect alignment throughout the process.
The versatility of this professional-grade tool extends beyond simple door hardware. It can accommodate drawer installations and includes accessories for other cabinet-making tasks like shelf pin boring. After years of regular use, the jig maintains its accuracy and precision.
Choosing the Right Method
Each approach serves different needs and skill levels in cabinet hardware installation. The hand layout method works well for occasional use or single installations, while the shop-made jig provides a good balance of cost and efficiency for regular projects.
Professional cabinet makers and contractors will find the precision jig worth the investment due to its speed, accuracy, and durability over hundreds of installations. The choice ultimately depends on project frequency, budget considerations, and desired consistency levels.
Understanding these different approaches allows woodworkers to select the most appropriate method for their specific needs and gradually advance their cabinet-making capabilities.
Watch the full video and subscribe to TodaysCraftsmen:

Matt’s Take
These are my personal thoughts and tips based on my own experience in the shop. This section is not written, reviewed, or endorsed by the original creator of this project.
Hardware installation is one of those tasks that separates the pros from the weekend warriors. I’ve drilled my share of wonky holes over the years, and there’s nothing quite like the sinking feeling when you realize a handle is off by an eighth of an inch. The progression Jeff and Jon show here really captures how most of us evolve our approach to this kind of repetitive work.
That shop-made jig approach is brilliant for anyone doing more than a few doors. I love how they solved the hinge-side problem with that centered groove – it’s those little details that make a jig actually useful instead of just another piece of shop clutter. When making your own jig, take time to get that first hole perfectly positioned. Everything else depends on it being spot-on.
Safety-wise, always back up your doors with scrap wood to prevent tear-out, especially on that final breakthrough. And here’s something worth remembering: whatever method you choose, drill a test hole in scrap material first. Cabinet doors are expensive to replace, and hardware holes are permanent. A few minutes of testing can save hours of frustration and potentially costly mistakes.