Billy from Newton Makes shared the woodworking tip featured in this video.
This video walks through a full table saw setup and calibration routine aimed at dialing in clean, consistent cuts by addressing the table insert, blade alignment, fence setup, and miter gauge work-holding.
Watch the full video and subscribe to Newton Makes:
Table Insert and Top
Start by installing the table insert so it sits perfectly flush or slightly below the tabletop; a raised insert creates bumps that will throw off measurements and workpieces.
Use the insert adjustment screws to fine-tune the fit before moving on to any blade or fence checks so the square always rests on an accurate tabletop surface.
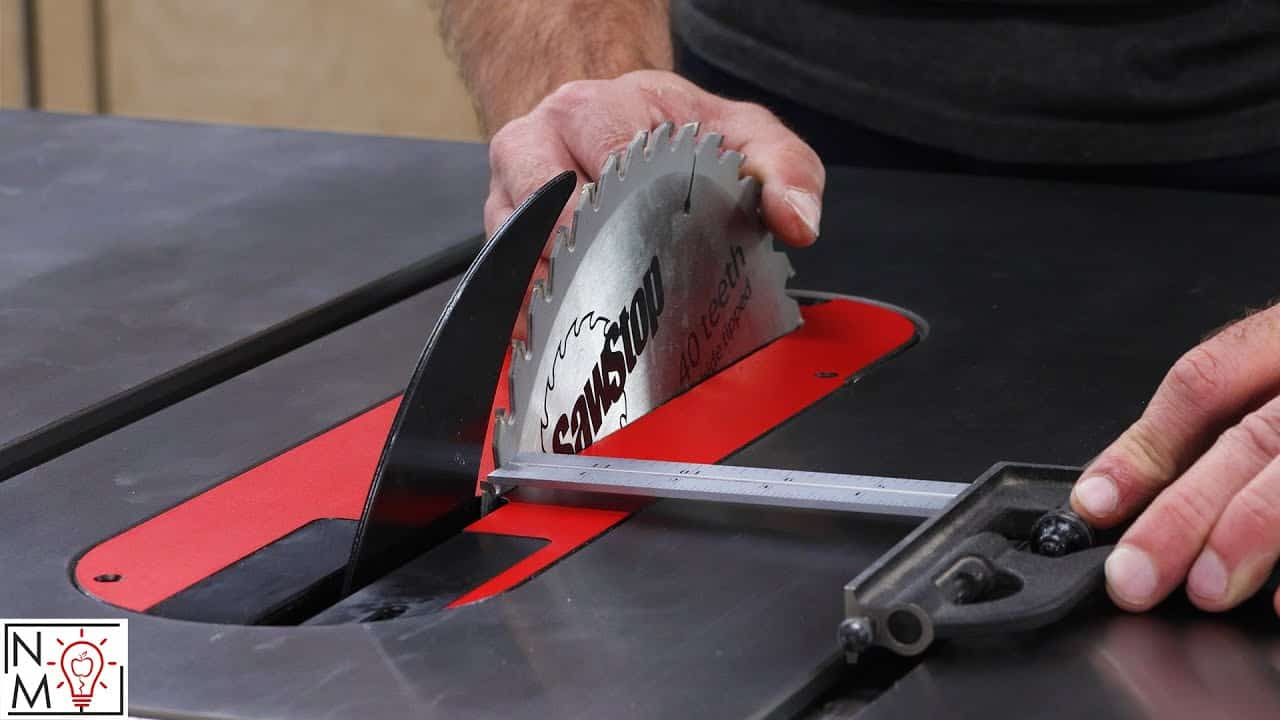
Square the Blade and Check Parallel
Raise the blade to full height and use a square on the tabletop (not the insert) to verify the blade is exactly 90° to the table; doing this at full extension gives the most precise reading.
Next, check the blade for parallelism to the miter slot by using a combination square or dial indicator method and testing at the front and back of the blade; if you need to adjust, loosen the bolts that connect the table top to the saw base and pivot the top until it’s parallel.
Fence Alignment: 90° and Parallel
Set the fence so it sits at 90° to the tabletop and then make sure it is parallel to the miter slot; many fences have adjustment screws, but thin shims or slick packing tape can work in a pinch when small tweaks are needed.
If perfect alignment proves difficult, prioritize safety: ensure the fence’s far end is not closer to the blade than the front, since a fence that angles toward the blade can pinch workpieces and cause kickback.
Miter Gauge Setup and Sacrificial Fence
Miter gauge accuracy is critical because many crosscuts rely on it; remove any slop by tightening and adjusting the gauge’s contact screws so it slides smoothly front-to-back without lateral play in the slot.
Attach a sacrificial fence—MDF is recommended for its flatness and stability—using recessed bolts so the fence can be clamped evenly along its length without external clamps interfering with the workpiece.
Drill multiple recessed holes along the MDF so the sacrificial fence can be repositioned as it gets cut shorter over time and use simple fasteners (hex nuts, T-nuts, or similar) to secure it tightly to the miter gauge.
After installing the sacrificial fence, check the miter gauge’s squareness to the blade with a long square and then make test cuts; small offsets are often best corrected by nudging the miter gauge itself rather than obsessing over upstream perfection.
Positive Stops and Final Checks
If the saw has positive stops for 45° and 90°, fine-tune the stop bolts and locknuts inside the cabinet or under the insert so the blade returns to those angles reliably whenever it’s rotated.
Perform a quick square check after making adjustments and then validate everything with test cuts; repeating the lock, slide, and test routine a couple times helps ensure nothing shifts under normal use.
Why These Checks Matter
Individual calibrations—insert height, blade square, fence parallelism, and miter gauge setup—combine to determine final cut quality, so addressing each area reduces cumulative error and improves consistency.
Billy emphasizes practical testing over perfection: do a quick cut, inspect it, and tweak the part that’s actually producing the error rather than chasing tiny tolerances in isolation.
These foundational setup steps make it much easier to achieve clean, square cuts and safe operation; periodic checks and simple sacrificial jigs will save time and frustration on future projects.
Please support Billy by visiting his website here: https://www.newtonmakes.com/shop.

Matt’s Take
These are my personal thoughts and tips based on my own experience in the shop. This section is not written, reviewed, or endorsed by the original creator of this project.
This kind of methodical setup routine is what separates frustrating shop sessions from enjoyable ones. I’ve found that many woodworkers skip the insert alignment step, but Billy’s right — even a slightly raised insert will throw off your square readings and create little bumps that mess with workpiece positioning.
The fence alignment priority he mentions is spot-on from a safety standpoint. A fence that angles inward toward the blade is asking for trouble, creating that pinch point that can grab your workpiece and send it flying. When you’re making those micro-adjustments with shims or tape, always err on the side of having the back end slightly away from the blade rather than closer.
That sacrificial fence setup on the miter gauge is one of those simple upgrades that makes a huge difference. MDF works great because it stays flat and gives you clean exit cuts. Those recessed bolt holes are key — regular clamps hanging off the sides just get in the way and limit what you can cut safely.
The real wisdom here is Billy’s approach to testing actual cuts rather than chasing perfect measurements in isolation. Sometimes a fence that measures slightly off still produces perfectly square cuts due to other factors. Your test cuts tell the real story.