Jodee from Inspire Woodcraft shared the woodworking tip featured in this video.
This quick shop trick removes the guesswork when setting shallow, non-through cuts at the table saw by giving a reliable reference for the blade’s highest point and where the blade actually contacts the workpiece.
Watch the full video and subscribe to Jodee’s channel:
Why this matters
Setting blade height by eye or by rotating a tooth can leave the depth off by a hair, which often forces a second deeper pass and wastes time.
Having a marked, visible reference for the top of the blade speeds setup and improves consistency for repeated cuts like grooves or shallow dados.
How to mark the blade
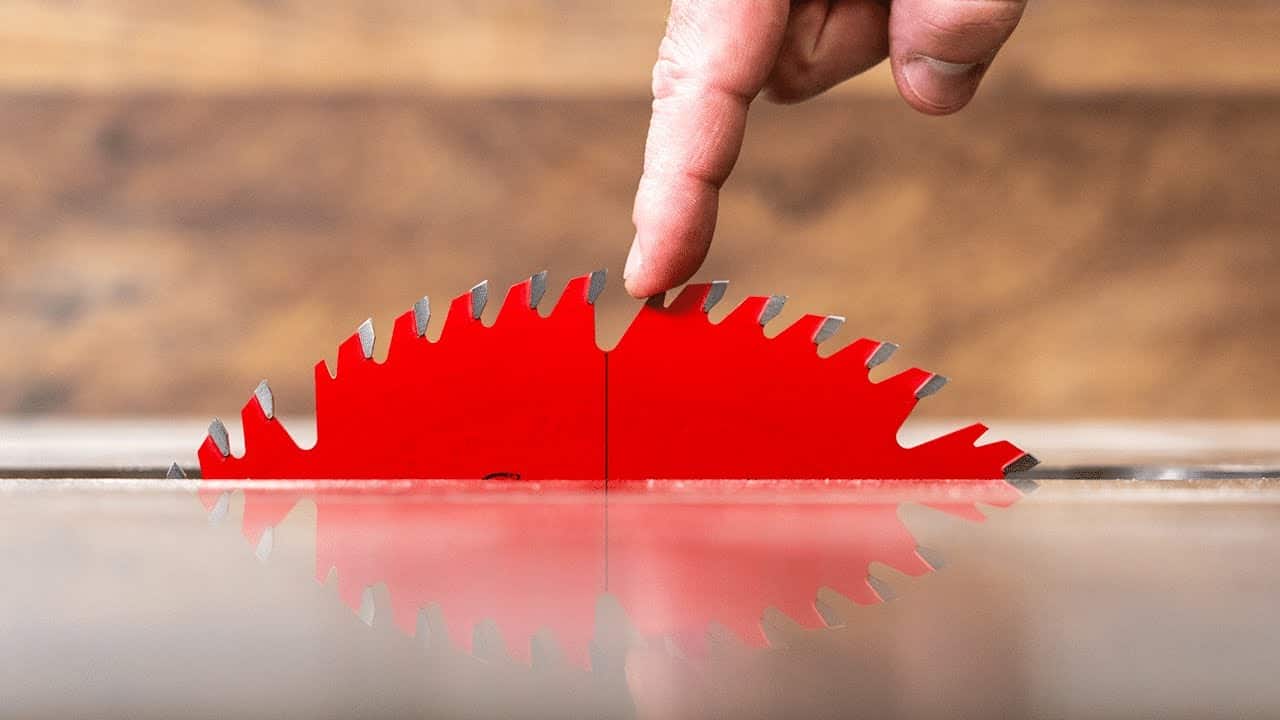
Identify the blade’s true top-of-rotation by marking from tooth to opposite tooth across the blade’s face so the line shows where the blade reaches highest.
Use that line as a plumb reference to align whatever gauge or measuring tool is used to set blade height instead of guessing where the front of a tooth sits.
Understand tooth geometry
Not all blades present the same geometry at the cut line, so the marking point depends on tooth type—flat-bottom grinds are straightforward, while alternating bevels need a different approach.
For alternating bevel teeth, mark from the bottom of the bevel or the raker tooth that produces the shallowest cut, because that point determines the shallowest depth when cutting.
Practical tips and adaptations
Run a scrap piece into the blade and inspect the kerf to confirm where the blade is actually severing material; this makes the marked line and subsequent measurements far more precise.
Once marked, the blade line becomes a repeatable reference for setting blade height on grooves, machine-fit channels, and other shallow operations, reducing trial cuts and improving fit.
Overall takeaways
This small layout habit—marking the blade at the correct tooth location and checking the kerf on scrap—turns a guessing game into a reliable setup routine that saves time and improves accuracy.
The method is adaptable across blades and projects, and it’s especially useful whenever a precise, shallow cut or a machine fit is required.
Support Jodee by visiting his online store here: https://inspirewoodcraft.com/collections/all.

Matt’s Take
These are my personal thoughts and tips based on my own experience in the shop. This section is not written, reviewed, or endorsed by the original creator of this project.
This is one of those simple tricks that makes you wonder why you didn’t think of it sooner. I’ve definitely been guilty of eyeballing blade height and then having to make adjustment cuts when the depth wasn’t quite right. Having that visual reference line takes all the guesswork out of it.
The tooth geometry point is really important here. With alternating top bevel blades, those angled teeth can throw you off if you’re not careful about which part of the tooth you’re referencing. It’s worth taking a minute to understand how your specific blade cuts before marking it up. Different blade designs will have different contact points with the wood.
One thing I really like about this approach is how it speeds up repetitive work. When you’re cutting a bunch of grooves for drawer bottoms or dados for shelving, being able to quickly dial in the exact same depth every time is a huge time saver. No more test cuts on every setup – just reference your mark and go.
The scrap test cut is crucial too. Wood grain and blade condition can affect how deep you actually cut versus where you think you’re cutting. Taking 30 seconds to check your actual cut depth against a ruler will save you from surprises later when parts don’t fit together properly.