This project was built and designed by Drew Fisher from Fisher’s Shop.
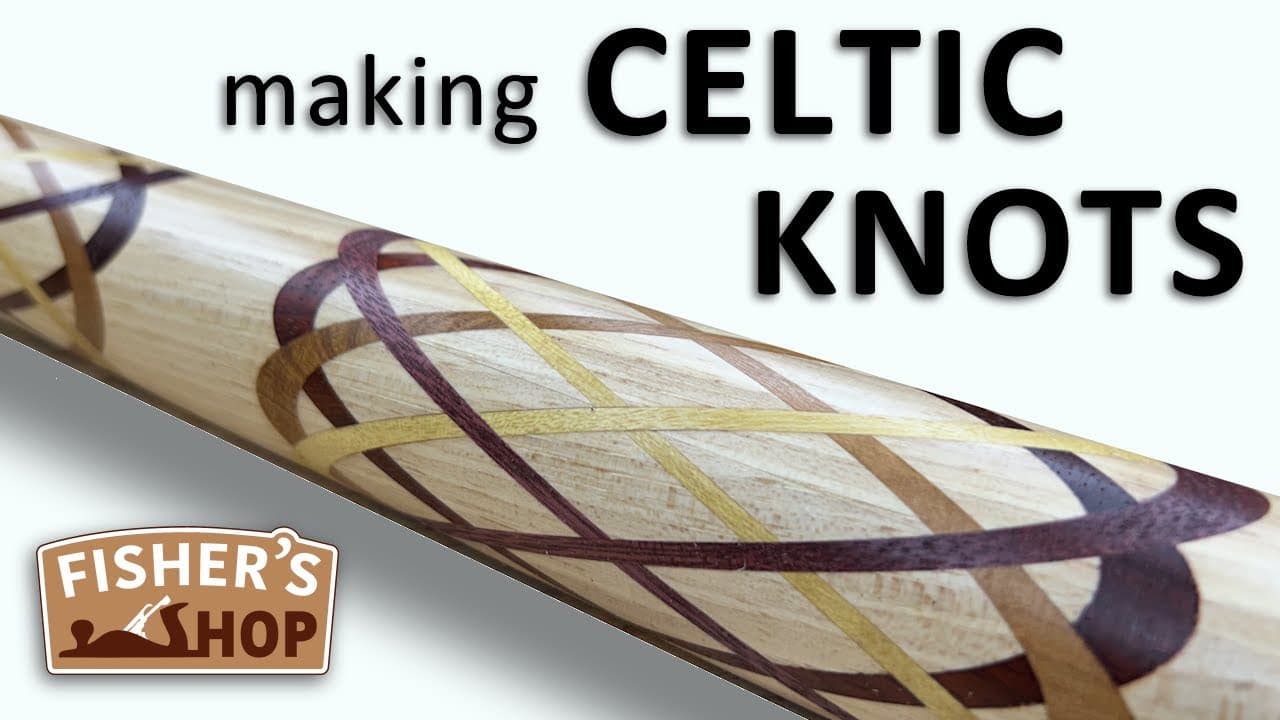
It showcases how to create striking Celtic knot patterns using contrasting wood inlays and careful lathe work.
By embedding thin strips of colorful hardwood into angled cuts and then turning the blank, Drew reveals interwoven ring patterns that wrap around cylindrical objects like tealight holders, mallet handles, and rolling pins.
The effect is both artistic and technically satisfying, and it’s more approachable than it first appears.
Watch the full video and subscribe to Drew’s channel:
What Is a Celtic Knot in Woodturning?
Celtic knots are created by inserting thin, contrasting wood strips into angled grooves on a square or octagonal blank.
When turned on a lathe, the strips become continuous curves that appear to weave in and out of the surrounding wood.
The more inserts used, the more complex and layered the pattern becomes. Drew demonstrates this technique across multiple projects, each showing how small design choices affect the visual outcome.
Choosing Woods and Planning the Layout
Contrast is essential for the knots to stand out. Drew selects hardwoods like walnut, maple, purpleheart, padauk, and yellowheart to provide bold visual separation between the base blank and the inlays.
Planning is key—especially when inserting mirrored strips on opposite sides. This alignment ensures that once the blank is turned, the curves form clean, symmetrical rings. Marking top and bottom, numbering sides, and sketching the layout help prevent confusion during the cutting and gluing phases.
Making and Preparing the Inserts
Each insert must match the width of the saw kerf to avoid gaps or misalignment. Drew cuts slightly oversized strips and then planes or sands them to fit snugly.
To make processing easier, he attaches several small strips to a flat board with painter’s tape and CA glue.
This method allows batch sanding and cleanup, speeding up preparation while keeping the inserts organized.
Converting Square Blanks into Octagons
Turning a square blank into an octagon simplifies angled cuts and improves the visual flow of the final turned piece. Drew does this by tilting the table saw and trimming each corner in succession.
This step isn’t strictly necessary, but it helps with layout consistency and gives the piece a more balanced profile on the lathe.
Using Jigs for Precision Cuts
To cut the insert grooves at consistent angles, Drew builds simple jigs that hold the blank in repeatable positions. These jigs ride in the table saw’s miter slots and are angled to produce uniform results on every face.
Leaving a small uncut portion in the middle of the blank keeps the piece intact and stable during glue-up. This method is safer and allows better control during insert placement.
Gluing and Clamping the Inlays
Drew glues the strips into the angled grooves using generous amounts of wood glue and clamps them tightly until dry.
Excess glue is cleaned up with scrapers or sanders before turning begins.
For blanks with mirrored patterns, inserts are glued into both sides using the same species and angle. This mirroring ensures balanced rings once the blank is rounded on the lathe.
Revealing the Knot on the Lathe
The most rewarding step is turning away the flat surfaces to reveal the curved knot patterns inside. Drew mounts the blank and slowly removes material in small passes until the full design appears.
Each new layer of turning reveals more of the curve, gradually connecting the inserts into continuous loops.
Patience is crucial here—removing too much too quickly can distort the pattern or ruin symmetry.
Applying the Knot to Different Projects
Drew walks through several finished items that feature the Celtic knot technique:
- A single-knot tealight holder demonstrates the core visual effect.
- A mallet handle with mirrored knots balances form and function.
- A weed pot (narrow-necked vase) shows how knot work adapts to curved, hollow forms.
- A French rolling pin with two knots turns the repeating pattern into a functional piece of art.
By varying the number of inserts and the wood species used, each piece tells its own story.
Sanding, Finishing, and Presentation
After turning, Drew sands the pieces to a fine finish and applies a wipe-on product to bring out the color and grain. For tools like the mallet and rolling pin, a more durable finish is chosen to handle wear and moisture.
Finishing touches include parting off the ends on the lathe and sanding them smooth off the lathe for a clean, polished appearance from all angles.
Final Thoughts on Celtic Knot Woodturning
This project highlights how a decorative technique can also serve as a lesson in precision, planning, and patience.
Celtic knots look complex, but with the right setup and materials, the process becomes repeatable and rewarding.
Drew’s video demonstrates that even a small decorative project—like a tealight holder—can teach skills applicable to larger, more ambitious woodworking builds.
From choosing woods to constructing jigs, every part of this process reinforces the importance of control and creativity.
Get Drew’s plans here: https://fishersshoponline.com/plans/.

Matt’s Take
These are my personal thoughts and tips based on my own experience in the shop. This section is not written, reviewed, or endorsed by the original creator of this project.
The visual impact of these Celtic knot patterns really comes down to that contrast Drew mentions. When selecting your inlay woods, think beyond just light versus dark — consider how the grain patterns will interact too. Sometimes a quieter grain in the inlay wood actually makes the knot pattern pop more than a busy, figured piece that competes for attention.
That jig approach for the angled cuts is smart, but I’d add a safety reminder about those partial cuts through the blank. Take your time with the setup and make sure your workpiece is rock-solid in the jig before starting the cut. Those angled cuts can want to grab, especially as you approach the end of the kerf. A good push stick or push block becomes even more important here.
One thing I really appreciate about this technique is how forgiving it can be for beginners. If your first inlay strip doesn’t fit perfectly, you can always trim it down or make a new one. The glue-up stage gives you a chance to dry-fit everything and make adjustments before committing. Just remember that wood movement is still a factor even with thin inlays — try to use similar moisture content woods to avoid issues down the road.
The turning reveal is genuinely exciting. Start with light passes and let the pattern emerge gradually. Rushing this stage after all that careful prep work would be heartbreaking, and those thin inlay lines can tear out if you’re too aggressive with the gouge.