This project was built and designed by Jodee from Inspire Woodcraft.
It focuses on two practical angle-based layout methods for creating mosaic wood wall art that resembles mountain ranges.
Using either a 30-degree or 45-degree cut pattern, these wall panels are easy to personalize and forgiving to build.
The process encourages experimentation with layout, color, and reclaimed materials—all without requiring complex joinery or exact measurements.
Watch the full video and subscribe to Jodee’s channel:
Why Make a Wooden Mountainscape?
Mountainscapes are an excellent way to repurpose leftover wood while exploring color and form. They combine artistic expression with foundational woodworking techniques like ripping, miters, layout, and finishing.
These projects are also very beginner-friendly. There’s no need for precise dimensions—just consistent angles and an eye for design. Each one becomes a unique, layered piece of wall art.
The 30- and 45-Degree Concepts Explained
Jodee’s two layout rules offer distinct visual effects. Both rely on repeating angled cuts to create layered peaks, giving the illusion of depth.
The 30-degree rule creates smoother, rolling mountain shapes by cutting each strip with opposing 30-degree angles. All pieces lean in the same direction, which makes it easy to stack and layer.
The 45-degree rule forms sharper, more dramatic transitions by alternating strips with opposing 45-degree cuts. This version introduces bolder geometry and more visual rhythm in the skyline.
Each method starts with a reference peak, and the rest of the design grows outward. This approach makes layout intuitive and repeatable.
Choosing and Prepping the Wood
Jodee often uses reclaimed fence boards or other salvaged lumber.
These materials bring built-in character, with textures and grain patterns that add richness to the final look.
To prepare the stock:
- Flatten one face and square one edge
- Rip the boards into strips sized for your panel
- Select a backing board slightly larger than the final piece
Leave an extra margin around the edges so the panel can be trimmed clean after glue-up. No need for perfect measurements—just consistency in the angle cuts.
Laying Out the Design
Jodee begins with a loose sketch and often selects a main mountain or peak to build around. Using either a miter saw or table saw set to the desired angle, he cuts the strips and assembles the layout directly on the backer board.
For the 30-degree method, all strips share the same orientation. For the 45-degree method, alternating directions create V-shaped ridges and valleys.
A helpful trick: leave a small gap between the strips and the backer when cutting to ensure a clean pass on the saw later.
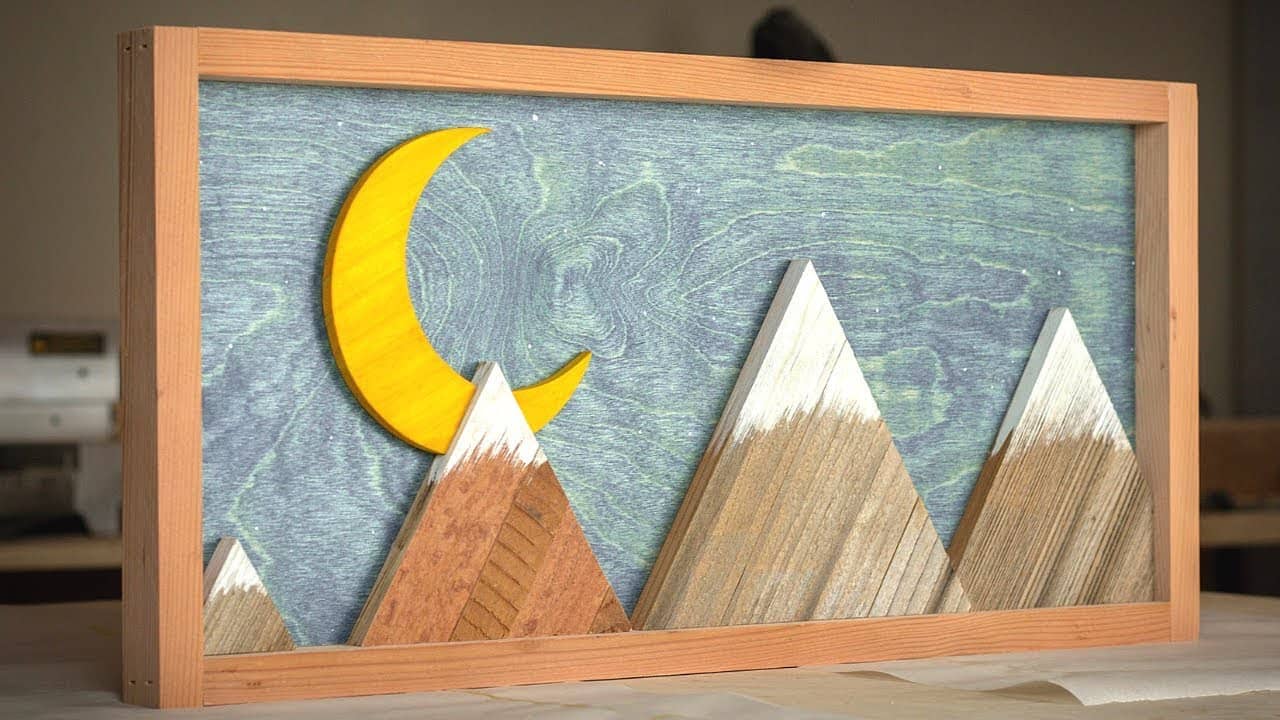
Adding Moons, Suns, and Silhouettes
Celestial shapes are a great way to personalize your mountainscape.
Jodee draws the shapes freehand or with a compass, then cuts them out using a bandsaw or jigsaw.
For crescent moons, two offset circles create the profile. To make it appear recessed behind a peak, trace the outline onto the mountain and notch the shape so it tucks behind the edge.
Leaving some rustic texture keeps the piece visually interesting. Sand just enough to remove splinters without losing the aged look.
Color, Stain, and Texture
Jodee maps out where colors and finishes will go by sketching lightly with pencil. He then applies finishes in layers:
- A whitewash and dye mix is used for sky tones
- Traditional stains bring out the wood grain on the mountain faces
- Painted snow caps add visual depth to the peaks
Edges are treated as carefully as faces to ensure the piece looks finished from all angles. Soft cloths or sponges work well for blending colors and creating natural transitions.
Assembly Tips
Assembly starts with setting the main peak and working outward. Jodee uses wood glue along the flat surfaces and small dabs of fast-setting adhesive on thinner strips or corners to speed things up.
Glue is kept away from the edges to prevent squeeze-out. If it does occur, wiping it quickly keeps the surface clean for staining or painting later.
Trimming and Framing
Once the glue has dried, the panel is trimmed to final size using a table saw against the plywood backer. This ensures square edges and allows you to remove any irregular margins.
A simple frame made from scrap wood adds polish. Jodee rabbets the frame pieces so they sit flush with the face of the panel.
Glue and staples are used to secure the frame to the backer.
A quick sanding smooths the edges before finishing.
Final Finish
Two coats of water-based polyurethane provide protection while preserving the color of the wood. This finish doesn’t yellow over time and allows the natural textures to shine through.
Light sanding between coats improves the feel without dulling the finish. The end result is a smooth, vibrant panel ready for display.
A Creative and Forgiving Project
Jodee’s mountainscapes are approachable for any skill level. They teach useful concepts like angle repetition, layout planning, and design balance—all while letting your creativity drive the result.
Start small, experiment with a few peaks, and add personal details like moons or tree lines.
The beauty of these projects is how each one becomes a unique expression of style, material, and color.
Support Jodee by visiting his online store here: https://inspirewoodcraft.com/collections/all.

Matt’s Take
These are my personal thoughts and tips based on my own experience in the shop. This section is not written, reviewed, or endorsed by the original creator of this project.
This type of mosaic work is a fantastic way to practice consistent angle cuts while building confidence with design layout. The beauty of Jodee’s approach is that you can start with whatever scrap wood you have on hand — even mixed species can add visual interest to your mountain layers. I’d recommend testing your miter saw or table saw setup on a few practice pieces first to dial in those 30 or 45-degree cuts, since consistency is what makes the final piece look cohesive.
One thing I really appreciate about this project is how forgiving it is with measurements. Unlike furniture work where tolerances matter, these mountainscapes actually benefit from some variation in strip widths and slight irregularities. That said, take your time with the layout phase before committing to glue. I like to snap a photo of promising arrangements since it’s easy to accidentally shift pieces when you’re moving around the shop.
When it comes to finishing reclaimed wood like fence boards, less is often more. Those weathered surfaces already have character, so focus your sanding on removing splinters rather than trying to get everything perfectly smooth. And here’s a shop tip: if you’re using fast-setting adhesive on thin pieces, have a damp cloth ready. That stuff can set quicker than you expect, especially in warm weather.