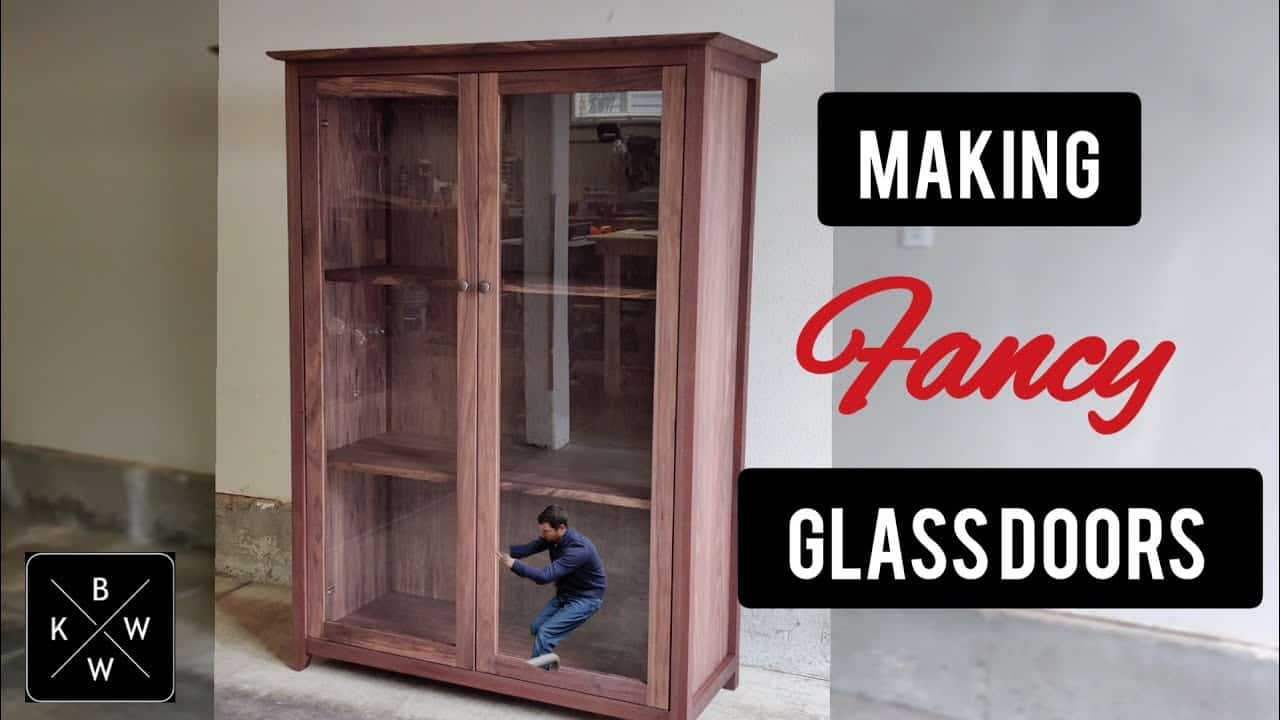
This project was built and designed by Keaton Beyer. It’s a detailed furniture piece that showcases both practical woodworking techniques and a clean, refined aesthetic.
Built primarily from walnut, the cabinet includes floating mortise and tenon joinery, glass door installation, and subtle finishing touches that elevate the entire piece. Keaton shares his full process from material prep through final assembly, offering valuable tips along the way.
Watch the full video and subscribe to Keaton’s channel:
Choosing the Right Wood
Keaton starts by selecting walnut for the entire cabinet. He looks for pieces with consistent grain and color, which helps the final product appear unified and professional.
After sourcing the wood, the next step is milling. Even without a jointer, Keaton flattens and straightens boards using a planer and router table, showing how to get excellent results with a minimal tool setup.
Edge Jointing and Glue-Ups
Once boards are milled flat, the edges are jointed using a router table. By adjusting the bit and fence properly, Keaton creates smooth, square edges ready for glue-up.
He spreads glue evenly and clamps the panels with light but consistent pressure. This technique reduces squeeze-out and helps produce strong, nearly invisible glue joints.
Cutting to Final Size
After the panels are glued and cured, Keaton uses a table saw to cut everything to final dimensions. A stop block ensures that all legs, rails, and stretchers are the exact same length.
This accuracy not only improves the look of the cabinet but also makes joinery more straightforward. It’s a small step that saves time later in the process.
Joinery and Structure
The frame is built using floating mortise and tenon joints. Keaton sets up a router with a bushing guide to cut the mortises and uses a simple shop-made jig to speed up the process.
Each joint is test-fit to ensure a snug fit. This method offers strength and allows for minor adjustments during assembly, which is especially helpful when working with hardwood.
Dry Fit and Assembly
Before gluing anything together, Keaton does a full dry fit of the cabinet frame. This lets him catch any minor issues—like overly long tenons—before final glue-up.
Once everything fits properly, he glues the frame together and clamps it square. Consistent pressure and good alignment during this stage set the foundation for a rock-solid final piece.
Sanding and Surface Prep
Even after milling and planing, Keaton spends time sanding the entire cabinet. This step removes tool marks and gives the walnut a clean, smooth surface ready for finishing.
He sands progressively through finer grits and checks for any uneven spots or glue residue. Attention to surface prep helps ensure the finish looks even and enhances the wood’s natural color.
Installing Glass Doors
The standout detail of this project is the pair of glass doors. Keaton cuts grooves into the rails and stiles using a table saw to hold the glass securely in place.
Once the frames are assembled, he installs wooden stays to keep the glass snug. These small strips are carefully fitted and add a subtle handmade touch to the cabinet’s design.
Mounting Hardware and Final Fit
With the cabinet assembled and the doors complete, Keaton installs soft-close hinges for a smooth and quiet operation. He takes time to align the doors properly so they sit flush and operate evenly.
He also discusses the use of buttons—small wood pieces that secure the cabinet top to the frame while still allowing for seasonal movement. These details make a big difference in the cabinet’s performance over time.
Finishing with Hard Wax Oil
For the final finish, Keaton applies hard wax oil, which enhances the walnut’s rich tones while offering good protection. The oil is applied with a cloth and buffed into the surface for a low-sheen, natural look.
The finish brings out depth in the grain and gives the cabinet a smooth, tactile feel. It’s a fitting choice for a piece that’s both functional and decorative.
A Showcase of Patience and Precision
Keaton’s build is a great example of thoughtful woodworking. From clever tool workarounds to precision joinery, each step is carried out with care and attention to detail.
The finished display cabinet is solid, beautiful, and well-suited for showcasing collections or treasured items behind glass. It’s a rewarding build that pushes both design and technique.
Please support Keaton, but visiting his website: https://www.keatonbeyerwoodworking.com/.

Matt’s Take
These are my personal thoughts and tips based on my own experience in the shop. This section is not written, reviewed, or endorsed by the original creator of this project.
What strikes me most about this build is how Keaton demonstrates that you don’t need a fully-loaded shop to create furniture-grade pieces. Using a router table for edge jointing is a smart workaround that many of us can relate to. The key is taking your time with setup and making sure that fence is perfectly straight and square to your table surface.
The floating mortise and tenon approach is rock-solid for cabinet frames. That router bushing system speeds things up tremendously once you get it dialed in, and the beauty is that each joint can be fine-tuned individually. When you’re working with walnut, those tight-fitting joints really showcase the craftsmanship.
Glass door installation can be intimidating, but Keaton’s method with the table saw grooves keeps things manageable. Those wooden stays are crucial – they prevent the glass from rattling and add that custom touch that separates shop-made from store-bought. Just remember to measure your glass thickness carefully before cutting those grooves.
The hard wax oil finish is perfect for walnut display pieces. It lets the grain show through while providing protection, and it’s much more forgiving to apply than something like lacquer. Plus, it can be refreshed down the road without stripping the whole piece.