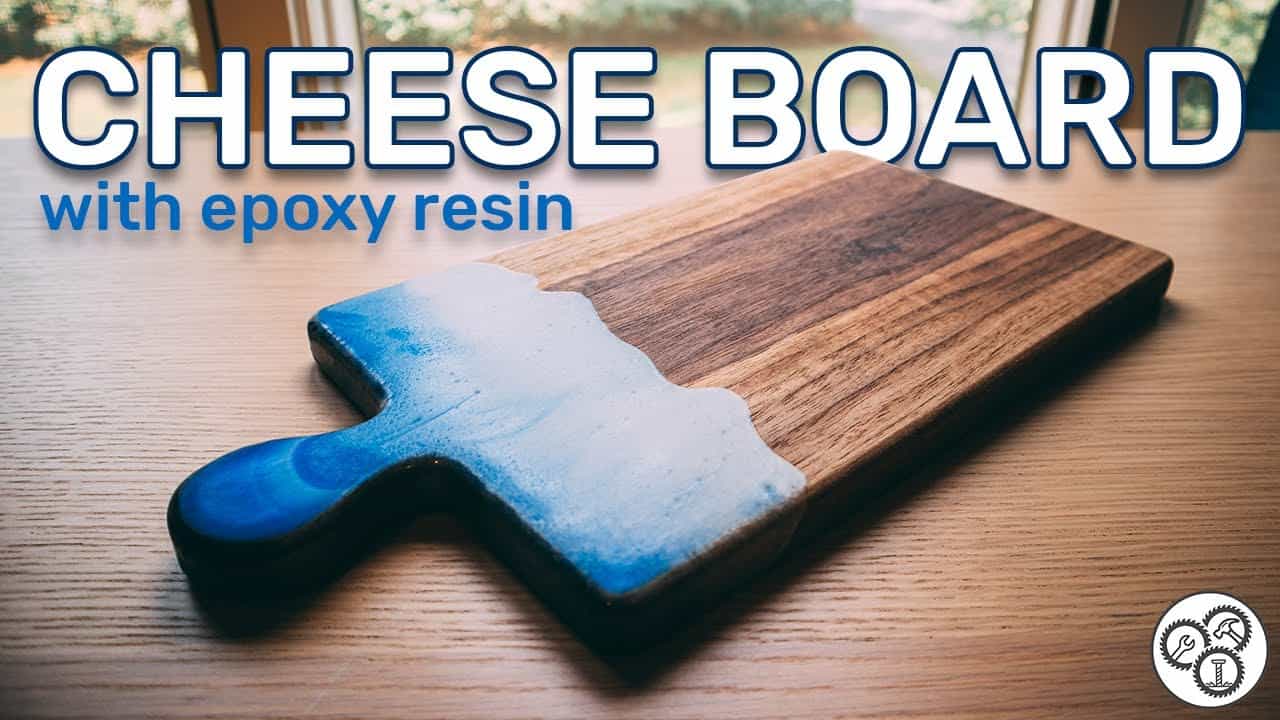
This project was built and designed by Tim from Casual Builds. Using a scrap piece of walnut and tinted epoxy resin, Tim created a striking cheese board with an ocean-inspired design that combines beauty and practicality.
The process blends basic woodworking with epoxy artistry, making this an excellent project for woodworkers looking to try something creative without overcomplicating the build.
Watch the full video and subscribe to Tim’s channel:
A Simple Project with Big Visual Impact
Cheese boards are a great way to showcase your woodworking skills in a functional format. Tim chose walnut for its rich grain and durability, then elevated the piece by adding a resin pour that mimics ocean waves.
This project doesn’t require a large toolset and can be completed with a jigsaw, router, sander, and a few mixing supplies. It’s a manageable build that delivers a polished result, even if you’re new to working with epoxy.
Milling and Preparing the Walnut
The project begins with milling the walnut flat. If the piece is bowed or twisted, using a jointer and planer helps establish a flat, even surface on both sides.
Once the board is surfaced, the edges are trimmed square. Clean edges not only improve the look but make the board easier to work with during the shaping and resin phases.
Designing and Shaping the Board
Tim sketches a flowing shape onto the board, including a rounded top and an ergonomic handle for serving. This is where creativity can take over—every cheese board can be shaped differently depending on the user’s preferences.
A bandsaw or jigsaw is used to follow the pencil lines. After cutting, the edges are refined using rasps and sanders until the shape is smooth and comfortable to hold.
Smoothing the Surface
With the rough shape cut, the board is sanded using various tools to remove sharp edges and prep the surface for the epoxy. Starting with coarse grits and working up to finer ones, this step ensures a clean and even application surface for the resin.
Hand sanding is also done in spots that power tools can’t reach. Taking time to refine each part of the board results in a better final finish and a more professional feel.
Mixing and Pouring Epoxy
The standout feature of this cheese board is the ocean wave effect, achieved by tinting epoxy resin with several shades of blue and white. Tim mixes multiple cups of epoxy using different pigment ratios to simulate depth and motion.
When it comes time to pour, the resins are layered and swirled directly onto the surface of the board. The technique requires some finesse—too much stirring can muddle the effect, while too little may leave the colors separate. Tim suggests pouring confidently and letting the resin settle naturally.
Letting It Cure and Cleaning Up
Once the epoxy is poured, it needs time to cure fully. This process can take several hours to overnight, depending on the brand and room temperature.
To minimize cleanup, painter’s tape is applied underneath the board to catch any drips. After curing, the board is sanded again to remove any high spots or imperfections in the resin surface.
Applying a Food-Safe Finish
With the sanding complete, Tim applies mineral oil to the board. This not only enhances the walnut’s rich color but also protects the wood from moisture and wear.
A few coats of oil are applied, allowing time to soak in between each one. The oil brings out the contrast between the dark walnut and the vibrant epoxy, creating a finished look that’s both bold and refined.
Tips and Lessons from the Build
Tim shares a few tips learned during the build process. First, be cautious about sanding too early—epoxy needs to be fully cured before it’s safe to sand without causing clouding or adhesion issues.
Second, using painter’s tape on the underside of the board helps keep the back clean. Once removed, the tape takes any excess resin with it, saving time during the finishing steps.
A Creative Twist on a Classic Woodworking Project
This cheese board build shows how simple materials and a bit of creativity can result in a unique, high-impact project. The epoxy adds a visual flair while the walnut provides a durable and elegant base.
Tim’s final product didn’t turn out exactly as he envisioned—but that’s part of the charm of working with epoxy. No two pours are the same, and experimenting with colors and patterns is part of what makes these builds enjoyable.
Please support Tim by visiting his website: https://www.casualbuilds.com/.

Matt’s Take
These are my personal thoughts and tips based on my own experience in the shop. This section is not written, reviewed, or endorsed by the original creator of this project.
This type of project is a perfect gateway into epoxy work without the intimidation factor of larger pours. The ocean effect Tim created really shows how a small amount of resin can transform a simple piece of walnut into something special. When working with tinted epoxy like this, I always recommend having extra pigment on hand—it’s easier to darken a mix than to try matching a color later.
Food safety is worth emphasizing here. Mineral oil is a solid choice for finishing cheese boards since it’s completely food-safe and won’t go rancid like some other oils. The key is applying thin coats and letting each one fully penetrate before adding the next. This builds up protection gradually and keeps the wood from getting oversaturated.
One thing I really appreciate about this build is the realistic approach to epoxy results. That ocean effect is tricky to control, and Tim’s honest about the final outcome not matching his exact vision. That’s the nature of resin work—sometimes you get happy accidents that look even better than planned. The unpredictability is part of what makes these projects fun, and it’s why I always tell people to embrace the process rather than stress over perfection.
The tape trick for catching drips is simple but effective. I use this technique on most of my epoxy projects, and it saves hours of cleanup time. Just make sure to remove it while the resin is still slightly tacky—waiting too long can make it harder to peel off cleanly.