This project was built and designed by Tim from Casual Builds. It’s a fun and practical woodworking gift that combines functionality with creativity, making it a great weekend project for any skill level.
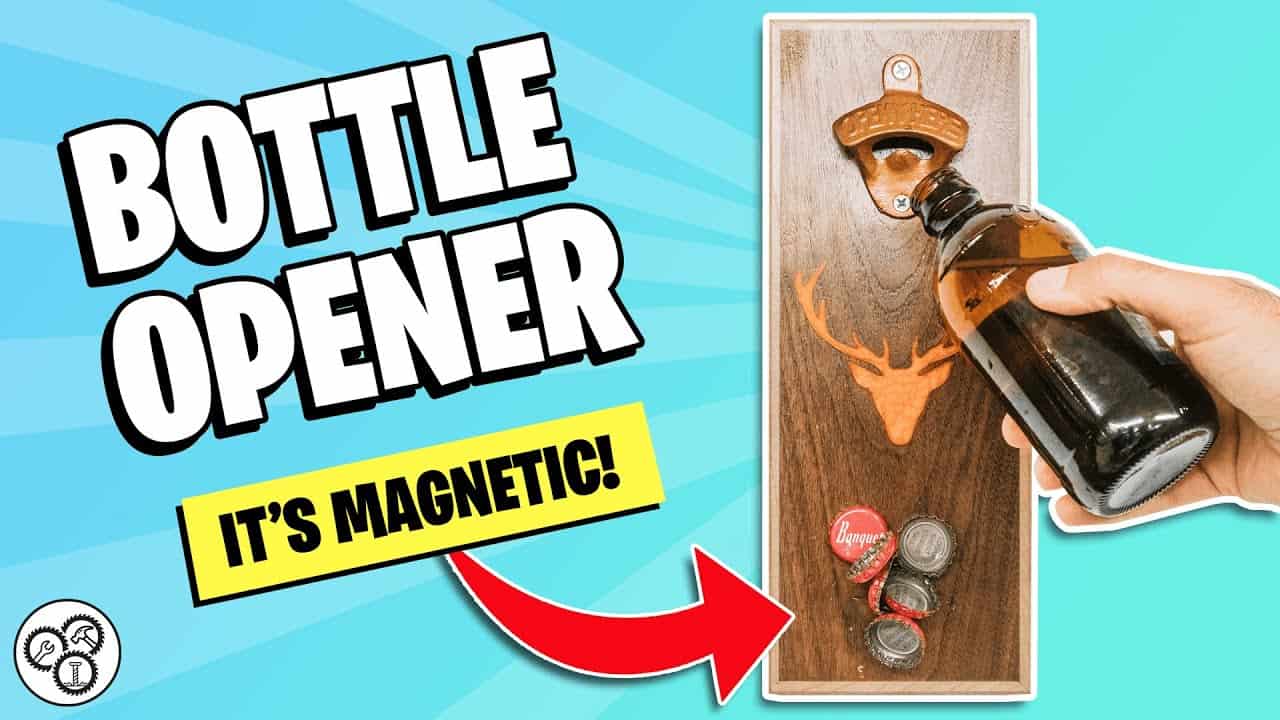
With a sleek design and built-in magnetic feature, this wall-mounted opener is perfect for a kitchen, garage, or home bar. The added cap catcher keeps things tidy, while custom design elements make it a conversation piece as well.
Watch the full video and subscribe to Tim’s channel:
Why This Project Works
A bottle opener may seem like a simple build, but this version offers a few clever twists. It’s functional, easy to hang anywhere, and includes a hidden magnet that catches caps as they fall.
Tim’s design adds a touch of polish with carved details and an epoxy-filled face. These enhancements elevate it from a basic shop project to a gift-worthy item you’ll want to show off or give away.
Choosing Materials and Tools
The project begins with a piece of durable hardwood for the main body. Walnut, maple, or cherry all work well depending on the look you want.
To prepare the board, Tim uses a planer, jointer, and table saw. While these tools help achieve straight, clean edges, you can also adapt this project with more basic tools and a bit more sanding. For design work, a CNC machine is used to carve decorative details, but this step can be skipped or swapped with hand tools for a simpler approach.
Preparing and Milling the Wood
The first step is to flatten one face of the board and square off the edges. After planing and jointing, the piece is ripped to width and cut to length. Offcuts are saved for plugs or extra support later in the project.
Ensuring that the face and edges are flat helps everything come together tightly in the next steps. Accurate milling also makes sanding and finishing easier later on.
Carving the Design
Using Easel software, Tim creates a custom layout for the CNC machine to carve into the face of the board. Adjustments to bit size, depth, and carving area help control the final design.
Once carved, the result is a personalized opener base with a clean, recessed detail. This carving becomes the visual centerpiece of the build and makes each opener unique.
Framing and Prepping for Epoxy
To frame the board, maple strips are cut with 45-degree miters at the corners. These pieces are glued in place around the main body, forming a shallow tray for the epoxy.
Tim uses painter’s tape to help hold the miters together and adds clamps once the glue is applied. The fit is tested beforehand to make sure the corners are tight and even.
Pouring the Epoxy
The framed area is filled with colored epoxy, mixed with pigment and carefully poured to avoid bubbles. A heat gun is used to pop any air bubbles that rise during the curing process.
This layer not only fills the carved design but also seals the face of the opener and adds a bright, glossy finish. Once cured, the piece can be sanded down to level the epoxy with the surrounding wood.
Adding the Magnetic Cap Catcher
To catch falling bottle caps, two strong magnets are installed in the back of the board. Holes are drilled deep enough to hold the magnets securely without punching through the face.
For a clean look, a walnut plug is added over each hole. These are glued in place and sanded flush once the epoxy holding them has cured. This small touch hides the hardware and keeps the back of the opener looking as clean as the front.
Applying the Finish
After sanding everything flush, Tim applies a few coats of shellac followed by polyurethane for durability. A final layer of paste wax adds a soft sheen and extra protection.
This finish combination enhances the grain and color of the hardwood, while also protecting the surface from moisture and wear.
Mounting Options
There are a few ways to mount the finished opener. It can be screwed directly into wall studs for a permanent solution, or attached with magnets for use on a fridge or metal surface. For a renter-friendly option, adhesive Velcro tape offers an easy, non-damaging way to display the project.
The magnetic catcher works in any setup, making this build flexible for both permanent installations and portable use.
Mistakes and Workarounds
Tim points out that minor mistakes can be corrected during the build. If the CNC machine cuts slightly off due to a setup error, epoxy can fill in the gap and still look intentional.
He encourages experimenting with new tools and not letting minor issues derail the project. Each build is a chance to improve skills and learn new tricks.
A Gift That Gets Used
This bottle opener isn’t just a woodworking exercise—it’s something people will actually use. The built-in cap catcher is a thoughtful addition, and the polished finish makes it stand out.
It’s the kind of project that’s fun to make, satisfying to finish, and easy to replicate for gifts or sales.
Please support Tim by visiting his website: https://www.casualbuilds.com/.

Matt’s Take
These are my personal thoughts and tips based on my own experience in the shop. This section is not written, reviewed, or endorsed by the original creator of this project.
The magnetic cap catcher is what really makes this project shine. Those rare earth magnets are incredibly strong, so when you’re drilling the holes, take your time and test the depth on scrap wood first. You want them seated deep enough to be secure but not so deep that they lose their pull through the wood thickness. A depth gauge or some tape on your drill bit helps keep everything consistent.
That shellac and polyurethane finish combination is a smart choice for something that’ll see regular use. Shellac gives you that warm, rich tone that really pops the grain, while the poly adds the durability you need around moisture and handling. Just remember to let each coat cure fully – rushing the finish on a piece like this will show every brush mark and bubble.
One thing I love about this build is how adaptable it is to different skill levels. Don’t have a CNC? A simple routed edge or even some burned-in lettering with a wood burning pen can give you that custom look. The core functionality stays the same, and you can always add your own personal touches. The magnetic feature is really the star here – it turns a basic bottle opener into something genuinely useful that people will reach for every time.