This clamp storage project was developed by Jodee from Inspire Woodcraft.
It’s a practical way to store woodworking clamps vertically—ideal for shops with limited wall space or awkward corners where horizontal racks won’t fit.
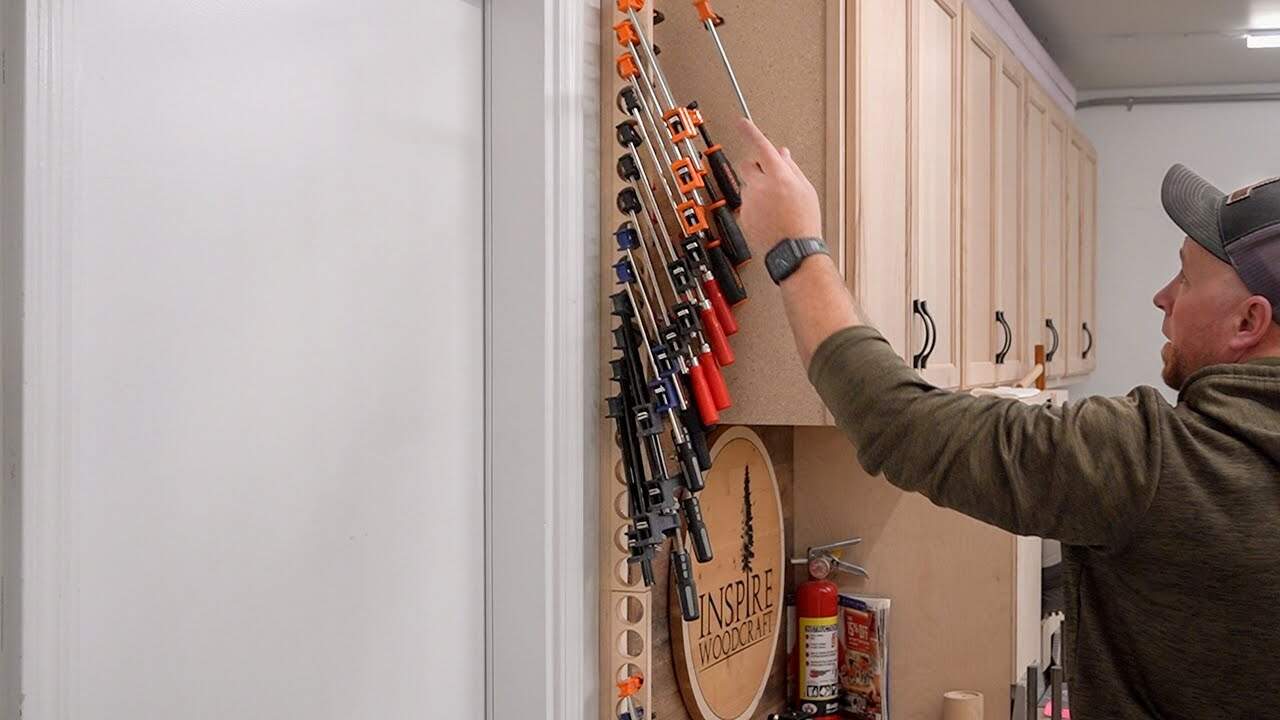
The design is simple, scalable, and built for function. It uses a staggered hole system that allows clamps to hang compactly in tight locations while keeping them accessible and organized.
Watch the full video and subscribe to Jodee’s channel:
What Makes Vertical Clamp Storage So Effective
Traditional clamp racks often take up large sections of wall space. Jodee’s vertical approach turns that concept on its side—literally—by stacking clamps in a vertical plane using staggered holes.
The layout borrows from the retail peg strip concept: a narrow base with repeated supports that hold items in a tight footprint.
For clamps, this means you can store many of them in the space typically required for one.
The system is especially effective for shops where workflow is key. Racks are placed near workstations, under benches, or beside tools—where clamps are actually used—rather than just where a big rack will fit.
Conceptual Build Overview
Rather than focusing on exact measurements, Jodee walks through the basic structure of the rack. It starts with two plywood strips joined at a right angle to form a strong vertical surface.
The outer face receives evenly spaced holes. Each clamp bar rests in one hole, while the clamp jaw sits in the hole below, creating a natural stagger that prevents interference and keeps things compact.
This structure can be mounted in any small shop space: beside a bandsaw, under a shelf, or even on the end of a bench. The goal is to add storage where there wasn’t any before.
Ideal Installation Spots
One of the main advantages of this system is its flexibility. It works in all the places where traditional clamp racks don’t:
- Narrow wall spaces between machines
- The underside or end of workbenches
- Recessed or unused wall areas
- Above doors or tool cabinets
- Right at your clamping workstation
The idea is to keep clamps where they’re used most, not stored somewhere across the shop. And because the racks are small and modular, you can install several in different areas for quick access.
Organizing Clamps by Size and Use
Jodee recommends sorting clamps by how often you use them—not just by type. Commonly used sizes go near the top for easy grabbing, while backups or long clamps go further down or in harder-to-reach spots.
This reduces frustration and avoids the “clamp pile-up” that happens when everything is stored in one place. Heavier clamps stay secure when placed lower, and the lighter, more frequently used clamps stay within arm’s reach.
Addressing Common Concerns
Some woodworkers worry that grabbing a clamp from the middle will be difficult. But the layout minimizes this issue by making sure the most-used clamps are in the most accessible spots.
Yes, removing a clamp often requires two hands. But that’s no different than most other storage methods, especially for longer or heavier clamps. The benefit here is how many clamps you can store in a tiny footprint.
To prevent sway for long clamps, Jodee recommends doubling up the face strip or reinforcing the rack in those areas. Even with some movement, the clamps stay securely in place thanks to the balanced stagger.
How the Idea Came Together
This system wasn’t designed on paper—it evolved from real shop needs. Jodee noticed that storing a few clamps vertically in bench dog holes was convenient. From there, he built a test rack onto the end of his bench using scrap plywood.
The trial version worked well, and he eventually mounted racks in multiple locations. That experimental approach is a key part of the lesson: start small, test the fit, and refine as needed based on how you actually work.
Tips for Building Your Own
Jodee shares several helpful tips for getting the most out of vertical clamp storage:
- Mount racks near where the clamps are used most often
- Group clamps by frequency, not just type or size
- Start with a temporary version before committing
- Reinforce areas where long clamps will hang
- Use plywood or MDF—looks don’t matter as much as strength
- Don’t be afraid to use odd spaces or corners
By following these tips, you can quickly create an efficient system that declutters your shop and improves your workflow.
Versatile and Easy to Adapt
This approach can be customized for different clamp styles—F-style, pipe clamps, parallel clamps, or even track clamps. Some woodworkers may want a separate rack for each type, while others can mix and match on one board.
You can also scale the rack up or down depending on the available space. Whether you use it for five clamps or 25, the concept remains simple and effective.
Support Jodee by visiting his online store here: https://inspirewoodcraft.com/collections/all.

Matt’s Take
These are my personal thoughts and tips based on my own experience in the shop. This section is not written, reviewed, or endorsed by the original creator of this project.
What I really appreciate about this approach is how it solves a problem most of us face daily — where to put clamps when we’re not using them. The vertical storage concept makes so much sense, especially in smaller shops where every square inch counts. I’ve found that keeping clamps close to where you actually work makes a huge difference in workflow, rather than having to trek across the shop every time you need one.
The staggered hole system is clever because it prevents clamps from interfering with each other while maximizing storage density. When drilling those holes, I’d suggest using a drill press if you have one — consistent spacing and perpendicular holes will make the whole system work much smoother. A simple jig or template can help if you’re doing multiple racks.
Safety-wise, make sure your mounting is solid, especially if you’re planning to load it up with heavier clamps. Those forces add up quickly, and the last thing you want is a rack full of clamps coming down. I also like the idea of starting with a test version first — it’s always better to work out the kinks with scrap wood before committing to a permanent installation.
The real beauty here is the modularity. You can build these to fit whatever odd spaces your shop has, and if your clamp collection grows (which it always does), you can just add another rack somewhere else.