This project was built and designed by Caleb from YouCanMakeThisToo. It’s a custom sewing station built to improve both storage and workflow for a dedicated seamstress, offering smart organization, durability, and clean aesthetics in one carefully thought-out package.
From plywood breakdown to cabinet doors and drawer assembly, this project highlights how woodworking can enhance even the most creative hobbies. Caleb blends functional design with practical build techniques that make this a rewarding watch—and a build worth replicating.
Watch the full video and subscribe to Caleb’s channel:
Solving a Common Workspace Problem
The inspiration behind this build came from a familiar issue: a sewing setup that couldn’t keep up with the growing collection of fabric, tools, and patterns. Caleb realized his wife’s sewing space needed a serious upgrade—not just more room, but smarter use of that room.
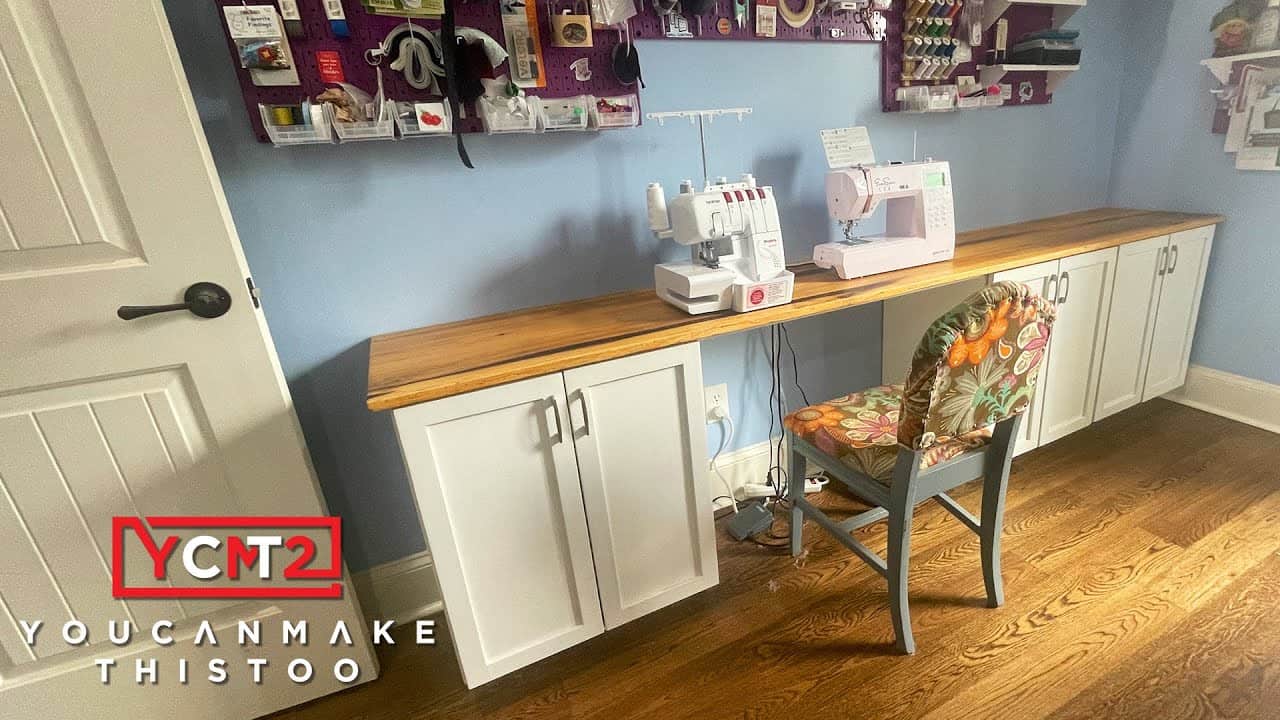
He set out to create a dedicated, multi-use station that would bring together her serger, sewing machine, cutting tools, and fabric all in one cohesive layout.
Laying Out the Design
Before any cuts were made, Caleb turned to Fusion 360 to map out the design. The layout featured two main cabinets tucked beneath existing wall-mounted storage, with a long surface bridging the two to create ample work space.
The sewing station included:
- Two cabinet towers with shelves and doors for fabric and tools
- A full-length tabletop to hold the sewing machine and serger
- Built-in drawers and lower cubbies for organizing patterns
- A spacious 4×5 foot cutting area for easy layout and trimming
This layout allowed everything to remain within arm’s reach while still feeling open and organized.
Choosing the Right Materials
To keep the build affordable without sacrificing durability, Caleb chose plywood for the bulk of the project. This material is stable, easy to work with, and ideal for painted surfaces.
He focused on efficient plywood breakdown from the start, taking time to plan cuts that would minimize waste and simplify handling. These early steps helped set the tone for a smooth assembly process later.
Tips for Cutting Plywood Cleanly
One challenge with plywood is avoiding tear-out, especially when working with prefinished or higher-grade panels. Caleb shared some solid advice here:
- When using a table saw, keep the finished side facing up
- For circular or track saws, the clean side should face down
- Applying painter’s tape along cut lines helps prevent splintering
- Always mark out your cut lines carefully, especially for cabinet parts
Small steps like these reduce finishing time and improve the quality of each piece.
Assembly with Pocket Holes and Pre-Finishing
Once all the components were cut, Caleb assembled the cabinet boxes using pocket holes and glue. He took time to pre-finish interior panels with a natural tone, helping protect the surfaces and reduce the chance of blotchy stain or uneven paint coverage.
The exterior received a clean coat of white paint, contrasting with the natural wood tones inside. This two-tone approach brightened up the workspace and gave it a polished, intentional look.
Door Joinery and Panel Construction
For the cabinet doors, Caleb used solid wood rather than plywood. He routed grooves for floating panels and assembled the frames using strong joints that allow for seasonal movement without cracking or warping.
After glue-up, he carefully sanded all the parts flush, smoothing out imperfections and ensuring consistent gaps around the door openings.
This attention to detail gives the piece a more professional, furniture-quality feel—especially important for a project that will be used daily.
Hinges and Hardware
Caleb installed the cabinet doors using concealed hinges, guided by a Kreg jig to drill clean, consistent holes. He paid special attention to alignment, knowing that nothing stands out more than uneven door gaps or sticky movement.
Small adjustments during this step ensured smooth action and reliable door swings. With the hardware installed, the piece was almost ready for use.
A Space That Inspires
This sewing table wasn’t just about storage—it was about supporting a creative hobby and giving it the room and respect it deserves. With more surface area, dedicated drawers, and built-in organization, it now acts as a central hub for every step of the sewing process.
The thoughtful layout and clean construction help minimize clutter while making the space more inviting. And with durable materials and solid joinery, this project is built to last through years of use.
Please support Caleb by visiting his website: https://www.ycmt2.com/.

Matt’s Take
These are my personal thoughts and tips based on my own experience in the shop. This section is not written, reviewed, or endorsed by the original creator of this project.
Building custom furniture for creative hobbies like sewing is one of my favorite types of projects to see. There’s something special about creating a workspace that’s tailored exactly to how someone works, and Caleb nailed that balance between function and clean design here.
That plywood breakdown strategy he mentions is crucial for any cabinet project. I always tell folks to spend extra time on the cut list and layout phase—it’ll save you headaches and material waste down the road. Using painter’s tape for tear-out prevention is a solid move, especially when you’re planning to paint the final piece anyway. Just make sure to score the tape line lightly with a utility knife before removing it to get the cleanest edge.
The two-tone finish approach really caught my eye. Natural wood interiors with painted exteriors give you that custom furniture look without breaking the budget. It’s also forgiving if you’re newer to finishing—any small imperfections on the interior get hidden by daily use, while the painted surfaces stay looking crisp. Those concealed hinges make all the difference too in achieving that clean, professional appearance.
Projects like this remind me why I love woodworking—you’re not just building furniture, you’re creating a space where creativity can flourish. When storage and workflow come together this well, it makes the hobby itself more enjoyable.