This video was created by Jodee from Inspire Woodcraft.
It focuses on the real-world techniques and mistakes that come with building a modern, minimalist table—from material prep and inlays to glue-up strategies and how to price your work.
While the final table looks clean and simple, the build involved dozens of small decisions, adjustments, and workarounds. Jodee walks through each step in detail, making this video a valuable resource for woodworkers interested in practical lessons, not just visual inspiration.
Watch the full video and subscribe to Jodee’s channel:
Milling and Material Prep
The first step is flattening and thicknessing all material before beginning joinery. Jodee breaks down rough lumber, flattens a reference face, and planes each board to a consistent thickness.
Grouping boards by their final use—whether for the top or the legs—helps match grain and reduce waste. One useful tip: if your planer blades leave ridges due to a nick, sanding those surfaces lightly allows more accurate edge jointing and helps keep glue-ups flat.
Glue-Ups and Floating Tenon Placement
Floating tenons (Dominoes) are used to keep the tabletop glue-up aligned. While this works well, Jodee points out that poor placement can cause problems later—especially if you plan to cut a circle from the panel with a router jig.
It’s important to mark board sequences and alignment locations with the whole build process in mind. That way, you won’t accidentally route through a tenon during later shaping steps.
Dealing with Knots and Small Defects
Rather than use epoxy for every knot, Jodee stabilizes the wood using a layered cyanoacrylate (CA) method. Thin CA glue is applied first to penetrate the fibers, followed by a thicker version to fill the space.
This keeps the character of the wood visible while still strengthening the area. It’s a faster alternative to epoxy and works well for subtle imperfections that don’t require a deep pour.
Joinery Alternatives: Grooves Over Face Gluing
The original plan was to attach narrow legs to wider boards using floating tenons. But small sanding differences created visible gaps. Instead, Jodee routed shallow grooves in the wider board and nested the narrow legs into them.
This created clean, gap-free joints. A simplified option for future builds is to make the narrow legs slightly wider and glue them into half-depth grooves for easier alignment and better fit.
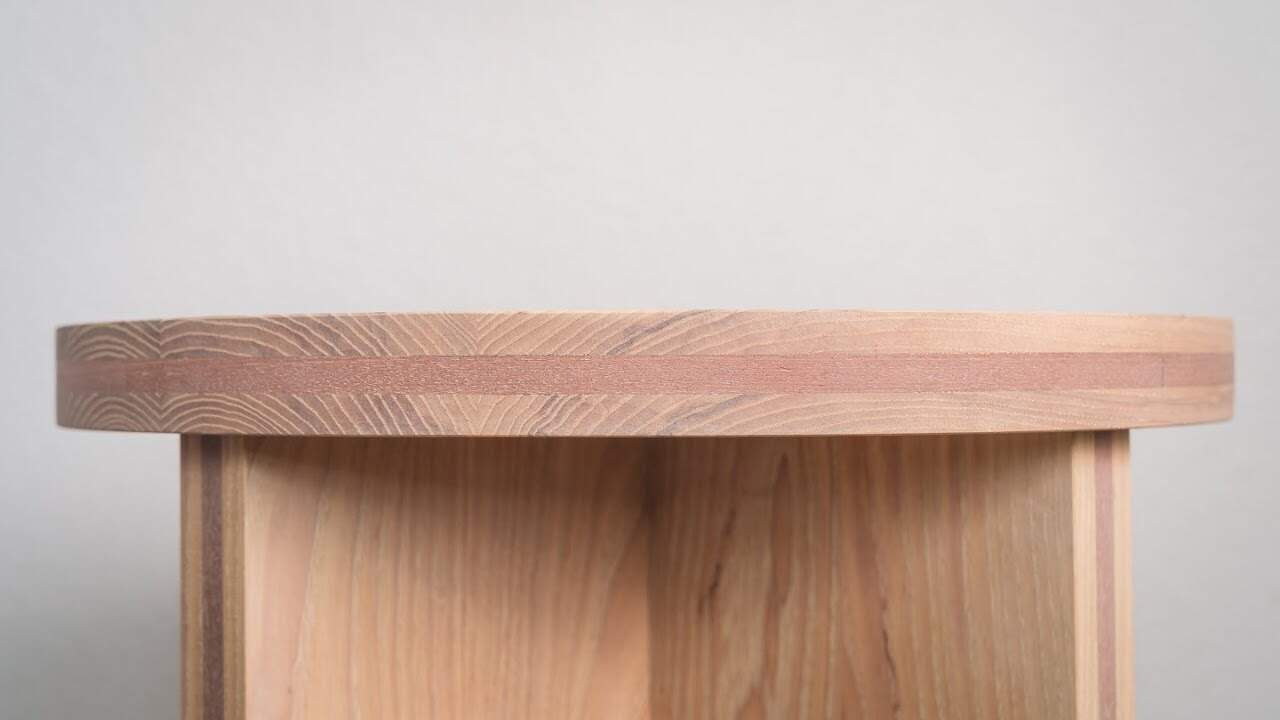
Cutting the Round Top and Adding an Inlay
A circle jig and plunge router are used to cut the tabletop. For large pieces, most of the waste is removed with a bandsaw, followed by a flush-trim pass at the router table.
To minimize tearout, especially in open-grain woods like ash, Jodee uses a shallow scoring pass before the full-depth cut. When tenons show after cutting the circle, a shallow rabbet is added to create space for a decorative inlay.
Installing a Tight Inlay
The inlay, made from contrasting sapelli, is glued into the rabbet. To clamp it evenly, sacrificial blocks are wrapped in packing tape and used to apply pressure without sticking.
A long open-time glue is chosen to give more working time and help hide any micro-gaps. Dry-fitting before clamping ensures the inlay fits snugly and cleanly.
Fixing Tearout and Tricky Corners
Some tearout occurred when routing around the inlay. Rather than redo the section, Jodee cuts a small patch, glues it in with CA, and blends the repair with sanding.
This kind of fix is quick and acceptable for personal pieces—and it’s a good example of not letting small defects stall a project unnecessarily.
Hidden Fasteners and Wood Movement
The table’s top is attached using a method that allows movement across the grain. One section of the base is glued solidly to restrict cupping, while the opposite end uses oversized pockets and floating tenons to allow for expansion and contraction.
This technique keeps the tabletop flat and stable while preventing seasonal issues. Designing this flexibility into the hardware plan ahead of time is a key takeaway from the build.
Final Touches and Finishing
Before final glue-up, all parts are sanded and edges are chamfered. Clamping jigs and painter’s tape help protect surfaces and manage glue squeeze-out.
The finish is Rubio Monocoat in a light tone. Applied in thin layers and wiped back carefully, it highlights the grain without leaving buildup in corners or open pores.
Thoughts on Pricing and Value
Jodee wraps up the video by reflecting on the pricing of similar furniture. A quick online search shows wide price ranges for comparable pieces—from a few hundred dollars to over a thousand.
The takeaway: many woodworkers underprice their work. Looking at what others charge for similar materials and finish quality can help you set more realistic expectations if you’re selling furniture.
What You’ll Learn from This Video
- Avoid placing floating tenons where router jigs will pass
- Use grooves instead of face-gluing for clean joints
- Stabilize knots with thin CA instead of epoxy for faster results
- Add inlays to hide mistakes and enhance visual appeal
- Design top attachments that allow for seasonal wood movement
- Price your work by looking at similar builds on the market
Jodee’s video is a great example of real-world woodworking—where plans change, mistakes happen, and good solutions matter more than perfection. It’s packed with tips and takeaways for woodworkers at every level.
Support Jodee by visiting his online store here: https://inspirewoodcraft.com/collections/all.

Matt’s Take
These are my personal thoughts and tips based on my own experience in the shop. This section is not written, reviewed, or endorsed by the original creator of this project.
What I love about this build is how it showcases real shop problem-solving. That switch from face-gluing to using grooves is brilliant—sometimes the best joint isn’t the one you planned, but the one that actually fits your situation. I’ve found that shallow grooves can be incredibly forgiving for alignment issues, and they often create stronger joints than trying to force a perfect edge-to-edge glue-up when dimensions don’t quite match.
The CA stabilization technique for knots is worth noting for anyone who finds epoxy overkill for small defects. Thin CA really does penetrate well, and the layered approach gives you more control than trying to fill everything at once. Just make sure your shop has good ventilation—CA fumes can be harsh in enclosed spaces.
That movement consideration in the base attachment is spot-on critical. Ash moves quite a bit with seasonal changes, and restricting it in the wrong places will cause problems down the line. The floating tenon approach on one end while keeping the other fixed is a smart compromise that lets the wood do what it wants to do naturally.
The pricing discussion hits home too. It’s easy to undervalue the time and skill that goes into clean joinery and thoughtful design. Taking a hard look at what similar quality pieces actually sell for can be eye-opening—and help you price your work more fairly.