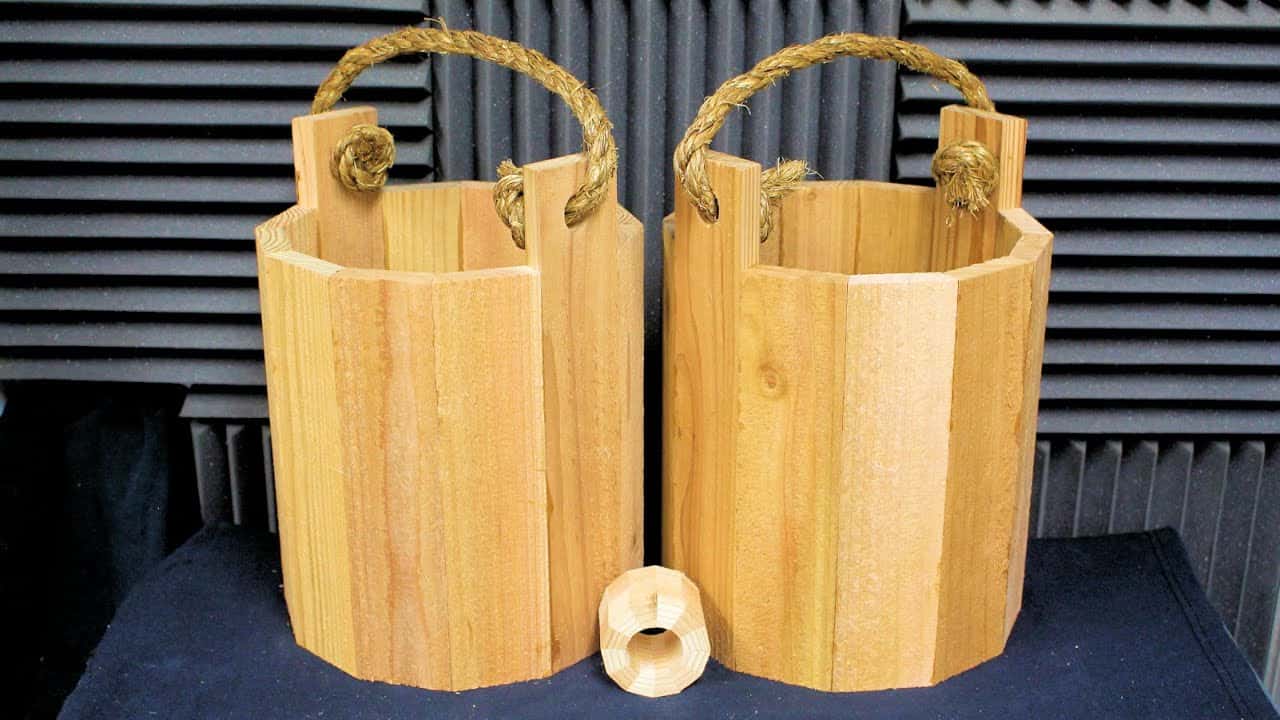
This project was built and designed by Clinton from Specific Love Creations. It’s a straightforward wooden bucket with clean lines, making it a great project for decoration, planting, or light practical use around the home or garden.
Built using cedar pickets and basic tools, the bucket combines charm and durability. The design avoids complex angles and encourages creativity with a layout that’s simple to cut, glue, and customize.
Watch the full video and subscribe to Clinton’s channel:
A Bucket That’s Built to Last
The key to this project is its simplicity. Unlike traditional wooden buckets with curved staves and metal bands, Clinton’s version uses flat-sided walls that taper together at consistent angles.
This approach makes the build much more approachable, especially for newer woodworkers or anyone working from a small home setup. The result is a rustic, functional piece that can be adapted for many uses.
Tools and Materials for the Build
Clinton uses cedar pickets for the sides—an affordable and weather-resistant wood perfect for outdoor exposure. Scrap wood can also be incorporated, which helps keep the cost down while making use of leftover materials.
The project can be completed with a few basic tools: a table saw, clamps, glue, and a drill. These are all common in most home shops, and no specialty equipment is required to get professional-looking results.
Cutting the Bucket Sides
The first step is to cut the side panels to equal length. Clinton makes all of these cuts at once to ensure they match up during assembly.
The sides are tapered by adjusting the angle on the table saw blade. Setting this angle correctly is important for achieving a snug, even fit once the sides are arranged into a ring shape.
Assembly Tips for a Tight Fit
Clinton recommends arranging the side panels in a randomized pattern to avoid color clumping and to give the bucket a more natural, handmade look. He uses painter’s tape to help hold the pieces together while dry fitting and gluing.
A generous amount of glue is applied to each edge before wrapping the sides into a circular shape. Clamps are then used to keep pressure evenly distributed as the glue dries, creating a tight, durable bond.
Making the Bucket Bottom
With the sides cured and solid, attention turns to creating the base. This circular bottom panel needs to fit snugly into the tapered walls, which may require some minor adjustment or notching for the best fit.
Clinton uses a sled on his table saw to make careful, clean cuts. Once the bottom panel is sized correctly, it’s sanded smooth to remove any sharp corners or splinters before being glued or secured into place.
Optional Edits and Fixes
If any steps are missed during early stages—like not cutting notches in time—Clinton shows how a router can be used to correct the shape and clean up the fit. This flexibility helps make the build more forgiving and adaptable as it progresses.
This is a good reminder that woodworking often includes mid-project tweaks, and a flexible mindset can save a lot of stress.
Adding a Rope Handle
To finish the piece with some character, Clinton adds a rope handle. A thick twisted rope is threaded through each side and knotted at both ends, giving the bucket a classic, antique look.
To keep the rope from coming loose over time, a small dab of hot glue is applied inside each knot. This helps secure the handle while still keeping it removable or replaceable later if needed.
Sanding and Finishing
The entire bucket gets a final sanding to remove rough edges and give the piece a smooth finish. Depending on your intended use, this could be the last step—or you could add stain, paint, or clear sealer to protect the wood and match your decor.
Clinton notes that leaving the bucket unfinished can give it a rustic look that fits nicely into gardens or farmhouse-style homes.
A Beginner-Friendly and Flexible Project
What makes this project appealing is its adaptability. Whether you’re building one for your patio, to hold gardening tools, or simply as decoration, the process is straightforward and satisfying.
The consistent angles and forgiving materials make this a great practice project. It offers a little challenge without being overwhelming and produces a finished product that feels both useful and personal.
Watch the full video and subscribe to Clinton’s channel:

Matt’s Take
These are my personal thoughts and tips based on my own experience in the shop. This section is not written, reviewed, or endorsed by the original creator of this project.
I really appreciate how Clinton approached this build with simplicity in mind. The flat-sided design eliminates the complexity of traditional coopering techniques while still delivering that classic bucket aesthetic. This is exactly the kind of project that builds confidence—you get to practice fundamental skills like accurate cutting and glue-ups without getting overwhelmed by advanced joinery.
Cedar pickets are a smart material choice here. They’re typically kiln-dried and dimensioned consistently, which takes a lot of guesswork out of the prep work. Plus, at around $3-5 per picket at most home centers, the material cost stays reasonable. If you’re planning to use this outdoors, cedar’s natural rot resistance means it’ll hold up well without any finish.
The angled cuts are where precision really pays off. Even small inconsistencies in those tapers will show up as gaps when you’re wrapping the sides together. I’d recommend making a test cut on some scrap first to dial in your saw’s angle—it’s much easier to adjust before you’ve committed to cutting all your good pieces. Take your time with the setup, and the assembly will be much more satisfying.
That rope handle detail is a nice touch that really sells the traditional bucket look. If you’re using this for heavier items, consider reinforcing the handle attachment points with small metal washers or leather patches to distribute the load and prevent tear-out over time.