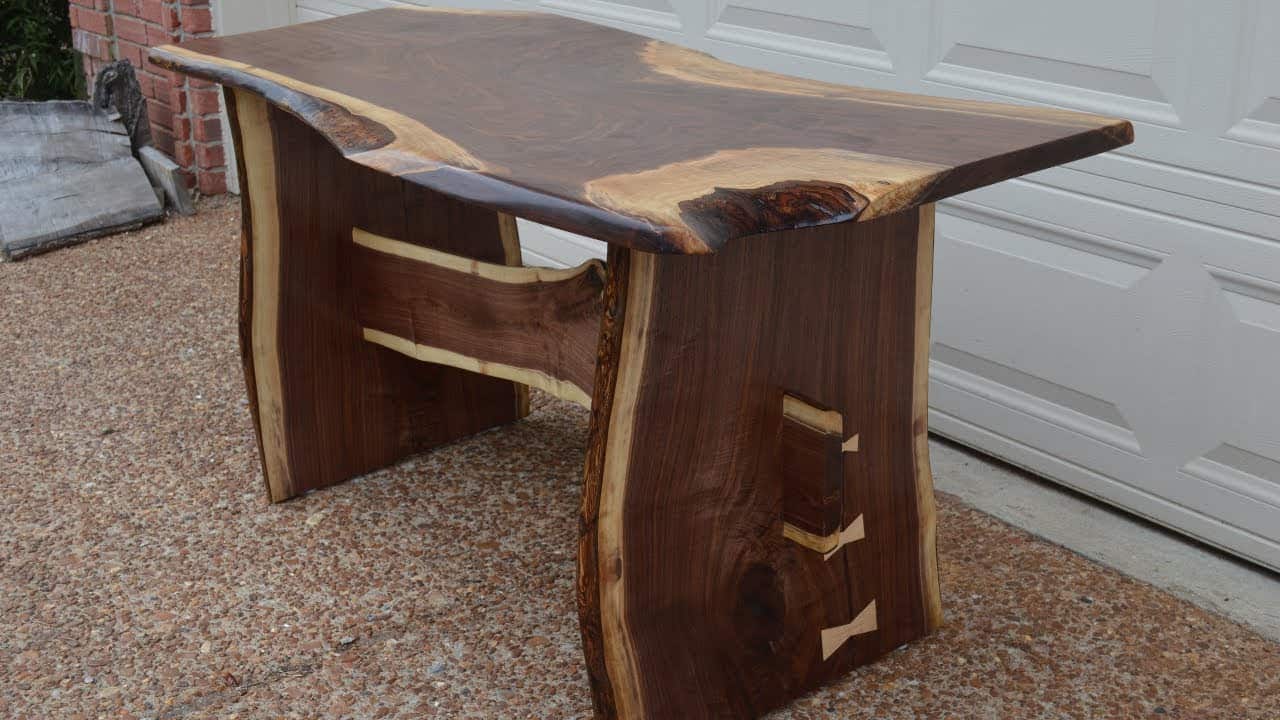
This project was built and designed by Caleb from YouCanMakeThisToo. It’s a striking walnut slab table that blends rustic charm with functional joinery for a showstopping dining centerpiece.
Caleb revisits the beauty of natural wood in this build, creating a farmhouse-style table from a live edge walnut slab. The result is both rugged and refined, with joinery techniques that hold up to real-world use and a finish that showcases the grain.
Watch the full video and subscribe to Caleb’s channel:
Shaping the Walnut Slab
The process begins by preparing the live edge walnut slab, starting with the careful removal of the outer bark. Leaving the inner bark in place helps preserve the organic feel of the slab while reducing the risk of it breaking off later.
To make the slab more structured without losing its natural beauty, Caleb marks a straight edge along one side as a reference point. He uses a framing square to create square ends, trimming the shape to be more rectangular while maintaining the original curves.
Flattening and Smoothing the Top
With the shape established, the next step is to smooth the surface. Although the slab isn’t thick enough to plane perfectly flat, Caleb uses a low-angle jack plane to remove saw marks and high spots.
Any remaining uneven areas are blended with a random orbit sander. The goal is not perfection but functionality—a smooth top that keeps glasses stable while preserving the slab’s natural texture.
Constructing the Table Legs
For the table base, Caleb uses an offcut from the slab to form one of the legs and selects a separate board for the second. Each leg is cut using the same straight-line technique and then smoothed just like the tabletop to maintain a consistent look.
The stretcher between the legs is also cut to length and shaped to match. This piece plays a crucial role in tying the base together and adding rigidity.
Bow Ties for Strength and Style
To stabilize natural cracks and knots in the slab, Caleb adds bow tie inlays made from curly maple. These not only strengthen weak points in the slab but also add a visual highlight that contrasts nicely with the walnut.
Each bow tie is hand-shaped and inlaid using careful measurements and tight chiseling. They’re functional, but they also elevate the piece artistically.
Aligning and Centering the Base
Getting the stretcher properly aligned between the legs requires some planning. Caleb finds the center of each leg and draws reference lines to help place the stretcher.
Small adjustments are made to make sure everything sits square and looks balanced, especially since live edge slabs aren’t perfectly uniform.
Mortising for Joinery
With the layout confirmed, Caleb begins cutting the mortises that will house the stretcher ends. He removes the bulk of the material using a Forstner bit, then uses chisels to square the walls and create clean, precise openings.
A scrap board is placed beneath the leg to help reduce chip-out during this process, a smart precaution that makes cleanup easier later on.
Reinforcing with a Lower Stretcher
To prevent racking and add even more strength, a second stretcher is added below the first. This creates a box-like structure in the table’s base, increasing long-term stability.
Mortises for this second stretcher are laid out and cut just like the first. With both stretchers in place, the frame becomes rigid and well-balanced.
Scribing the Legs to the Slab
Since the slab top isn’t perfectly flat, Caleb doesn’t try to force the legs to match it. Instead, he uses a scribing technique to trace the curve of the slab onto the legs, then cuts the tops to fit the surface naturally.
This creates a tight, flush joint and adds to the handcrafted appearance of the table. It’s a more time-consuming step but pays off in both strength and aesthetics.
Filling Voids and Applying Finish
Small gaps and imperfections are filled with a mixture of glue and fine sanding dust. This creates a tinted filler that blends with the walnut while sealing cracks and holes.
The table is finished with multiple coats of oil, shellac, and polyurethane, giving the surface depth and durability. Each coat is carefully applied and sanded between layers to build a strong, protective finish that highlights the grain.
Final Assembly with Flexibility in Mind
To attach the tabletop to the base, Caleb uses tabletop clips that allow for seasonal wood movement. These clips hold the slab firmly while letting it expand and contract naturally.
Once everything is assembled and tightened down, the finished piece stands as a perfect blend of rustic material and precise joinery.
Please support Caleb by visiting his website: https://www.ycmt2.com/.

Matt’s Take
These are my personal thoughts and tips based on my own experience in the shop. This section is not written, reviewed, or endorsed by the original creator of this project.
Working with live edge slabs like this walnut piece requires a different mindset than dimensional lumber. The key is embracing the natural irregularities rather than fighting them. That scribing technique Caleb uses to fit the legs to the slab bottom is spot-on — trying to force a perfectly flat connection on naturally curved wood usually ends in frustration and gaps.
Those bow tie inlays serve double duty here, and it’s worth noting that placement timing matters. Installing them after initial shaping but before final finishing gives you the best chance to blend everything seamlessly. When cutting the mortises for bow ties, work in small increments with sharp chisels — walnut can chip out if you’re too aggressive, especially near the end grain areas.
The tabletop clip attachment system is crucial for slab tables. Walnut moves significantly with seasonal changes, and a rigid attachment will either crack the slab or pull apart the joinery. Those clips allow the necessary movement while keeping everything secure. For anyone considering a similar build, budget extra time for the finishing process — slab surfaces with their mix of end grain, long grain, and natural irregularities can absorb finish unevenly, so multiple thin coats usually work better than trying to rush with heavy applications.