This project was built and designed by Brett from Brett’s Basement Woodshop. It’s a high-end chessboard featuring Peruvian Walnut, Bird’s Eye Maple, and African Mahogany, all carefully selected and joined to create a functional, durable, and visually stunning board.
From the decorative inlays to the laminated frame, every step of the process showcases attention to detail and expert-level precision. Whether you’re a woodworking enthusiast or a chess lover, this is a project that combines beauty with practical craftsmanship.
Watch the full video and subscribe to Brett’s channel:
The Concept Behind the Design
Brett’s goal with this build was to elevate a classic chessboard into something that felt both luxurious and handmade. By using premium hardwoods with striking contrast and grain character, he created a board that feels like a showpiece while remaining fully functional for everyday play.
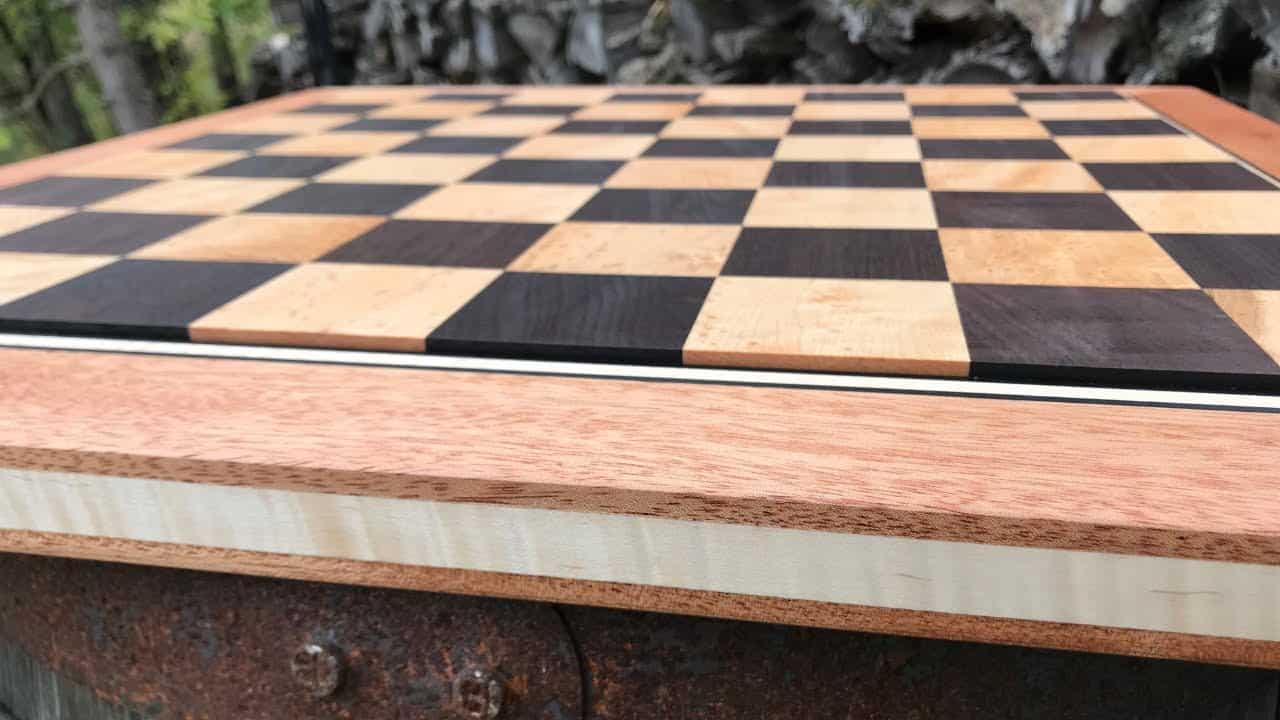
The squares alternate between dark Peruvian Walnut and light Bird’s Eye Maple. These sit within a frame of African Mahogany, which is accented with a tiger maple inlay. The overall effect is refined and balanced, offering depth, contrast, and warmth.
Milling and Preparing the Lumber
The first phase of the project involves breaking down the lumber into manageable, properly milled pieces. Flat and square stock is essential for glue-ups and joinery to go smoothly.
Brett typically uses a benchtop jointer for edge preparation but decided to joint these boards on the table saw instead. This approach provided more control and helped avoid warping—an issue he has run into with sensitive hardwoods like maple.
Resawing and Initial Glue-Ups
Once the boards were sized and jointed, they were ripped down into narrower strips for the chessboard squares. These strips were then resawn to reduce thickness and glued together in pairs.
Clamping the boards overnight helps stabilize them and reduces movement, which is especially important with thinner stock. This early glue-up stage is also an opportunity to maximize yield from the lumber while keeping all parts consistent.
Using Titebond Extend for Better Glue Time
For this project, Brett used Titebond Extend—a glue with a longer open time than standard wood glues. This allowed him to work more deliberately when applying glue across multiple pieces, reducing stress and avoiding rushed adjustments.
He applied the glue using a roller, which helped spread it quickly and evenly. This small upgrade in workflow resulted in cleaner bonds and a more efficient build overall.
Cutting the Chess Squares
Once the panels were set, Brett cut them into equal-width strips and rotated them to form the traditional checkerboard pattern. Getting clean, accurate squares required careful measurements and consistent angles throughout the cutting process.
After dry fitting to confirm the layout, he glued the strips together and clamped the entire board flat. This step demands patience and precision to ensure every corner and seam lines up perfectly.
Constructing the Frame
With the playing surface complete, Brett turned to the frame. African Mahogany was chosen for its durability and warm tone, but the pieces he started with had some warping issues.
To resolve this, Brett resawed the mahogany and laminated it into more stable blanks. This strategy not only corrected the original defects but also ensured the frame would sit flat against the board with no twist or cup.
Adding Decorative Inlays
One of the standout features of this build is the inlay work around the frame. Brett chose to use paper stone, a durable composite that mimics the look of ebony while being easier to work with and more affordable.
Inlay grooves were carefully routed, and each strip was set into place with a tight fit. These fine details added a high-end finish and helped separate the board from more standard chessboard designs.
Final Assembly and Finish Work
The final glue-up brought all the components together. Brett clamped the frame around the chessboard, checking for alignment on all four corners. Precision here was key—any gaps or misaligned edges would have been noticeable against the contrasting woods.
Once cured, the piece was sanded thoroughly through multiple grits. Chamfered edges softened the feel without compromising the sharp aesthetic. For finish, Brett used a combination of oil and wax, which enhanced the grain patterns and added protection without leaving a plastic-like coating.
A Showcase of Detail and Dedication
This chessboard build reflects the kind of careful planning and execution that defines fine woodworking. From premium material selection to small joinery tricks, Brett shares not just how to make a chessboard—but how to make it exceptional.
Every design choice in this build was made with purpose, resulting in a board that looks great, feels solid, and will hold up for years of play. It’s the kind of project that’s rewarding to build and impressive to display.
Please support Brett by visiting his website: https://www.brettsbasementwoodshop.com/.

Matt’s Take
These are my personal thoughts and tips based on my own experience in the shop. This section is not written, reviewed, or endorsed by the original creator of this project.
Working with premium hardwoods like Peruvian Walnut and Bird’s Eye Maple can be both rewarding and challenging. These species have gorgeous grain patterns, but they can be finicky during milling and glue-up. The decision to use the table saw for edge jointing instead of a benchtop jointer makes a lot of sense here — you get more control over feed rate and can better manage tearout on figured woods.
The Titebond Extend choice is smart for a project like this. When you’re dealing with multiple strips and precise alignment, that extra working time takes the pressure off and lets you focus on getting everything perfect. I’d also suggest having some cauls ready during glue-up — they help distribute clamping pressure evenly across the entire surface and prevent any slight bowing.
The laminated frame approach is a great problem-solving technique. Rather than fighting warped stock or trying to flatten it aggressively (which can create thin spots), resawing and laminating creates more stable material while often improving the grain pattern. It’s one of those moves that turns a material challenge into a design advantage.
Paper stone is an excellent inlay choice for this application. It machines cleanly, doesn’t have grain direction issues like wood, and the dark color provides that crisp contrast against the mahogany frame. The oil and wax finish will really make those grain patterns pop while giving the board a nice tactile feel for handling the chess pieces.