This project was built and designed by Tim from Casual Builds. It’s a practical garage storage solution that combines function, mobility, and a straightforward building process—all using common materials and basic tools.
Designed to hold bins, tools, and supplies, this shelving unit is ideal for weekend DIYers looking to improve their space without a complicated setup. Tim shows how to get professional-level results with accessible materials and a simple approach.
Watch the full video and subscribe to Tim’s channel:
A Smart Use of Space
Garage clutter can pile up quickly, especially if tools and totes don’t have a dedicated place. These mobile shelves solve that problem with multiple tiers of storage and the flexibility to roll wherever you need them.
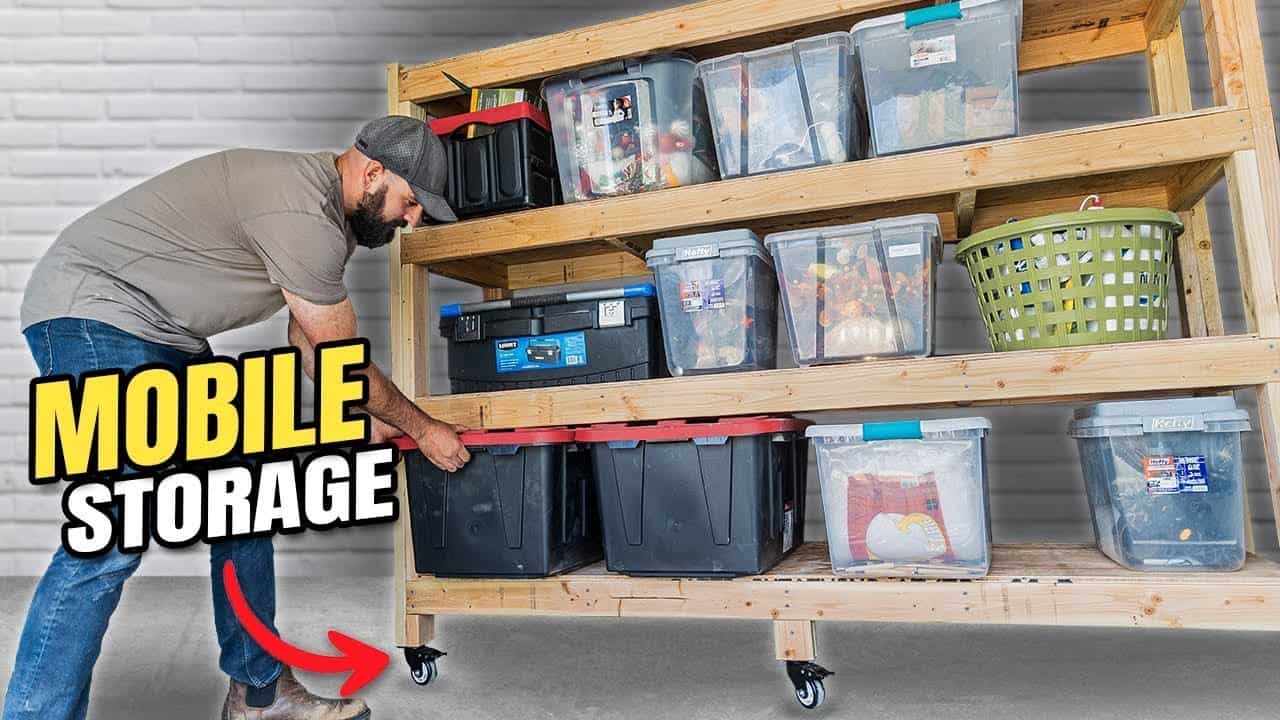
The final unit stands about 67 inches tall, 82 inches wide, and 24 inches deep. With these dimensions, it fits a wide range of plastic storage bins or boxes while still allowing easy movement around your garage or workshop.
Tools and Materials You’ll Need
The project relies mostly on 2×4 lumber for the frame and plywood for the shelf surfaces. These materials are readily available at any home center and offer a great mix of strength and affordability.
As for tools, only a few essentials are required: a miter saw or circular saw, drill, nail gun or impact driver, clamps, and an oscillating multi-tool if you’re looking for precise plywood cuts. The simplicity of this tool list makes the project approachable, even for those just getting started.
Organizing Cuts Before Assembly
Before assembling anything, Tim recommends creating a cut list. Knowing the quantity and length of each piece of lumber not only speeds up the process but also reduces waste.
He uses a cut list optimizer to plan ahead—especially helpful when you’re working with several 2x4s. This approach helps avoid excessive offcuts and keeps your workspace tidy throughout the project.
Building a Strong Frame
With all the lumber cut to size, the next step is assembling the vertical frame. The vertical posts are laid out and marked where each shelf support will be installed. Clamps help hold pieces in place while glue and nails are used to secure everything together.
Tim emphasizes the importance of taking time during this phase to ensure all parts are square. A solid frame is the foundation for sturdy shelves, and any misalignment now could cause problems down the road.
Installing Shelf Supports
After the main frame is built, 2×4 slats are added horizontally to support each shelf level. These slats are spaced based on what you plan to store—boxes, bins, or tools—so there’s room for customization.
Pre-drilling holes is highly recommended here to prevent wood from splitting. Once the slats are in place and secured with screws and glue, the shelving unit begins to take shape.
Adding Mobility with Casters
To make the unit mobile, Tim installs heavy-duty casters on the bottom of the frame. These allow the shelving unit to be easily moved around, which is especially helpful in a tight garage or workshop.
Each caster is secured with lag screws to ensure they’ll hold up under the weight of the loaded shelves. Once installed, the entire unit rolls smoothly while staying stable and level.
Cutting and Fitting the Plywood Shelves
Next, Tim cuts the plywood sheets that serve as the shelf surfaces. Each piece is measured and trimmed to fit snugly between the frame rails, providing a flat surface for storage.
For areas that require corner notching, Tim uses an oscillating multi-tool to cut precise shapes that wrap around posts. These detailed cuts help each shelf panel sit perfectly in place with no gaps or shifting.
Final Assembly and Fastening
Once the plywood pieces are cut and placed, they’re fastened with a nail gun to lock everything into position. This final step secures the whole structure and gives the shelving unit a clean, finished appearance.
The end result is a professional-looking set of mobile shelves that are both strong and easy to maneuver. They’re built to handle a garage environment and can be adapted for workshops, basements, or sheds.
Built for Function and Flexibility
One of the best things about this design is how scalable it is. You can easily adjust the size to fit your specific space or needs, and add features like a pegboard backing or additional shelves later on.
Tim built this version with a friend, adding a social element to the project that made it even more enjoyable. Whether you’re working solo or with a partner, this is the kind of build that comes together quickly and makes a big difference.
Please support Tim by visiting his website: https://www.casualbuilds.com/.

Matt’s Take
These are my personal thoughts and tips based on my own experience in the shop. This section is not written, reviewed, or endorsed by the original creator of this project.
Mobile storage units like this really shine in smaller garages where every square foot counts. The caster choice is crucial here—I’d recommend going with locking wheels so you can secure the unit in place when loading heavier items. Nothing’s worse than having your storage roll away when you’re trying to stack boxes on it.
That cut list planning Tim mentions is spot-on and saves both time and money. When you’re dealing with multiple 2x4s, having a solid plan prevents those frustrating moments where you realize you cut a board too short. Plus, knowing your dimensions upfront helps when you’re at the lumber yard—you can sometimes have them make the cuts for you if your saw setup at home is limited.
The pre-drilling advice for the shelf supports is worth emphasizing. 2×4 lumber can be unpredictable when it comes to splitting, especially near the ends. Taking that extra minute to drill pilot holes will save you from having to start over with a cracked board. And when you’re working with a frame this size, keeping everything square during assembly really does make the difference between a wobbly unit and one that’ll serve you well for years.