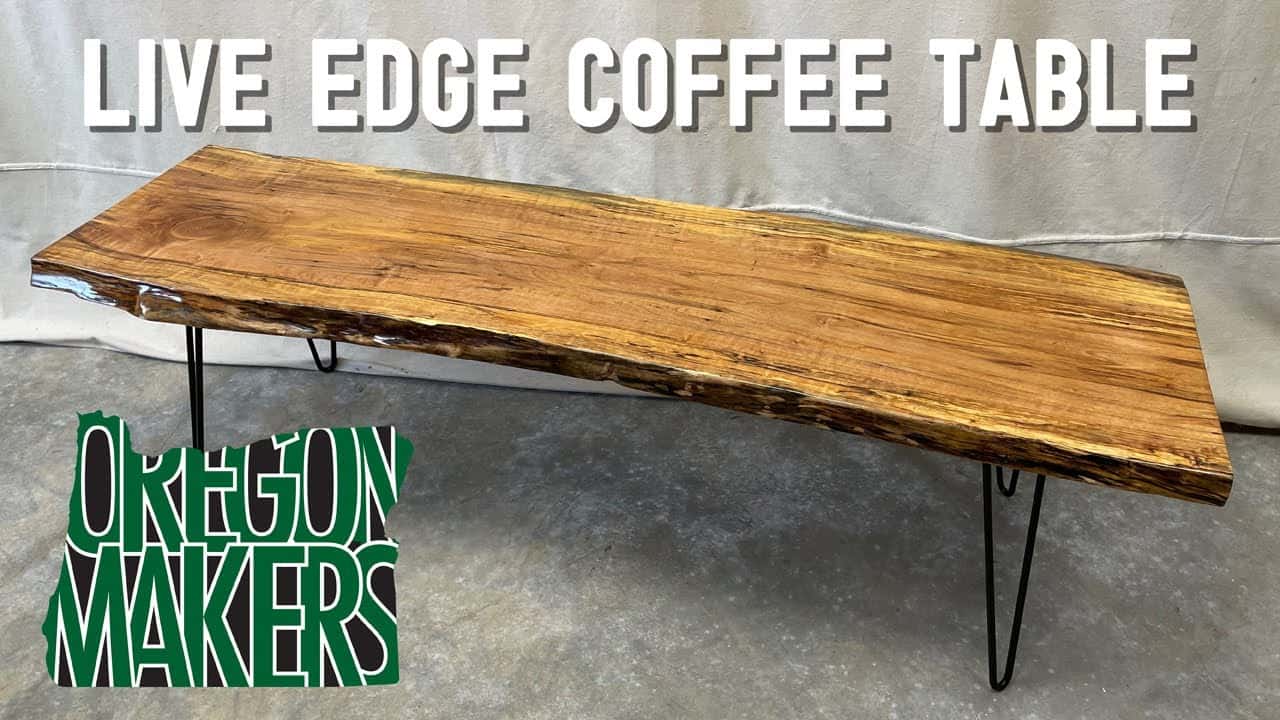
This project was built and designed by Mike from Oregon Makers. It’s a simple but striking build that takes a natural live edge slab and turns it into a sleek coffee table with modern hairpin legs.
With a focus on preserving the slab’s character and enhancing its durability, Mike walks through each step—from sanding and stabilizing the wood to finishing and final assembly. The result is a table that showcases both natural beauty and clean design.
Watch the full video and subscribe to Mike’s channel:
Selecting and Preparing the Slab
The slab used for this table had been air-dried for about a year, giving it time to stabilize. This makes it easier to work with and reduces the risk of major warping after finishing.
Before any work began, Mike checked the slab for flatness. While generally flat, it had a few slight imperfections and cupping that needed attention. Rather than running it through a planer, which wouldn’t fit the slab’s width, Mike chose hand sanding to level things out.
Cleaning and Sanding the Surface
A wire brush was used to remove any loose bark and debris from the slab’s live edges. This not only cleaned the surface but helped bring out the grain for finishing later.
Sanding was done in multiple stages, working through finer grits for a smooth result. A belt sander with a sled was used to apply even pressure and avoid gouging, especially on the uneven grain and spalted areas of the slab.
Edges were finished by hand sanding to remove any sharp spots. This gave the piece a tactile, comfortable feel while preserving the natural curves of the wood.
Stabilizing Soft Grain and Spalting
Parts of the slab contained spalted, punky wood, which needed to be stabilized before finishing. Mike applied a penetrating epoxy to these areas to harden the fibers and prevent future deterioration.
This step also helped lock in the texture and color of the spalting, making it safe to sand and finish while keeping the table structurally sound.
Applying a Durable Finish
Mike started with a satin finish but decided to move toward a glossier look for more visual impact. After each coat, the surface was scuffed lightly with a sanding pad to improve adhesion.
To remove dust before re-coating, he wiped down the slab with denatured alcohol. This evaporates quickly and leaves the surface clean for a smooth, streak-free finish.
Several layers of finish were applied to build up depth and durability. Once satisfied with the clarity and sheen, Mike allowed the table to cure before moving on to the base.
Choosing and Installing the Legs
The hairpin legs were sourced from Rockler and offer a modern, minimal contrast to the organic slab top. Their shape complements the natural grain without competing for attention.
To ensure the legs were properly aligned, Mike used a guide board to space them evenly. He placed each leg six inches from the edges for balance and support.
Pre-drilling the mounting holes helped prevent splitting, and the legs were attached securely with screws. With the legs mounted, the table was flipped and ready for a final check.
Softening the Shine with Wax
After assembly, Mike evaluated the final finish and decided it had just a bit too much gloss. To tone it down without losing the depth, he applied a finishing wax across the surface.
Once dry, the wax was buffed to a soft sheen that felt silky smooth and reduced glare. This final layer also helps protect the table from fingerprints and surface wear over time.
A Statement Piece for Any Room
The finished table balances rustic charm with modern lines, offering a natural focal point for any living room. The grain, shape, and slight imperfections in the slab tell the story of the wood itself.
This project shows how a simple slab and a set of hairpin legs can be combined to make a professional-looking piece of furniture. It’s approachable for intermediate woodworkers but delivers a result that feels custom and high-end.
Whether you’re creating for your own home or looking to make pieces to sell, a live edge slab table is a rewarding build. With a bit of sanding, smart joinery, and careful finishing, it’s possible to turn raw lumber into something truly unique.
Watch the full video and subscribe to Mike’s channel:

Matt’s Take
These are my personal thoughts and tips based on my own experience in the shop. This section is not written, reviewed, or endorsed by the original creator of this project.
Working with live edge slabs can be intimidating at first, but Mike’s approach here shows how straightforward it can be with the right techniques. That penetrating epoxy trick for stabilizing spalted wood is gold — I’ve seen too many beautiful pieces develop soft spots or crumbling edges because this step got skipped. It’s worth investing in quality epoxy for this, as the cheap stuff often doesn’t penetrate deep enough to really lock things down.
The belt sander with sled technique is smart for evening out cupping without a wide planer. Just remember to keep that sander moving — it’s easy to create dips if you linger in one spot. For slabs this size, I also like having a straightedge handy to check your progress as you go.
Mike’s finishing approach shows good instincts, especially that final wax step. High-gloss finishes can look fantastic in photos but sometimes feel too “plastic” in person. That wax layer not only knocked down the shine but added a really nice tactile quality. When you’re putting this much work into showcasing natural wood grain, the finish should enhance it, not overpower it.
Those hairpin legs from Rockler are a solid choice — they’re well-made and the mounting system is foolproof. Just double-check your measurements before drilling. At around $40-50 for a set, they’re reasonable for the quality and definitely easier than fabricating your own steel base.