This project was built and designed by Michael from Maker At Play. It’s a simple but highly effective hammer rack designed specifically for a French cleat wall, giving your tools a dedicated home that’s easy to access and reposition.
Hammers are among the most-used tools in any workshop, yet they often end up misplaced or piled in drawers. This rack solves that problem by offering a clean, customizable way to store multiple hammers in one organized spot.
Watch the full video and subscribe to Michael’s channel:
Why Build a Hammer Rack?
A hammer rack may seem like a small addition, but it makes a big impact in workshop efficiency. Keeping hammers visible, sorted, and within reach saves time and reduces frustration during any woodworking project.
Instead of digging through a toolbox or cluttered bench, this rack puts your most-used striking tools right in front of you. It also keeps your workspace safer by minimizing the chance of tools falling or being stored precariously.
Planning the Design
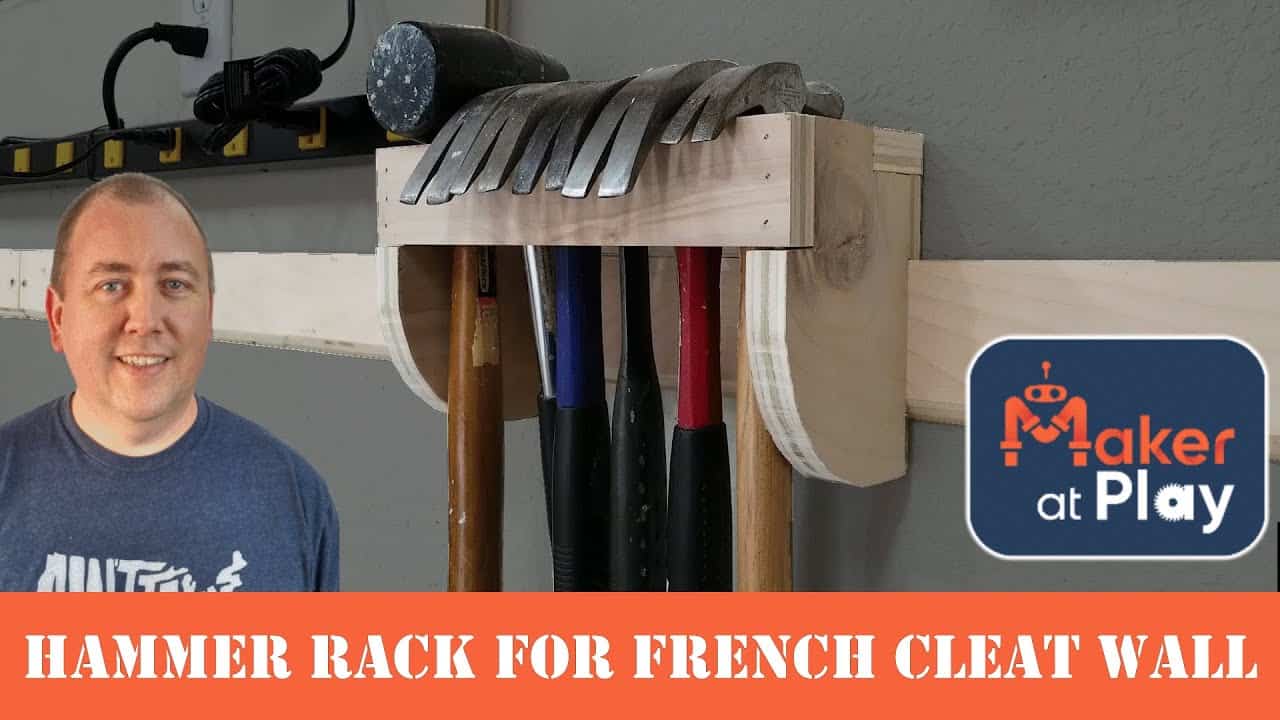
Michael starts by laying out the design using plywood offcuts to mock up the size and spacing. This step helps him visualize the overall shape and determine how many hammers the rack will hold comfortably.
Rather than building one generic shelf, the rack is customized based on the hammer collection it’s meant to support. The final shape features a series of angled slots that hold each hammer by the handle, keeping them upright and separated.
Materials and Tools
This build uses plywood for durability and strength. It’s an ideal material for shop projects because it holds fasteners well and remains stable over time, especially in fluctuating shop conditions.
The tools involved are basic: a miter saw or circular saw, brad nailer, wood glue, clamps, and a drill. Optional tools like a round-over bit or palm sander are used to give the final piece a clean and comfortable feel.
Cutting and Shaping the Rack Components
The first step is cutting the horizontal rails from plywood strips. These rails will form the top and bottom of the rack, supporting the hammer heads and handles.
Michael then moves on to cutting the side panels, which help define the depth and overall look of the rack. These panels are shaped for both function and style, with smoothed curves and rounded edges for safety.
Assembling the Rack
Assembly begins with attaching the side panels to the bottom rail using glue and brad nails. Once those are set, the front and top rails are added.
The top rail is especially important because it overlaps the French cleat when mounted. This overlapping section adds strength and ensures the rack stays firmly in place, even when fully loaded.
Proper alignment during assembly is key. Clamps help hold the pieces tight while the glue dries, and the nails provide immediate structure to keep things square.
Smoothing and Finishing
After the glue has set, all edges are sanded to remove any rough spots. While this rack is purely functional, Michael still takes the time to refine the surface for a better look and feel.
Some woodworkers may choose to apply a clear coat or shop finish, but Michael leaves the rack natural to match the rest of his shop furniture. Either way, the result is a polished storage solution that looks right at home on a workshop wall.
Mounting to the French Cleat
Mounting the rack is quick and easy thanks to the cleat system. The back of the rack is cut at a matching 45-degree angle, allowing it to hang securely on any cleat strip installed on the wall.
Because the French cleat design is modular, the rack can be removed or repositioned without tools. This flexibility makes it easy to rearrange your storage layout as your tool collection grows or changes.
A Shop Upgrade Worth Doing
This hammer rack takes up minimal space but delivers maximum convenience. It’s a great weekend project that adds immediate value to your workspace, keeping essential tools right where you need them.
Michael’s build is a reminder that even small shop upgrades can lead to big improvements in workflow. With just a few pieces of plywood and a handful of fasteners, you can solve one of the most common workshop annoyances.
Whether you follow his exact design or customize it for your own tool set, this project is a worthwhile addition to any French cleat wall system.
Support Michael by visiting his website: https://makeratplay.com/.

Matt’s Take
These are my personal thoughts and tips based on my own experience in the shop. This section is not written, reviewed, or endorsed by the original creator of this project.
French cleat systems are game-changers for shop organization, and this hammer rack is exactly the kind of simple project that shows why. The beauty of designing storage around your specific tools means everything has its place, and you’re not fighting with generic solutions that almost work.
That mockup step with plywood scraps is smart shop practice. Taking time to visualize spacing before cutting your good material saves headaches later. I always keep offcuts around for exactly this kind of planning work – it’s amazing how different something can feel in your hands versus in your head.
One thing I appreciate about this build is the attention to those rounded edges and smooth surfaces. Shop-made storage gets handled constantly, and rough edges or splinters become real annoyances over time. A few minutes with sandpaper during construction pays dividends every time you grab a tool.
The French cleat’s modularity really shines with projects like this. Being able to move your storage around as your workflow changes is huge, especially in smaller shops where every inch matters. Plus, building your own brackets means you can customize the depth and spacing for exactly what you need to store.