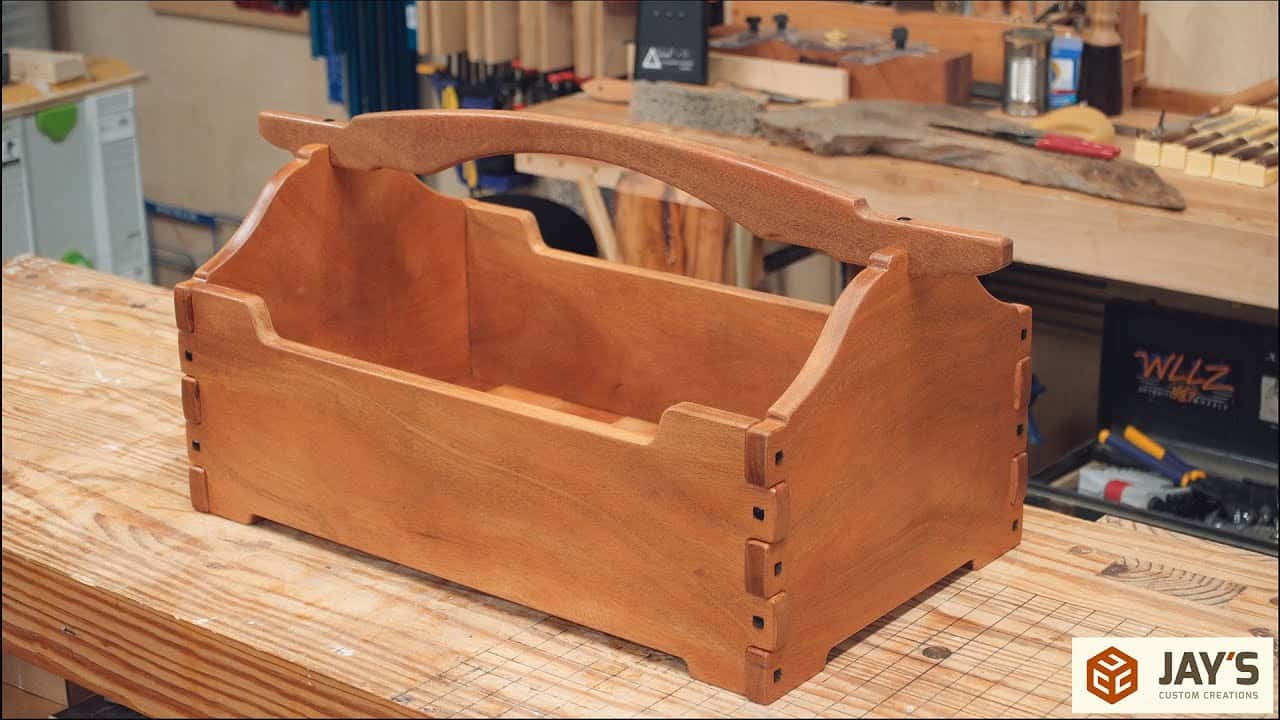
This project was built and designed by Jay Bates. It’s a functional and elegant tool tote that introduces classic Greene and Greene style elements using mahogany, ebony, and thoughtful joinery details.
With manageable size and straightforward techniques, this project is perfect for woodworkers wanting to explore the Greene and Greene aesthetic without committing to a large piece like a dresser or side table.
Watch the full video and subscribe to Jay’s channel:
Starting the Build
The project begins with a challenging mahogany board that has a noticeable twist. Rather than discarding the wood, Jay works around the imperfections by cutting smaller, manageable pieces based on the twists.
Because of the board’s shape, using a miter saw isn’t practical. Jay opts for hand cutting, which adds both control and a bit of a workout to the process.
Milling and Preparing the Wood
After rough cuts are made, the boards are milled using a standard process. Excess material is trimmed off at the bandsaw, followed by jointing one face flat and planing the opposite face to achieve a true surface.
With the stock ready, templates are traced onto the boards. These templates allow the pieces to be shaped consistently and are especially helpful in maintaining the flowing, subtle curves associated with Greene and Greene furniture.
Pattern Routing for Precision
Waste material is first removed using a bandsaw, with closer cuts handled by a jigsaw when needed. The templates are secured to the wood using double-sided tape, providing a strong hold without damaging the surface.
Using a flush trim router bit, Jay follows the template to create clean, repeatable shapes. This step ensures the visual consistency and fine craftsmanship that define the Greene and Greene style.
Rounding the Edges
All routed edges are given a roundover treatment to soften the look and feel. However, areas where the handle will be attached are left square to maintain joinery integrity.
After routing, minor touch-ups with a rasp and sandpaper help fine-tune the curves and transitions. This hands-on work ensures that every surface blends smoothly and feels comfortable in hand.
Building Strong and Stylish Joints
The box joints that hold the tote together are secured using screws, staying true to traditional Greene and Greene design. These screws will later be hidden with decorative ebony plugs, adding another classic visual element.
Pilot holes are drilled carefully at each finger joint using a drill press to ensure precision. Afterward, a small square punch is used to shape each opening, preparing them to receive the ebony plugs.
Shaping and Installing the Handle
The handle is milled from a matching piece of mahogany. Although the grain orientation isn’t perfect, the slight curve of the wood adds both strength and visual appeal to the design.
The shape is roughed out on the bandsaw and refined using a router setup with top and bottom bearings. This double-bearing technique minimizes tear-out and keeps the shaping process clean and controlled.
Final Assembly of the Tote
Once the main components are ready, the tote is dry-assembled to check fitment. The handle is temporarily placed without permanent attachment to make installing the ebony plugs easier.
Ebony stock is milled to final size, and each plug is tapped into place with careful fitting. This step not only strengthens the joints but also enhances the classic look with dark accents against the rich mahogany.
Constructing the Bottom Panel
Instead of using a solid bottom, Jay builds a random-width shiplap panel from milled scrap pieces. Each board is glued to cleats attached to the frame, allowing slight movement over time without causing splits or gaps.
This method maintains structural stability while giving the tote a bit of rustic character. It also makes efficient use of scrap wood, which fits the spirit of practical woodworking.
Finishing and Final Details
After full assembly, the tote is sanded thoroughly to remove any machining marks or rough spots. Special attention is given to blending the ebony plugs seamlessly into the surrounding mahogany.
A few coats of shellac are applied by hand, providing a rich, natural finish that highlights the warmth of the wood. Light sanding between coats ensures a smooth, durable surface ready for daily shop use.
A Classic Introduction to Greene and Greene Style
This tool tote captures the essence of Greene and Greene furniture—subtle curves, rounded joinery, contrasting materials, and clean craftsmanship. It’s a functional shop accessory that also serves as a practical exercise in a classic woodworking style.
Whether used to organize hand tools or as a decorative storage piece, this tote is a rewarding project that showcases skill and attention to detail.
Please support Jay by purchasing his plans here: Jay’s Custom Creations.

Matt’s Take
These are my personal thoughts and tips based on my own experience in the shop. This section is not written, reviewed, or endorsed by the original creator of this project.
The Greene and Greene aesthetic is all about those subtle curves and the interplay between light and dark woods. What I really appreciate about this approach is how the ebony plugs aren’t just functional—they become a key design element. When you’re working with contrasting woods like this, getting clean, consistent plug installation is crucial. A sharp chisel and patience during the fitting process will make all the difference in achieving that seamless look.
That shiplap bottom construction is brilliant for a tool tote. Solid bottoms can be problematic with seasonal wood movement, especially when you’re dealing with different grain orientations in the frame. The cleat system allows each board to move independently while staying secure. It’s also a great way to use up shop scraps—those random widths actually add visual interest rather than looking like an afterthought.
Hand-cutting twisted lumber is something we’ve all faced, and this approach here is spot-on. Sometimes the best solution isn’t fighting the wood but working with what it gives you. Those gentle curves in the handle that came from the board’s natural shape probably ended up looking more organic than a perfectly straight piece would have. Shellac is an excellent choice for shop tools too—it builds up quickly, feels great in your hands, and you can always add another coat down the road without any compatibility issues.