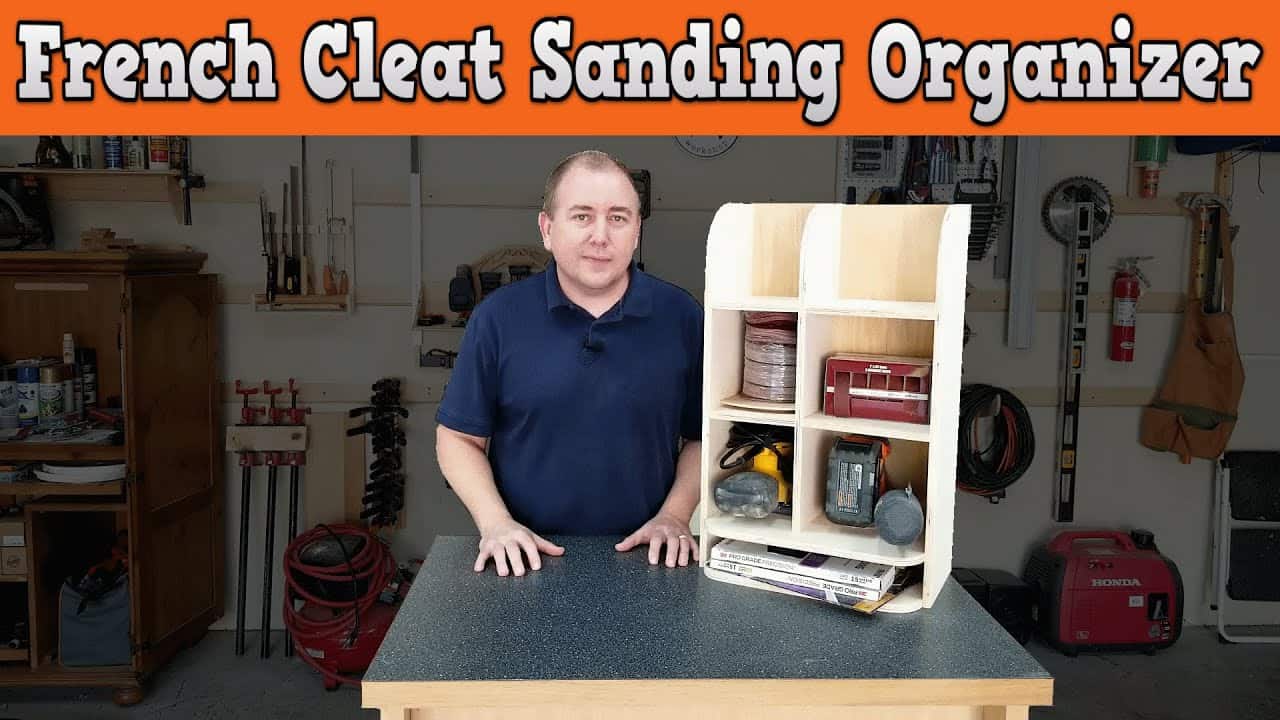
This project was built and designed by Michael from Maker At Play. It’s a wall-mounted sanding station built to fit on a French cleat wall, offering smart storage for sanders, sanding discs, and more.
Designed to reduce clutter and improve workflow, this organizer puts all your sanding gear in one place while keeping your workspace clean and accessible. It’s a great project for woodworkers looking to improve shop efficiency without sacrificing style or durability.
Watch the full video and subscribe to Michael’s channel:
Why a French Cleat System Works
Michael’s sanding organizer takes full advantage of the French cleat system—a wall-mounted method that allows tool stations to be added, moved, or adjusted as needs change. This flexibility is ideal for shops where every inch of wall space counts.
With the cleat, the sanding station can be positioned exactly where it’s needed and easily removed or relocated. It also allows for future tool station upgrades, so woodworkers can expand their wall system without reworking their layout.
Planning the Design with Fusion 360
While some projects benefit from improvising as you go, Michael took a more structured approach for this one. He used Fusion 360 to model the sanding station before cutting any material.
This planning step helped visualize the design, refine proportions, and work out key dimensions. Michael also referenced a tutorial by Paul Jenkins, which provided useful guidance for using Fusion 360 specifically for woodworking projects.
Material Choices and Tools
For durability and visual appeal, hardwood was used for most of the build. Though the video doesn’t list every tool, the project includes the use of a bandsaw, a belt sander, and a CNC machine for cutting clean, consistent dividers.
These tools allowed for accurate shaping and smoother finishes. Even though the CNC machine adds precision, the project can be adapted for traditional tools with a bit of extra layout time.
Cutting and Shaping Components
After planning, the boards were milled flat and cut to size. To improve safety and add a polished look, Michael rounded the edges of most components before moving to the bandsaw.
To ensure matching curved parts, several boards were taped together and cut simultaneously. A compass was used to lay out smooth, symmetrical arcs. After rough cutting on the bandsaw, sanding cleaned up the curves and removed any saw marks.
Assembling the Case
Assembly started with gluing and nailing the core structure. Michael shared a useful insight during this step: had he pre-attached the center divider to the shelf before building the full case, assembly would have gone faster and smoother.
Still, using a nail gun and a square helped align the case properly. A plywood back panel was added to square up the structure and add strength—an important detail for wall-mounted storage.
While some nails poked through during assembly, Michael points out that mistakes like this are part of the process, especially in shop furniture where function is more important than perfection.
Organizing Sandpaper with CNC-Cut Dividers
One of the most helpful features of the sanding station is its sandpaper storage section. Dividers were cut using a CNC machine to sort different grits into clearly labeled slots, making it easy to grab the right paper during a project.
These dividers are slotted into place and can be adjusted or replaced later if storage needs change. Additional shelving space was also left open for future tools or sanding accessories.
This type of planning allows the station to grow along with the shop—something many woodworkers appreciate as their tool collection expands.
A Custom Fit for Any Workshop
Michael’s design is meant to be adaptable. While his version fits his current set of tools and paper, the layout can be adjusted based on what each woodworker uses most.
Whether storing orbital sanders, hand sanding blocks, or specific paper shapes, the organizer can be tailored to fit. The modular nature of the French cleat system makes this especially easy to modify over time.
Lessons Learned and Takeaways
This project shows how a bit of extra planning pays off. From using design software to preparing clean joints and adjusting the build process on the fly, Michael demonstrates practical strategies that improve both speed and final results.
Even small mistakes, like misfired nails, are framed as learning moments—something every woodworker encounters. It’s this real-world experience that makes projects like this especially valuable to watch and learn from.
Support Michael by visiting his website: https://makeratplay.com/.

Matt’s Take
These are my personal thoughts and tips based on my own experience in the shop. This section is not written, reviewed, or endorsed by the original creator of this project.
French cleat systems are one of those shop upgrades that really transform how you work. Once you start using them, you’ll wonder how you managed without that flexibility to move and adjust your tool storage as your needs change. The ability to pull down a complete sanding station when you need it, then hang it back up to clear the bench, is a game-changer in smaller shops.
Michael’s approach of modeling this in Fusion 360 before cutting is smart, especially for a project with multiple components that need to fit together precisely. When you’re dealing with sanders of different sizes and trying to maximize storage in a compact footprint, that upfront planning time really pays off. It’s much easier to adjust proportions on screen than to remake parts that don’t quite work.
The sandpaper organization system here is particularly well thought out. Anyone who’s spent time digging through a box of mixed grits knows how valuable proper storage is. Having each grit clearly visible and accessible means you’re more likely to use the right paper for the job instead of just grabbing whatever’s on top. That CNC approach gives clean, consistent dividers, though you could achieve similar results with a router and some careful layout work.
The modular design is what really makes this shine long-term. As your sander collection grows or changes, you can modify the layout without starting over. That’s the beauty of building your own shop furniture – it can evolve with your needs.