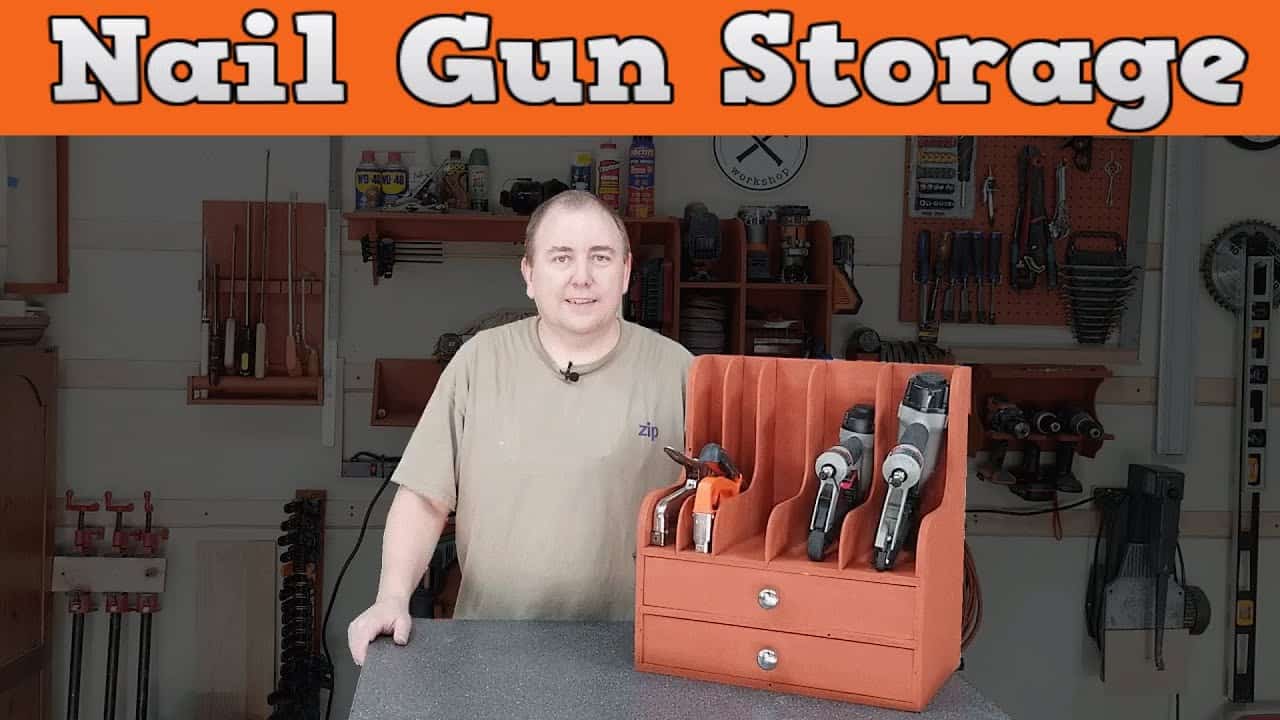
This project was built and designed by Michael from Maker At Play. It’s a custom-built storage cabinet for organizing nail guns, staple guns, and their accessories—all mounted conveniently with a French cleat system.
The design strikes a smart balance between function and space-saving. With vertical stalls and dedicated drawers, the cabinet keeps everything tidy and accessible while freeing up valuable workspace.
Watch the full video and subscribe to Michael’s channel:
Tackling the Tool Clutter Problem
Like many woodworkers, Michael found himself constantly shifting around nail guns and supplies just to get started on a project. These tools tend to be bulky, and without a clear system, they clutter up the bench or get misplaced entirely.
His goal was to create a compact solution that gave each tool and accessory its own spot. This would not only make the space more efficient but also reduce downtime looking for the right fasteners.
Design Inspiration and Customization
The final design was inspired by builds from DIY Tyler and Dreadknot Woodshop. Michael took the parts he liked best from both and adapted them into a layout that suited his own workflow.
The cabinet features vertical stalls across the top for several nail and staple guns, each fitted to size. Below that are two drawers—one for nails and one for staples—making it easy to sort and grab what’s needed without digging through bins or boxes.
Planning the Layout
Before picking up any tools, Michael sketched out the concept and walked through the dimensions. While he didn’t share exact measurements, the planning process focused on fit, spacing, and weight distribution.
The key here was getting the stalls just large enough for each gun to slide in and out smoothly, while keeping the overall footprint of the cabinet small enough to hang easily on the wall.
Material Choice for Strength and Simplicity
Michael used half-inch plywood for the entire build, valuing its strength, light weight, and affordability. It was important to use material that could handle the load of both the tools and drawers filled with nails and staples.
Flatness was also a consideration—warped boards would affect drawer slides and tool alignment. He selected sheets that were as straight as possible to ensure smooth assembly.
Cutting and Joinery
Once the layout was finalized, the plywood was broken down into panels. Each piece was squared carefully to make assembly easier down the line. Dados were cut into the sides to hold the internal dividers and shelves in place.
These grooves helped reinforce the cabinet’s structure and also made it easier to align the pieces during glue-up. Michael points out that this step took time but paid off by making the rest of the build more precise.
CNC for Clean Profiles
To shape the dividers, Michael used a CNC machine to cut one detailed profile. This first piece then became a physical template, helping him quickly replicate the others.
While not necessary for every shop, the CNC gave him confidence in the curves and spacing, especially for the stalls holding the nail guns. The repeatability helped keep the project moving efficiently.
Assembling the Cabinet
Glue and brad nails were used for the main assembly. The dados ensured each part fit snugly, reducing the need for clamps and preventing slippage during the build.
Michael took care to keep everything square as he worked, checking alignment as each new panel went in. The result was a strong and clean structure with tight joints throughout.
Finishing Touches
With the cabinet assembled, a round of sanding smoothed out the surfaces and edges. Michael then applied a coat of paint for a clean, finished look. The color also helps the cabinet stand out from the background, making the tools more visible.
While some may choose to stain or clear-coat their plywood, the painted finish worked well for a shop setting and gave the piece a professional appearance.
Real-World Use and Final Notes
After mounting the cabinet and loading it with tools, Michael noticed a few things he’d tweak in a future version. The stall heights could be adjusted for a tighter fit, and the drawer depth could be slightly increased for added capacity.
Still, the cabinet performed exactly as intended: keeping nail guns and staples in one compact location, easy to reach, and out of the way. The French cleat mounting makes it simple to move or reposition as needed.
A Practical Upgrade for Any Shop
This nail gun storage cabinet solves a common shop issue with a simple, well-built solution. Vertical storage keeps tools secure, while drawers prevent loose accessories from getting lost.
For any woodworker looking to clean up their workspace, this build offers inspiration and practical takeaways. It’s a great reminder that small upgrades can have a big impact on shop organization.
Watch the full video and subscribe to Michael’s channel:
(Embed YouTube video here)
Support Michael by visiting his website: https://makeratplay.com/.

Matt’s Take
These are my personal thoughts and tips based on my own experience in the shop. This section is not written, reviewed, or endorsed by the original creator of this project.
French cleat systems are one of my favorite shop organization solutions because they make it so easy to reconfigure your wall storage as your needs change. The beauty of this approach is that you can move the entire cabinet to a different spot or add more units alongside it without any major reconstruction.
When working with half-inch plywood for a project like this, I always pay close attention to the grain direction on the dados. Running those grooves parallel to the face grain gives you much stronger joints, especially important when the cabinet will be holding heavier tools. The CNC template approach Michael used is smart too — even if you don’t have a CNC, you can achieve similar results by making a careful template with a jigsaw and then using a flush-trim bit with your router.
One thing I really appreciate about this build is the thoughtful drawer sizing. Nail and staple organization can quickly become a mess if you just throw everything in one big drawer. Having dedicated spaces keeps you from digging around when you’re in the middle of a project. The vertical tool storage is equally practical — those guns can be surprisingly heavy, and having them properly supported in individual stalls prevents them from banging into each other and getting damaged.
The French cleat mounting system also distributes the weight evenly across your wall, which is crucial when you’re hanging a loaded cabinet. Just make sure your cleat is secured into studs, especially with all those heavy pneumatic tools.