This project was built and designed by Mike Montgomery from Modern Builds. It’s a space-saving folding workbench that mounts to the wall and provides a solid, stable surface for woodworking, DIY projects, or any workspace that needs to stay flexible.
Designed for tight workshops or garages, this workbench folds up vertically when not in use, keeping your floor space clear without compromising on strength. Mike’s approach is efficient, beginner-friendly, and makes great use of simple materials like plywood and 2x4s.
Watch the full video and subscribe to Mike’s channel:
Why a Folding Workbench Is a Smart Upgrade
Many workshops deal with limited space, especially in shared garages or basement setups. This design offers a practical solution—build a sturdy work surface that folds flat against the wall when not in use.
It’s more stable than setting up sawhorses and plywood, and more compact than a fixed work table. Whether you’re working with hand tools or small machines, it gives you the flexibility to adapt your space without sacrificing function.
Building the Leg Assembly
The base of the workbench starts with a leg assembly made from 2x4s. These are joined together with stretchers to create a strong and stable foundation.
Instead of basic butt joints, Mike uses half lap joints where the stretcher meets each leg. This creates a seamless fit that increases both strength and durability. A circular saw and chisel are used to cut and clean up the joints for a flush connection.
Adding Shape and Function to the Legs
To help the legs swing freely when the bench folds, Mike rounds the tops using a simple homemade compass to trace a clean curve. These curved ends also improve the overall look of the workbench.
After marking the arc, the curves are cut with a circular saw to maintain square and accurate results. Taking a few minutes here adds both function and style to the finished piece.
Constructing the Workbench Top
The top is built from a plywood sheet secured to a 2×4 frame. The plywood extends slightly beyond the frame on all sides to create a useful overhang for clamping and edge work.
The frame is assembled using pocket hole screws and glue. Square corner clamps help hold the parts in place during assembly, ensuring that the frame stays perfectly aligned as you drive the screws in.
Attaching the Plywood Surface
With the frame built and squared, the plywood top is secured from underneath using wood screws. Mike also adds glue to increase the holding strength, making sure the top remains solid under load.
The result is a wide, stable surface with a strong connection to the frame. This step is where the workbench starts to feel substantial and shop-ready.
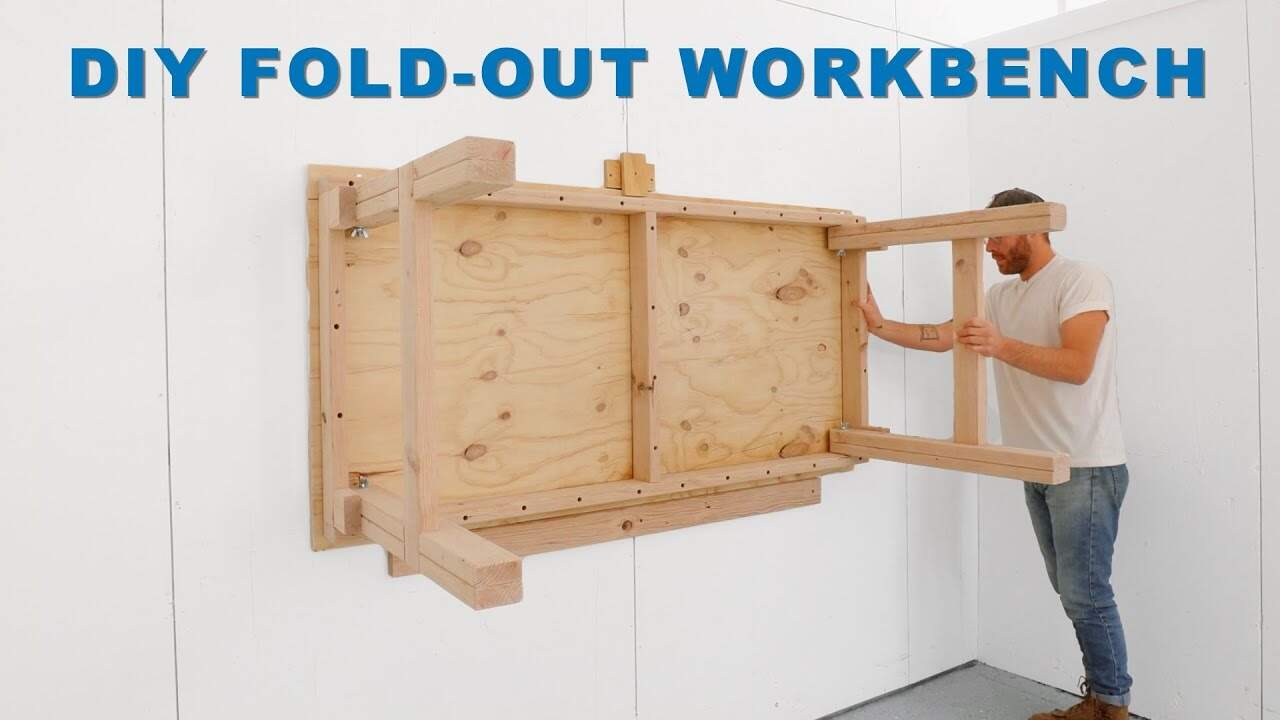
Mounting and Folding the Legs
To attach the legs to the workbench top, Mike drills pilot holes through the top frame. Bolts, washers, and wing nuts are used to hold the legs in place while allowing them to fold when needed.
This mounting method keeps the legs strong during use, but flexible when it’s time to stow the bench away. The use of wing nuts means no tools are needed to loosen or tighten the legs, adding convenience to the design.
Stop Blocks for Stability
To make sure the legs lock in at a precise 90-degree angle, stop blocks are added to the inside corners of the leg assembly. These blocks act as physical stops, so the legs don’t shift under weight or movement.
It’s a small but important detail that improves stability and helps the workbench feel secure, even during more aggressive work like sanding or drilling.
Finishing Touches
To clean up the overall look, Mike adds wooden dowels over exposed screw holes. These can be flush-cut and sanded down, creating a smooth, finished appearance.
No stain or paint is necessary unless you want to match it to existing shop furniture. The natural look of the plywood and 2x4s gives it a clean, utilitarian feel.
Mounting the Bench to the Wall
The final step is to secure the bench to the wall using a horizontal cleat. This cleat holds the workbench in place when it’s folded up, keeping it from swinging out or falling forward.
Mike emphasizes making sure the cleat is level before attaching it, as it affects the folding motion and the overall fit of the bench. Once installed, the bench folds up cleanly and stores flat against the wall.
A Compact Bench That Does the Job
This project is a great example of form meeting function. The folding wall-mounted workbench is strong, space-efficient, and perfect for small shops or multipurpose spaces.
Mike’s clear explanation and thoughtful design make this a solid build for beginners or anyone looking to improve their shop layout. It’s practical, affordable, and built to last.
Please support Mike by visiting his website: https://www.modernbuilds.com/.

Matt’s Take
These are my personal thoughts and tips based on my own experience in the shop. This section is not written, reviewed, or endorsed by the original creator of this project.
This design hits the sweet spot between functionality and space efficiency. The half-lap joints on the leg stretchers are a smart choice — they distribute stress better than simple butt joints and really lock everything together. If you’re new to half-laps, take your time with the layout and test your cuts on scrap first. A sharp chisel makes all the difference for clean shoulders.
The bolt-and-wing-nut mounting system is brilliant for a folding bench. It gives you that solid connection during use but lets you break it down quickly when needed. Those stop blocks are crucial too — without them, you’ll spend way too much time fiddling with leg positioning every time you set up. I’d suggest chamfering the edges of those blocks slightly so they don’t catch or bind when folding.
For the wall cleat, double-check your stud locations with a good finder. This bench will see real loads, and you want that cleat hitting solid framing. If you’re mounting to concrete or block walls, use proper masonry anchors rated for the weight. A level cleat makes all the difference in how smoothly the bench folds — trust me on that one.