This project was built and designed by Mike Montgomery from Modern Builds. It’s an 8-foot-long floating media console that blends clean design, smart lighting, and practical storage for a standout home theater upgrade.
Designed to mount securely to the wall and conceal wires and electronics, the project also includes a sleek French cleat system and built-in Philips Hue LED lighting. Mike walks through every step in detail, offering practical tips that make this modern build approachable for woodworkers at nearly any skill level.
Watch the full video and subscribe to Mike’s channel:
Starting with a Clean Workspace
Before cutting begins, Mike sets up a makeshift cutting mat using polystyrene insulation. This protects the floor while offering a stable surface for cutting sheet goods with precision.
Having a clean, dedicated workspace also makes it easier to lay out parts, keep materials organized, and stay efficient throughout the build. The early setup goes a long way in preventing mistakes later on.
Planning Dimensions for Storage
One of the most important steps is making sure the console is deep enough to store larger electronics. Mike recommends planning around the biggest component to avoid tight fits or overhang.
As he cuts down the plywood panels, offcuts are set aside for later use—especially for mounting hardware like the French cleat. These small adjustments and reuse opportunities help make the project more efficient and budget-friendly.
Constructing the Cabinet Box
The exterior frame of the console includes the top, bottom, and side panels. Mike uses a pocket hole jig to keep joinery hidden while speeding up the assembly.
Glue is applied to all joints for long-term strength, and the parts are clamped tightly to dry. Internal dividers are made slightly shallower than the outer frame to leave room behind the cabinet for wiring and airflow.
Pocket holes are later concealed with plugs for a seamless finish. With the cabinet box assembled, attention turns to wall-mounting hardware and the custom front panel.
Building a French Cleat System
To mount the cabinet securely to the wall, Mike cuts a long French cleat from leftover plywood. The cleat is cut at a 45-degree angle, creating two matching halves—one attached to the wall and one to the back of the cabinet.
This setup provides a strong connection while still allowing the console to be removed easily if needed. The cleat also makes leveling and positioning the console much simpler during final installation.
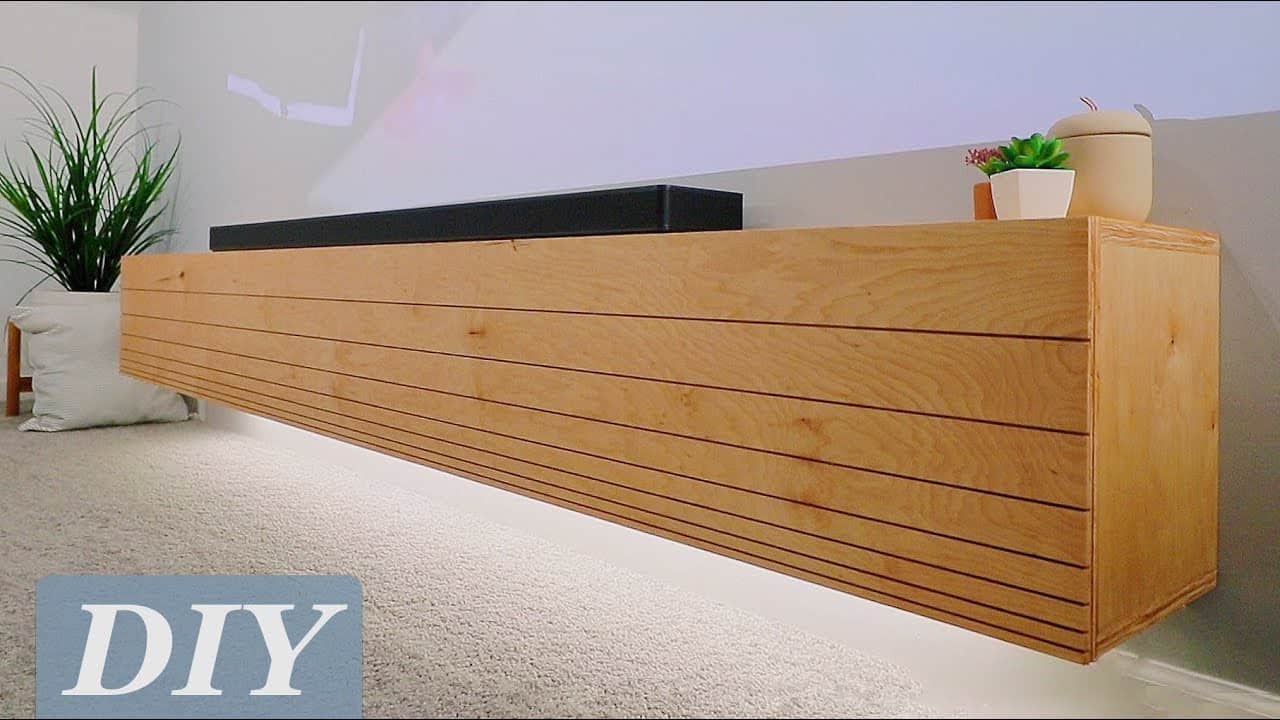
Creating a Custom Front Door
Instead of a plain panel, the front of the media console gets a sunburst relief pattern. Mike achieves this look by making a series of angled grooves using precise spacing—wider at the top and closer at the bottom—to create a gradient visual effect.
The relief design adds texture and interest without being overpowering. Once cut, the panel is sanded thoroughly and prepared for finish.
Surface-mounted hinges make installing the door easier since no mortising is required. Additional hinges in the center help stabilize the door and reduce sag over time.
Clean Wiring and Finish Details
After the box is sanded smooth, Mike applies a natural oil-based finish. This enhances the wood grain and adds a subtle sheen without obscuring the plywood layers, especially around the exposed edges.
To control electronics, cords are routed neatly through the back and corners of the cabinet. The reduced depth behind the dividers helps keep cables out of view while still accessible if needed.
Mike also drills small pilot holes and uses adhesive-backed mounts to guide wires invisibly, keeping the front and bottom surfaces clean and modern.
Adding Undermount LED Lighting
For a contemporary touch, Philips Hue LED strips are added beneath the console. The strips come with an adhesive backing, making them easy to install along the bottom edge of the cabinet.
Once connected to the Hue hub, the lights can be controlled through a smartphone app, allowing you to change brightness and color with ease. The lighting creates a soft underglow that elevates the room’s ambiance, especially during movie nights.
The LEDs are installed before final mounting, and extra care is taken to leave enough slack for connection while hiding any visible cables.
Mounting the Console to the Wall
With the build complete, it’s time to install the console. Mike secures the wall-mounted cleat directly into studs for maximum support.
Once the cleat is anchored, the console slides into place and locks in securely. Additional screws may be added for safety, depending on wall structure and weight distribution.
Optional upgrades, like adding a pendant light above or additional acoustic panels around the media setup, can finish off the entertainment area. Mike briefly shares some tips for light mounting using damage-free adhesive tape for renters or temporary setups.
A Sleek, Functional Build with Big Impact
This floating media console offers a great balance between form and function. It clears floor space, conceals electronics, and adds ambient lighting—all while maintaining a clean, modern appearance.
Mike’s build is thoughtfully planned, well-executed, and highly adaptable. Whether you want a similar 8-foot span or need to scale it down for a smaller room, the techniques and tips apply just as well.
Please support Mike by visiting his website: https://www.modernbuilds.com/.

Matt’s Take
These are my personal thoughts and tips based on my own experience in the shop. This section is not written, reviewed, or endorsed by the original creator of this project.
French cleats are one of my favorite mounting solutions for heavy wall cabinets like this. The beauty is in how they distribute weight across multiple studs while giving you that satisfying “click” when everything locks into place. Just make sure to find at least three studs for an 8-foot console—the extra support is worth the effort, especially when you’re loading it up with electronics.
That sunburst relief pattern Mike created really makes this piece stand out from typical media consoles. The gradient spacing technique takes some patience to lay out, but it’s a great way to add visual interest without complicated joinery. If you’re new to this type of detail work, I’d recommend making a test piece first to dial in your spacing and groove depth.
The built-in cable management is smart planning. Leaving that extra space behind the dividers might seem like wasted storage at first, but trust me—you’ll appreciate having room for power strips, cable routing, and heat dissipation once everything’s installed. Modern electronics generate more heat than you’d think, and good airflow keeps everything running smoothly for years.