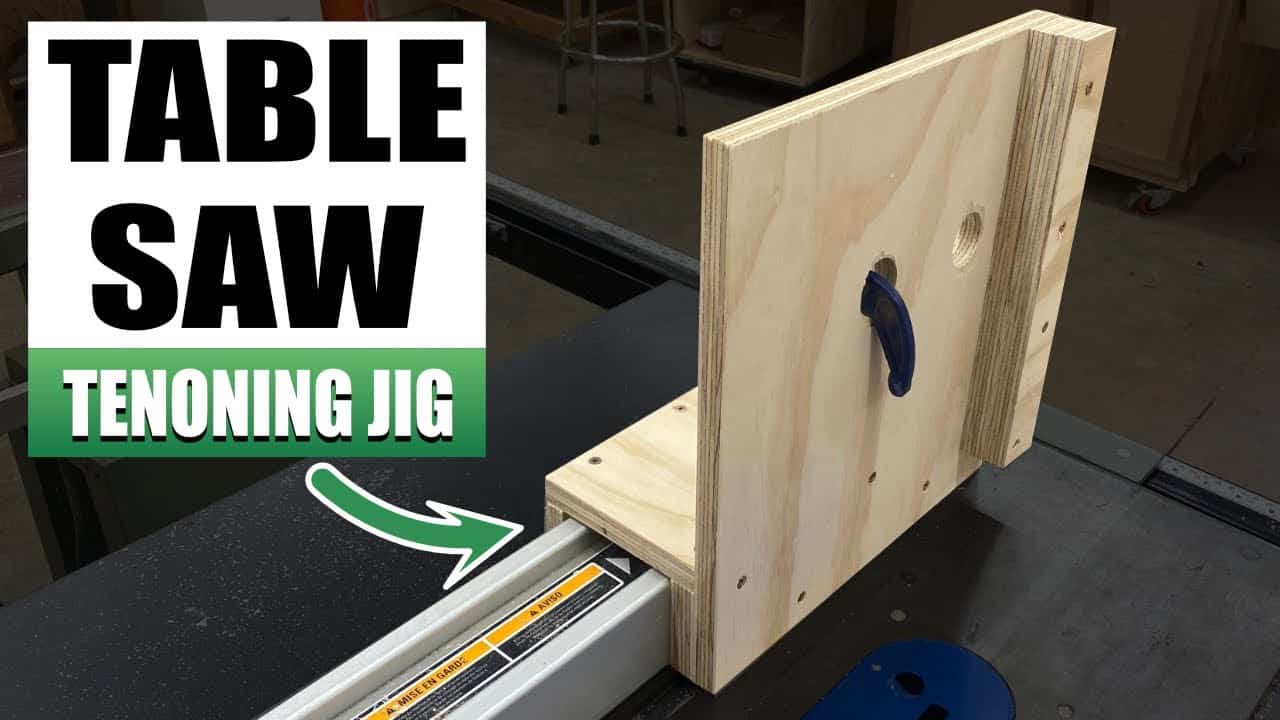
This project was built and designed by Nick from Rocky River Woodworks. It’s a shop-made tenoning jig built from scrap plywood and designed to improve precision and safety on the table saw.
A tenoning jig helps you make consistent, accurate tenons by holding your workpiece vertically as it’s pushed through the blade. Nick’s simple and effective design fits over the table saw fence and can be built in an afternoon using leftover materials.
Watch the full video and subscribe to Nick’s channel:
What a Tenoning Jig Does
A tenoning jig holds your material upright and square to the blade, making it easier to cut accurate cheeks and shoulders. Instead of relying on steady hands or tricky sleds, the jig creates repeatable results with less effort.
More importantly, it boosts safety by holding the piece securely throughout the cut. This reduces the risk of shifting, binding, or kickback—all common issues when trying to cut tenons freehand.
Materials and Tools
Nick builds this jig almost entirely from three-quarter-inch plywood scraps. It’s a great way to use up offcuts that might otherwise collect dust in the corner of your shop.
The main pieces include two vertical sides and one horizontal top piece that spans the table saw fence. Fasteners, glue, and a few clamps round out the material list. Basic shop tools like a miter saw, drill, and countersink bit are all that’s needed to get it done.
Measuring for a Custom Fit
The build begins by measuring the width and height of your table saw fence. These measurements are essential to ensure the jig fits snugly without being too tight to move or too loose to stay in place.
Nick recommends test-fitting each side piece before attaching them. If your fence tapers or has uneven wear, adjusting the fit at this stage will help keep the jig square during use.
Cutting and Assembling the Jig
Once the dimensions are finalized, the side and top panels are cut to size. The top piece acts as a bridge across the table saw fence, while the side panels ride flush against it for support.
Assembly starts with securing the side panels to the top using wood glue and screws. Each screw is countersunk to prevent it from interfering with workpieces or getting caught during use.
Keeping everything square is critical here. Nick checks for flush alignment before driving each screw to make sure the jig tracks evenly across the fence.
Adding Clamp Support
To hold the workpiece in place during the cut, Nick drills holes into the back face of the jig. These allow clamps to pass through and secure your material from behind.
Using a Forstner bit on the drill press, the holes are sized to fit standard F-style clamps. Nick leaves enough space around each hole to accommodate different clamp positions depending on the size of the workpiece.
This extra step adds major versatility to the jig. Whether working with narrow stock or large panels, the clamp holes ensure a solid hold every time.
Making the First Cut
With the jig built and fitted over the table saw fence, Nick loads a test piece to check alignment and adjust the blade height. The jig holds the piece upright and stable, letting the blade cut along the length of the tenon shoulder.
This method results in accurate, repeatable cuts with minimal setup. Once the first tenon is done, it’s easy to run a batch of identical pieces using the same setup.
Nick notes that this approach works especially well for mortise-and-tenon joinery, drawer construction, or any project where precision is key. The jig keeps everything consistent while reducing the time it takes to dial in individual cuts.
Customizable for Your Needs
While this version is built to fit Nick’s saw, the design can easily be modified for different fence sizes or cutting needs. You could add stops for repeatable cuts or attach vertical guides for narrower stock.
Because it’s made from plywood, the jig is lightweight and easy to store when not in use. It’s also inexpensive to repair or replace if it ever gets damaged in the shop.
Nick built his using materials already on hand, proving that shop improvements don’t always require big purchases. A few hours of work can lead to better results on every future project.
A Shop Jig Worth Building
If you’ve ever struggled to get tight-fitting tenons or wanted a more controlled way to cut joinery on the table saw, this jig is worth trying. It simplifies the process, makes your cuts safer, and offers professional-level accuracy with minimal investment.
Nick’s build shows how a straightforward design can solve common workshop challenges without overcomplicating things. It’s an ideal upgrade for hobbyists and serious woodworkers alike.
Please support Nick by visiting his website here: https://www.rockyriverwoodworks.com/.

Matt’s Take
These are my personal thoughts and tips based on my own experience in the shop. This section is not written, reviewed, or endorsed by the original creator of this project.
What I love about Nick’s design is how it solves the biggest challenge with table saw tenons — keeping everything stable and square throughout the cut. The clamp-through holes are a brilliant touch that really sets this jig apart from simpler versions. Being able to secure your workpiece from behind eliminates that nerve-wracking moment when you’re trying to hold everything in place with just your hands.
The plywood construction is spot-on for this application. It’s stable enough to handle the forces involved but won’t damage your saw blade if there’s accidental contact. Plus, at around $15-20 in materials, it’s hard to beat the value compared to commercial versions that can run $100 or more.
One thing worth emphasizing is the importance of that initial fit-testing Nick mentions. A jig that’s too loose will give you sloppy results, while one that’s too tight becomes a wrestling match every time you use it. Take your time with those measurements — a few extra minutes upfront will save you hours of frustration later.
If you’re new to tenon cutting, this jig will completely change your experience. The confidence that comes from having your workpiece locked down securely makes all the difference in both safety and accuracy.