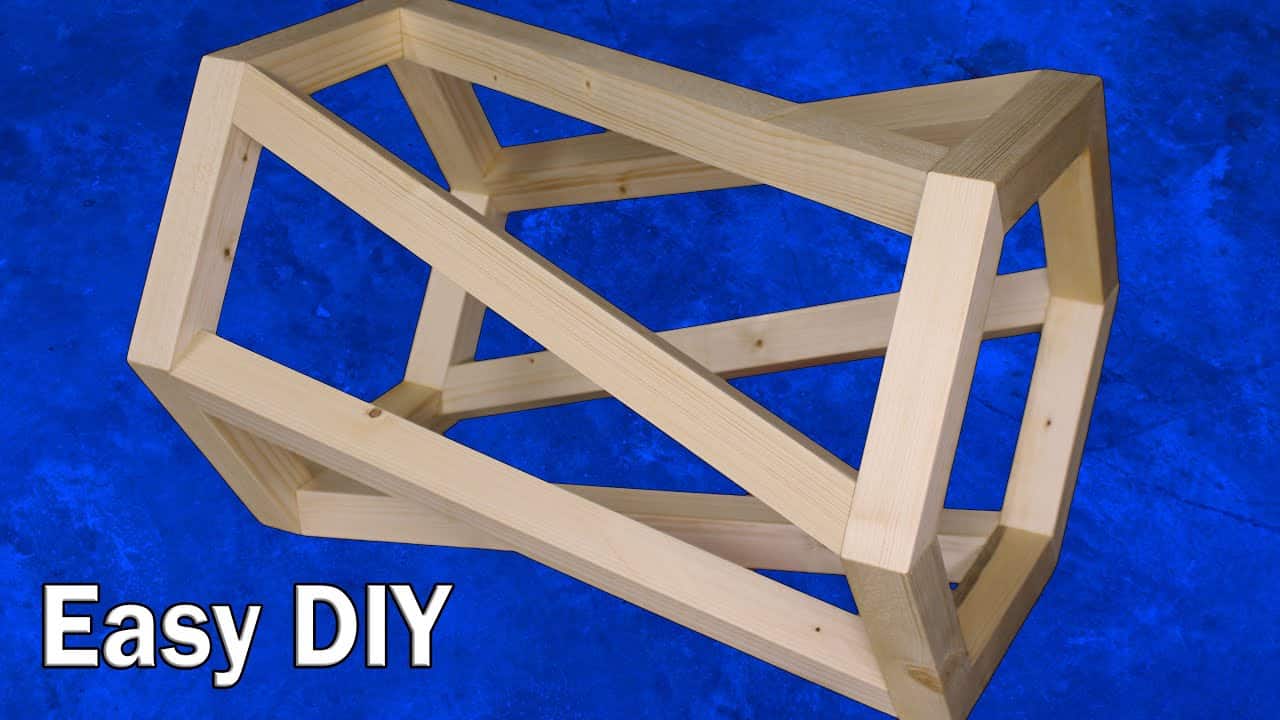
This project was built and designed by Clinton from Specific Love Creations. It’s a geometric table with a clever spiral leg design that creates a stunning visual illusion while remaining approachable for woodworkers at nearly any skill level.
The design looks like the legs are twisting between a hexagon-shaped top and base, but the build itself is simpler than it appears. With careful planning, a few angled cuts, and some patience, this table comes together beautifully.
Watch the full video and subscribe to Clinton’s channel:
A Concept That Looks Complicated—But Isn’t
The standout feature of this table is its twisting-leg illusion. By attaching angled legs between matching hexagonal top and bottom panels, the table gives the appearance of motion, even when standing still.
To achieve this look, Clinton recommends using six legs at minimum. This helps create the spiral illusion and gives the table structural balance. The material of choice is 2×4 lumber, which keeps the project budget-friendly and accessible.
Selecting and Preparing Lumber
Clinton begins by selecting boards with minimal knots or defects, which simplifies the cutting and fitting process later on. Clean, straight-grained lumber makes it easier to get precise angles and tight joints.
The 2x4s are cut down into smaller segments using a table saw. These pieces will eventually form the sides of the hexagons for the tabletop and base. Square edges and straight cuts are essential for this part of the build.
Cutting the Hexagonal Sides
Each of the six segments that make up the top and bottom are cut with consistent 30-degree angles on both ends. This allows the pieces to join seamlessly into a hexagon without gaps.
A stop block is used at the saw station to ensure that all pieces are identical in length. This not only improves symmetry but also reduces errors when assembling the final structure.
Dry Fitting and Assembling the Panels
Before applying glue, Clinton does a dry fit of each hexagon. This step is critical to identify any fit issues and make minor adjustments before moving forward.
Once the pieces fit cleanly, wood glue is applied, and the sections are clamped using a strap clamp to hold everything in place while drying. The result is two clean, symmetrical hexagonal frames that will become the top and bottom of the table.
Designing and Cutting the Legs
With the frames completed, it’s time to move on to the legs. Each leg is cut to the same length, but angled cuts on both ends give them the illusion of twisting between the hexagon corners.
The angle must be measured carefully so that each leg stretches from one corner of the top hexagon to the adjacent corner on the bottom. This layout causes the legs to crisscross slightly, generating the spiral effect as you walk around the table.
Smoothing and Attaching the Legs
After all six legs are cut and verified for fit, the rough edges are sanded smooth. The ends are kept sharp and flat where they will attach to the top and bottom frames to ensure stability.
Each leg is then attached to the panels using screws or strong adhesive. At this point, the spiral illusion really starts to become apparent. The symmetry of the hexagon combined with the angled legs gives the appearance of rotation, despite the structure being completely stationary.
Finishing Options and Personal Touches
Before final assembly, Clinton recommends sanding the full structure and applying any stain or protective finish. It’s easier to apply these treatments while the parts are still separated.
This is also a good opportunity to personalize the table. Some builders might opt for a natural wood finish, while others may choose bold paint colors or a tinted stain. You can also experiment with different top materials, such as glass, butcher block, or plywood, to suit your decor.
Securing the Top and Final Assembly
Once the legs are securely fastened and the finish is dry, the top panel is installed. This locks everything into place and completes the table.
The result is a compact, eye-catching piece of furniture that’s both functional and visually impressive. Whether you use it indoors or outside, the spiral table brings a touch of creativity to any space.
A Conversation Piece and Skill Builder
This project is an excellent example of how simple techniques—like angled cuts and smart joinery—can be used to create complex-looking designs. It’s a great build for anyone looking to improve their accuracy with compound angles or just have some fun making something unique.
Clinton walks through each step in his video with clear instructions, making this project approachable for newer woodworkers while still satisfying for experienced makers.
Watch the full video and subscribe to Clinton’s channel:

Matt’s Take
These are my personal thoughts and tips based on my own experience in the shop. This section is not written, reviewed, or endorsed by the original creator of this project.
The visual impact of this spiral table really comes down to precision in those 30-degree cuts. When you’re cutting hexagon segments, even a degree or two off can throw the whole assembly out of whack and kill that clean geometric look. I always keep a digital angle gauge handy for projects like this to double-check my miter saw setup before making cuts.
One thing I really appreciate about this design is how it demonstrates that impressive-looking furniture doesn’t always require exotic woods or expensive tools. Standard 2×4 lumber and basic shop equipment can create something genuinely striking when the geometry is planned out well. The key is taking your time with the layout and test fits.
For anyone tackling this build, pay special attention to grain direction when selecting your lumber. You want the grain running lengthwise on those angled legs for maximum strength, especially since they’re carrying the load at compound angles. And don’t rush the clamping process on those hexagons — strap clamps can be tricky to get even pressure, so check for gaps as you tighten.
The finishing stage is where you can really make this piece your own. A clear finish will highlight the wood grain and emphasize the geometric lines, while a solid color can make the optical illusion even more dramatic. Either way, this is the kind of project that gets people asking “how did you make that?”