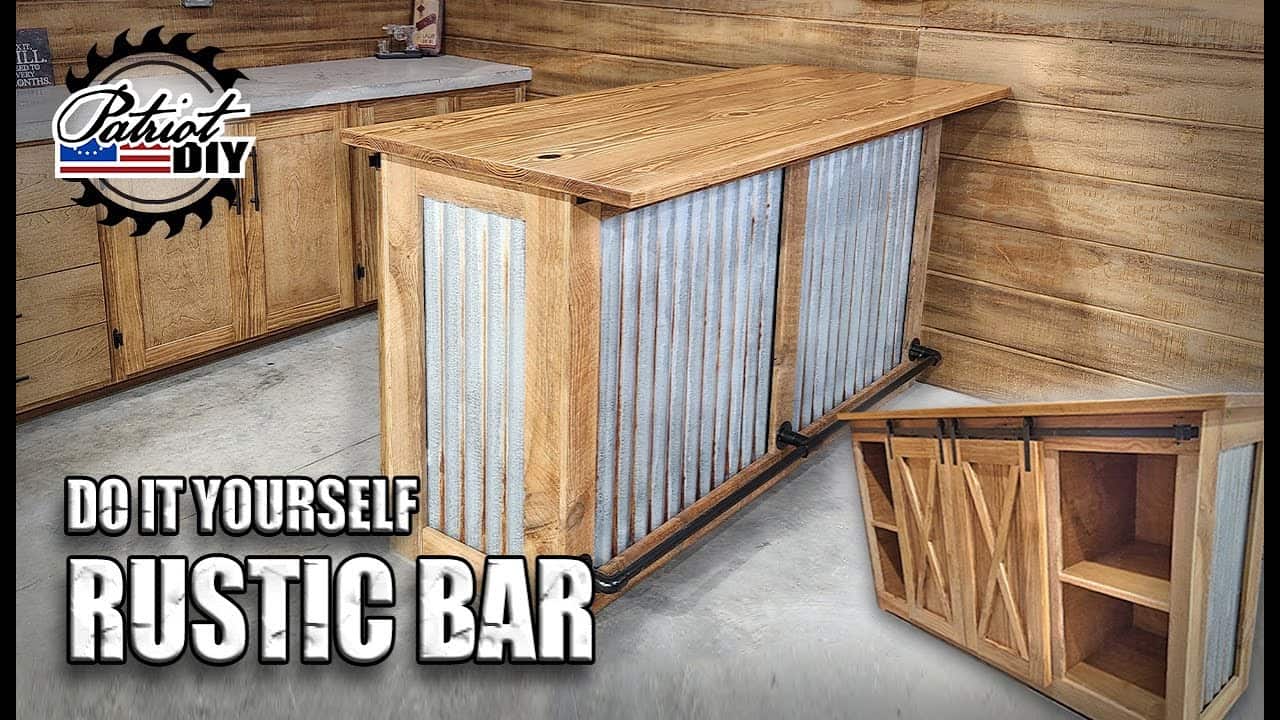
This project was built and designed by Jason from PatriotDIY. It’s a large, feature-rich bar built with reclaimed barnwood, corrugated metal, and industrial accents—ideal for adding character and function to any man cave or entertainment space.
Designed to be both eye-catching and practical, the bar includes cabinet storage, sliding barn doors, a footrest, and a sturdy bar top. With its weathered textures and rugged style, this project is a great example of how woodworking and design can come together in a single build.
Watch the full video and subscribe to Jason’s channel:
Rustic Aesthetic and Purpose
This bar combines style with utility. It offers seating, storage, and a centerpiece for any basement, garage, or dedicated hangout space. The reclaimed barnwood and aged metal give it a distinct look that feels authentic and hand-built.
By using a combination of 100-year-old wood, black pipe fittings, and galvanized metal, Jason leans into the rustic theme while still maintaining clean construction and strong joinery. It’s a balance of old-world materials with modern assembly techniques.
Planning and Material Prep
Before the first cut, Jason walks through the planning phase, considering how much space the bar will take up and what features it should include. Whether it’s just a simple cabinet or a fully featured island, having a clear layout helps keep the build moving smoothly.
Once the design is set, the materials are prepped. The cabinet body is made from plywood, while all visible trim is handled with reclaimed barnwood. This ensures strength beneath the surface and rustic charm where it matters most.
Building the Cabinet Frame
The base cabinet begins with cutting plywood to size. A track saw makes rough cuts quick and clean, while the table saw brings everything to final dimensions. Dado cuts are added for the bottom panel, locking it securely in place.
All parts are sanded and stained before assembly, especially the interior. Jason uses a gel stain to darken and enhance the grain, giving even plywood a richer, more rustic tone. Pre-staining also helps avoid tight corners later during finishing.
Assembling the Structure
With all parts prepped, the cabinet comes together using wood glue and screws. Pocket holes are used for shelf dividers and inner supports, giving the build strength without visible fasteners on the outside.
Everything is squared up during assembly to keep doors and trim aligned later. The cabinet becomes the structural heart of the bar, so making it sturdy and level is key.
Galvanized Metal Accent Panels
To add texture, Jason installs corrugated galvanized metal along the cabinet’s outer faces. These panels are cut to size and then chemically aged using a mix of muriatic acid and hydrogen peroxide, which produces a natural rusted patina.
The panels are then attached using construction adhesive and roofing screws. This not only locks them in place but also introduces visual contrast that plays well with the warm barnwood trim.
Barnwood Trim and Decorative Touches
Trim pieces are made from reclaimed wood, cleaned up, and cut to length. These are attached using brad nails and wood glue, framing the metal panels and bringing the rustic look full circle.
Every trim edge is placed with care to hide seams and align flush with corners. This step adds a handmade feel to the finished bar and helps blend all the different textures together.
Adding a Footrest with Black Pipe
For comfort and a touch of industrial style, Jason adds a footrest using black pipe. Instead of traditional plumbing parts, he uses a simplified system designed for projects like this—no threading or wrenches required.
Set screws hold everything in place, and the pipe rests are attached directly to the bar base for a secure fit. This detail ties in well with the other metal elements and adds functionality without complicating the build.
Sliding Barn Doors
Sliding barn doors are added to conceal the cabinet interior while maintaining easy access. Jason uses select pine for the door frames, connecting them with pocket holes and glue.
The classic X-pattern adds visual interest, while the sliding hardware allows for smooth operation. These doors are both decorative and practical, keeping supplies tucked away but always within reach.
Building the Bar Top
The bar top is made from construction-grade lumber, glued and clamped into a solid slab. Dowels are added between boards to keep them aligned during glue-up.
Once dry, the top is sanded thoroughly and finished with a dark stain and polyurethane. The result is a rich, durable surface that ties the entire build together.
Final Assembly and Placement
Jason secures the cabinet to the floor using treated lumber and screws. The bar top is attached from underneath for a seamless look, and support brackets are added for any overhang.
To complete the look, matching stools are added—preferably in black metal to complement the industrial accents throughout the build.
Please support Jason by visiting his Etsy Store: https://www.etsy.com/shop/patriotdiy.

Matt’s Take
These are my personal thoughts and tips based on my own experience in the shop. This section is not written, reviewed, or endorsed by the original creator of this project.
Working with reclaimed barnwood can be tricky—it’s often warped, split, or filled with old nails. Taking time to properly clean and flatten each piece before use makes a huge difference in the final result. A metal detector can save your blades from hidden hardware, and a planer helps bring everything to a consistent thickness.
The chemical aging process Jason uses on the galvanized metal is pretty slick, but it requires serious ventilation and safety gear. Muriatic acid is nasty stuff, so work outdoors, wear gloves and eye protection, and have water nearby for cleanup. The patina effect is worth the extra precaution, but don’t rush this step.
Pre-finishing interior surfaces before assembly is one of those small moves that pays off big. Once everything’s together, getting a brush or rag into tight corners becomes nearly impossible. Same goes for the staining—doing it in pieces lets you control the coverage and avoid drips in hard-to-reach spots.
That simplified black pipe system is a game-changer for projects like this. Traditional plumbing fittings can be a pain to work with and often don’t sit exactly where you need them. The set-screw style gives you more flexibility and saves time threading everything together perfectly.