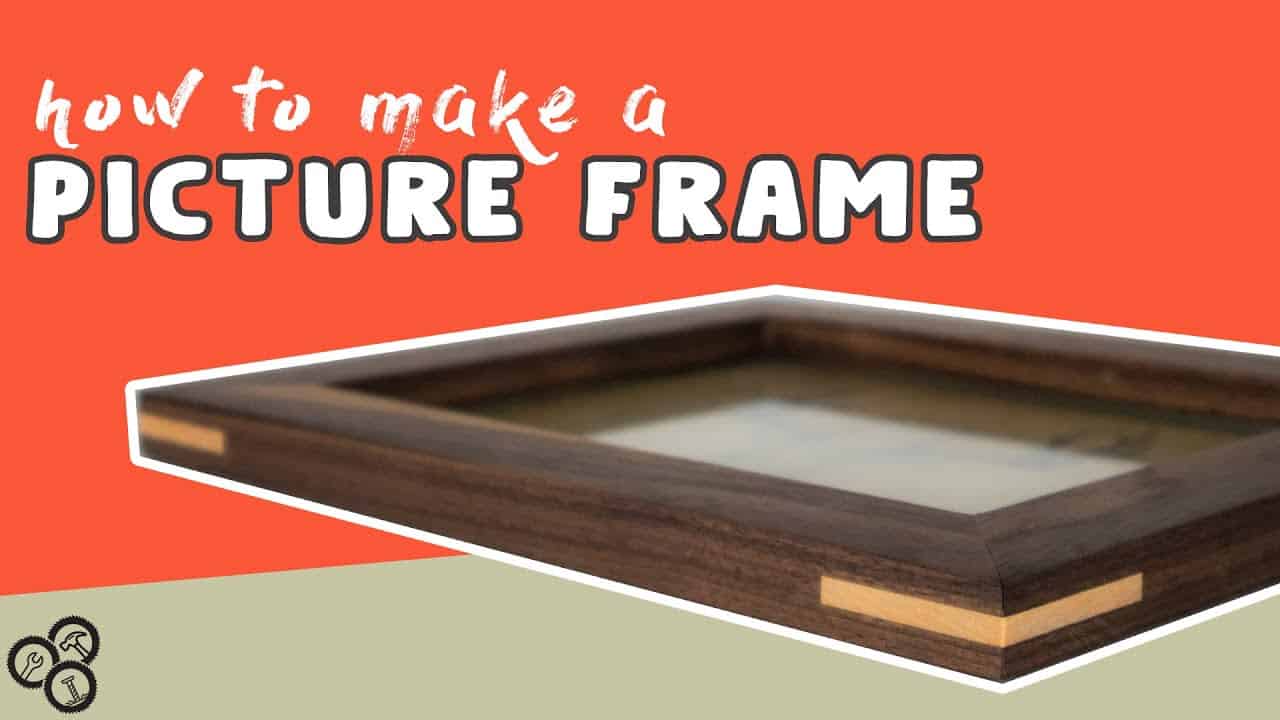
This project was built and designed by Tim from Casual Builds. It’s a simple but refined picture frame project that uses splines to strengthen the corners and add a decorative contrast.
Whether you’re just getting started in woodworking or have a few projects under your belt, this build strikes a great balance between approachability and craftsmanship. Tim walks through each step clearly, making it a rewarding project for makers at any skill level.
Watch the full video and subscribe to Tim’s channel:
Getting Started with the Right Wood
The frame is designed to fit an 8×10 photo and is built from walnut for its strength and rich grain. Walnut is a great choice for frames thanks to its dimensional stability and finish-friendly surface.
The first step is breaking down the stock. Tim rough-cuts his walnut to length and width, leaving room for refinement once the joints and features are added. This approach helps avoid sizing issues later in the build.
Jointing and Ripping to Final Width
After trimming to rough size, the edges of each board are jointed to create one flat reference surface. This ensures cleaner rips on the table saw and a better fit at the corners.
Each board is then ripped to its final width, around an inch and a half. This width keeps the frame visually balanced—not too bulky, but strong enough to support splines and a glass insert.
Cutting the Rabbets
To hold the picture, glass, and backing, a rabbet is cut into the back inside edge of each frame piece. Tim uses a dado blade for this, but a router table with the correct bit would also work.
The rabbets need to be clean and consistent for the insert materials to sit flush. This step is worth double-checking since tight tolerances will make assembly smoother later on.
Making Accurate Miter Cuts
Next, 45-degree miters are cut on each end of the four frame sides. A miter saw set to a precise angle makes this job easier, and using a speed square to verify the angle adds extra confidence.
To reduce tear-out, Tim uses a zero-clearance insert under the blade. This ensures the cuts have clean edges and prevents the fibers from chipping away at the corners.
Dry Fit and Frame Assembly
Before applying glue, a dry fit is done to confirm all four corners come together without gaps. If adjustments are needed, this is the stage to catch them.
With a good dry fit, Tim applies wood glue to the miters and clamps the frame together. Tape can be placed near the seams to control glue squeeze-out, which makes cleanup easier once the glue sets.
Reinforcing the Joints with Splines
Once the frame is glued and dry, Tim adds splines to reinforce the miters. Splines not only add strength but also introduce a contrasting wood detail that enhances the frame visually.
To cut the spline slots, a jig is used to hold the frame upright and steady. Tim cuts shallow kerfs into each corner, then mills thin strips of maple to serve as the splines.
Each spline is glued into its slot, allowed to dry, and then trimmed flush with the frame. This small detail elevates the entire look of the project while strengthening an otherwise fragile joint.
Sanding and Grain Raising
After trimming the splines, the entire frame is sanded smooth. Tim starts with a coarser grit and works his way up to a fine finish.
To get an ultra-smooth surface, he mists the frame with water to raise the grain before sanding again. This extra step helps ensure the finish soaks in evenly and leaves no roughness behind.
Applying the Finish
Tim uses a classic oil-based finish mix that includes boiled linseed oil, polyurethane, and mineral spirits. The blend enhances the natural contrast of walnut and maple, while also adding a durable protective coat.
He applies a heavy coat, lets it soak in, and wipes away the excess. This approach creates a warm, rich finish that highlights the figure of the wood without overpowering it.
A Simple Project with Lasting Results
This picture frame project is a great example of how small woodworking builds can still offer opportunities to develop precision and explore new techniques. From miter joints to splines and hand-applied finishes, there’s a lot to learn—and plenty to enjoy—in a build like this.
The splines add both structural support and visual flair, making the frame more than just a simple photo holder. It becomes a piece of functional art that complements whatever image it holds.
Please support Tim by visiting his website: https://www.casualbuilds.com/.

Matt’s Take
These are my personal thoughts and tips based on my own experience in the shop. This section is not written, reviewed, or endorsed by the original creator of this project.
Picture frames are one of those projects that look simple but demand real precision—especially when you’re adding splines. The beauty of Tim’s approach here is how he tackles the fundamentals first before getting fancy. That rabbet cut is crucial to get right, and using a dado blade like Tim does gives you much more control than trying to achieve the same depth with multiple passes on a regular blade.
The spline technique really makes this frame special. Those contrasting maple splines aren’t just decorative—they’re doing serious structural work. Miter joints are inherently weak because you’re gluing end grain to end grain, so those cross-grain splines create a mechanical connection that’ll hold for decades. The jig setup is key here since any wobble will show up as uneven spline slots.
That grain-raising step before final sanding is worth emphasizing. It might seem like extra work, but walnut can be tricky—the dense and soft grain areas react differently to moisture, and raising the grain first prevents that fuzzy texture that can show up after your first coat of finish. The oil/poly/spirits blend Tim uses is a classic combo that really brings out walnut’s natural depth without hiding the wood under a thick film.