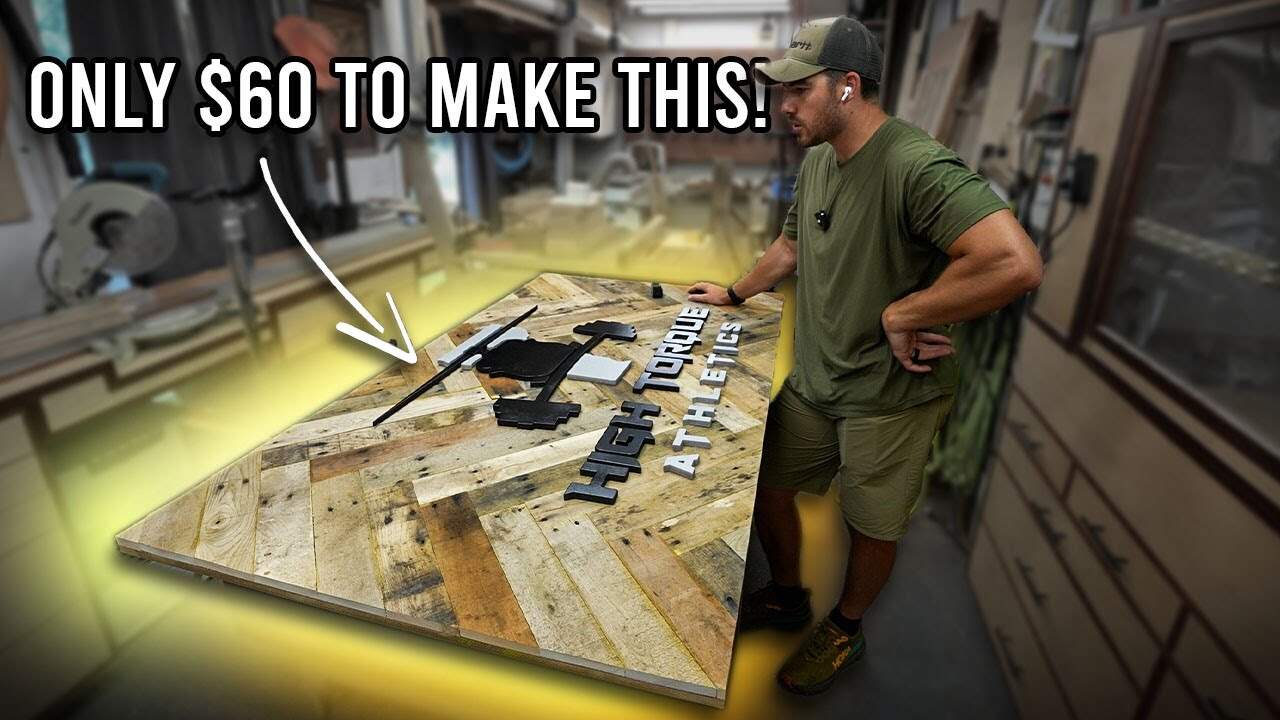
This project was built and designed by Sam Macy.
It’s a practical method for making high-impact business signage using pallet wood, painted lettering, and an epoxy topcoat—all while keeping costs low.
Sam’s approach balances visual appeal with durability, making it ideal for small businesses, workshops, or anyone looking to create custom signage without spending hundreds on a commercial sign shop.
Watch the full video and subscribe to Sam’s channel:
Why This Approach Works
Instead of ordering expensive custom signage, Sam demonstrates how to build your own with reclaimed wood and basic shop techniques.
The result looks polished and professional but is made from affordable materials like pallet wood and MDF.
Two principles drive the design: contrast and structure. The textured wood backing gives the sign character, while smooth painted letters ensure readability. A manufactured backing panel adds rigidity and prevents the piece from warping over time.
Sourcing and Preparing the Wood
Pallets used for heavy materials—like those found at hardware stores or supply yards—tend to be straighter and made from hardwood.
Sam selects these for their character and stability, looking for boards with texture, knots, and nail marks.
Breaking down pallets takes time, but it pays off when you end up with clean, usable boards. It’s best to discard warped or split pieces early to save frustration during layout and assembly.
Building the Sign Base
Instead of gluing planks directly together, Sam adheres them to a flat backing panel made from MDF. This helps the sign stay stable and gives a solid surface for attaching letters and hardware.
Before adding any pallet wood, both sides of the MDF are sealed with a thin coat of finish—usually shellac or leftover sanding sealer. This step prevents moisture from soaking into the panel unevenly and helps reduce warping later on.
Designing and Laying Out the Face
Sam uses a herringbone pattern for the pallet planks, but the same method applies for straight or chevron layouts.
The key is to cut planks to the same width and mark reference lines on the panel to ensure the layout stays square.
After laying out the pattern, the planks are glued in place using outdoor-rated wood glue. Small pin nails are used to hold each board in place while the glue cures. These fasteners aren’t structural but help keep things from shifting.
Once the surface is fully covered, the edges are trimmed flush with a circular saw to create clean, straight sides.
Cutting the Letters
Letters are cut from MDF using a CNC machine, but a scroll saw or bandsaw can work just as well with a printed template.
After cutting, Sam smooths the edges and applies a filler primer to prepare for paint.
The goal is to achieve a buttery-smooth finish on the letters. Multiple coats of filler primer with sanding between coats help remove any fuzz or texture from the MDF before the final color is applied.
Attaching the Letters
Once painted, the letters are laid out using painter’s tape to create reference lines and ensure spacing is even. Sam places the letters carefully before using fast-set glue to attach them to the pallet face.
Because the background is uneven, strong adhesives like cyanoacrylate (CA glue) create a quick bond and hold the letters tightly in place. This also gives time to make adjustments before the glue sets completely.
Applying the Epoxy Finish
A clear epoxy flood coat is poured over the entire face of the sign. This not only protects the wood and lettering but also enhances the visual contrast between the rustic planks and the polished letters.
Sam sets up plastic sheeting to catch drips and carefully levels the sign before applying the epoxy.
After curing, any hardened drips along the edges are trimmed flush to keep the back flat for mounting.
Mounting with a French Cleat
To hang the sign securely, a French cleat system is used. This involves attaching an angled board to both the wall and the sign itself so the two interlock.
The cleat allows the sign to be removed easily for maintenance or transport. Screws added from below lock it in place and prevent accidental lifting or shifting.
Smart, Scalable, and Budget-Friendly
This method works well for a single sign or a batch of signs for clients. Pallet wood is often free, MDF is inexpensive, and tools like a CNC or scroll saw make it easy to reproduce designs consistently.
For makers selling signs, this approach offers a great balance of labor and return. The final product looks like it came from a pro shop—without the price tag.
Watch the full video and subscribe to Sam’s channel:

Matt’s Take
These are my personal thoughts and tips based on my own experience in the shop. This section is not written, reviewed, or endorsed by the original creator of this project.
What I love about Sam’s approach is how he turns a limitation into a feature. Pallet wood can be unpredictable—varying thicknesses, nail holes, weathering—but mounting everything to that MDF backing eliminates the headaches of trying to get reclaimed boards perfectly flat and aligned. It’s a smart workaround that actually makes the project more stable than traditional edge-glued construction.
The epoxy flood coat is doing double duty here. Beyond protection, it’s leveling out all those surface variations between the textured pallet wood and smooth painted letters. That creates a really nice tactile contrast while keeping everything uniform under your hand. Just make sure your workspace is dust-free before pouring—epoxy loves to trap particles, and there’s no fixing it once it cures.
French cleats are criminally underused for shop projects. Once you get comfortable making them, you’ll find excuses to use this hanging system everywhere. The beauty is in the security—that sign isn’t going anywhere until you lift it up and out. For business signage that might need periodic cleaning or seasonal storage, it’s perfect.
The cost factor here is hard to beat. Even factoring in your time, you’re probably looking at $30-50 in materials for a sign that would cost $200+ from a commercial shop. Scale this up for multiple signs or client work, and the math gets even better.