This project was built and designed by Caleb from YouCanMakeThisToo. It’s a creative and functional LEGO table with flip-top versatility, custom inlays, and built-in storage—ideal for both kids and adult LEGO fans.
Built from a single sheet of plywood and packed with clever design features, this table serves as both a play surface and a practical piece of furniture. It’s a great way to blend woodworking with creativity and fun.
Watch the full video and subscribe to Caleb’s channel:
Breaking Down the Build
The core of this LEGO table starts with a single 4×8 sheet of plywood. It’s cut down into parts for the legs, frame, tabletop, and shelf. The project uses common tools like a circular saw, jigsaw, and router, making it approachable for most shops.
Caleb begins by trimming the plywood down using a track saw, though a circular saw with a straightedge works just as well. Stickers on the plywood are removed with a heat gun—just a few seconds of heat loosens the adhesive for a clean surface.
Cutting Decorative Shapes
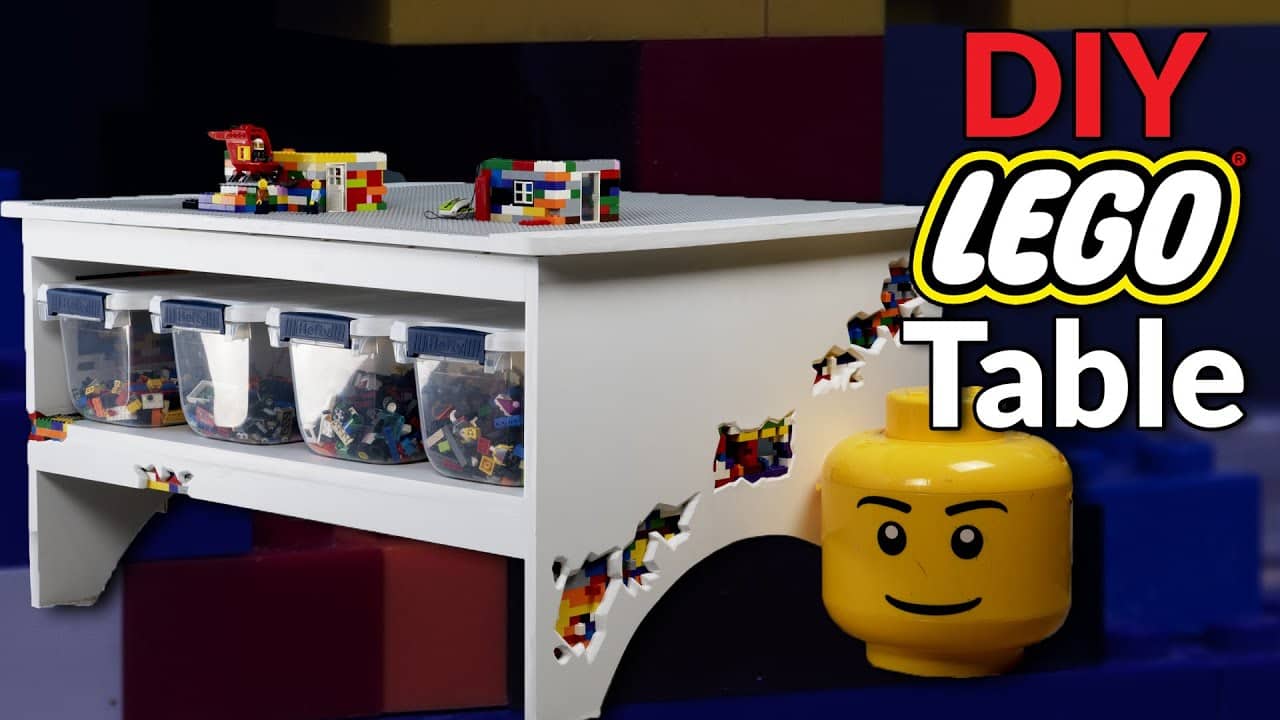
Each side panel of the table is designed with arch cutouts that act as legs. Caleb marks the positions for shelf placement and then experiments with arch shapes until finding the right one. A compass helps create smooth, symmetrical curves that can be mirrored on both sides.
The arches are cut out using a jigsaw. A bandsaw could work too, but most builders will find the jigsaw sufficient. Rounding the corners of the table is another small detail that improves safety and gives the table a finished look.
Adding Edge Banding for Clean Lines
To dress up the raw plywood edges, Caleb applies iron-on edge banding. This not only improves the final appearance but also helps the plywood take paint more evenly.
For curves and inside edges, spring clamps hold the banding in place while it’s heated. Once applied, the excess is trimmed with a chisel or edge trimmer. If any small gaps appear, wood filler is used before sanding everything flush.
Easy Joinery Options
The main structure is assembled using pocket hole screws—a quick and forgiving method that still allows for easy disassembly later. For those who want more strength, domino joinery is an alternative, though it’s not required for most applications.
After assembling the base, Caleb marks out locations for the LEGO inlays to be added later. Precise measurements here help everything align during final assembly.
Creating Custom LEGO Inlays
One of the standout features of this table is the addition of embedded LEGO builds. Caleb gathers a collection of random LEGO pieces and creates abstract designs that will be inlaid into the tabletop.
To install them, he routes out shallow recesses that match the shape of each LEGO piece. The goal is for the nubs of the LEGO to sit just below the surface. CA glue holds the inlays securely in place.
Creative Design with a Reveal Effect
For added flair, Caleb uses a jigsaw to cut reveal patterns into the plywood. These shapes give the illusion of LEGO bricks being exposed beneath the wood, as if the top layer has peeled away.
This artistic touch gives the table a playful, custom look that stands out. It’s a great example of how woodworking and creativity can combine into something personal and unique.
Flip-Top Mechanism and Function
The tabletop features a flip design, making it easy to switch between a flat work surface and a LEGO play area. To build it, Caleb first installs a center panel with aligned LEGO baseplates and then fits the top to flip over seamlessly.
A dado stack on the table saw is used to route shallow recesses for the LEGO baseplates. This keeps them flush with the surrounding surface for clean lines and smooth transitions.
Final Assembly and Details
Once everything is prepped, the table goes together quickly. Because most pieces only fit one way, assembly is intuitive. The LEGO inlays are installed during this phase to avoid damaging them in earlier steps.
For alignment, dowel holes are drilled into the table base and top to keep the flip-top centered. Rubber bumpers are added to help seat the top snugly.
Paint and Finish
The entire table is painted white to make the colorful LEGO sections stand out. Caleb applies two coats of primer and follows up with two coats of milk paint for a durable, smooth finish.
Any final imperfections are sanded out, and edge touch-ups are done by hand. The result is a clean, bold piece that works in both kids’ rooms and shared family spaces.
A Fun, Functional Table with Personality
This LEGO table is more than just a toy stand—it’s a creative woodworking project with real utility. With its flip-top design, hidden LEGO reveals, and thoughtful joinery, it’s a piece that invites both play and admiration.
Caleb shows how even a basic material like plywood can become something special with time, care, and a bit of fun. It’s a great weekend project that will be used and appreciated for years to come.
Please support Caleb by visiting his website: https://www.ycmt2.com/.

Matt’s Take
These are my personal thoughts and tips based on my own experience in the shop. This section is not written, reviewed, or endorsed by the original creator of this project.
The flip-top mechanism on this table is really clever—it transforms the whole piece from a regular table into a dedicated LEGO workspace in seconds. When routing those shallow recesses for the baseplates, taking your time with test cuts on scrap material pays off. Getting that depth just right so everything sits flush makes a huge difference in the final look and feel.
Pocket hole joinery is perfect for a project like this. It’s strong enough for furniture that’ll see regular use, but forgiving if you need to make adjustments during assembly. Plus, if you ever need to move or modify the table down the road, those screws come apart easily without damaging the wood.
That iron-on edge banding trick works great on plywood projects. The key is getting the temperature right—too hot and you’ll scorch the banding, too cool and it won’t stick properly. A household iron on medium heat usually does the job. Having those spring clamps ready for the curved sections saves a lot of frustration.
The artistic LEGO reveals cut into the plywood are what really make this table special. It’s a great reminder that functional projects don’t have to be boring—a little creative flair turns a basic table into something kids (and adults) will actually get excited about using.