This project was built and designed by Danny from ModernRemade. What started as a beat-up, sticker-covered cabinet destined for the trash turned into a sleek, functional piece of furniture with a fresh look and renewed purpose.
Danny’s approach to upcycling focuses on practical improvements, creative details, and smart tool use—all while showing that almost any discarded item has potential if you’re willing to take it apart and rebuild it with care.
Watch the full video and subscribe to Danny’s channel:
Salvaging a Cabinet on the Brink
The project began with a cabinet that had clearly seen better days. Covered in peeling marble stickers and showing signs of long-term wear, the piece looked more like a curbside pickup than something worth saving.
Instead of tossing it, Danny broke the cabinet down into individual parts. This disassembly phase helped identify which sections were salvageable and which ones needed to be replaced. While the base and sides were solid enough to reuse, the doors and surface layers needed to go.
Laying Out a Game Plan
Before starting the transformation, Danny created a basic plan to guide the rebuild. This included removing any stickers, sanding down adhesive residue, replacing the doors, and cleaning up the structure for painting and decorating.
Removing the marble-effect stickers was the first hands-on task—and a sticky one at that. Underneath was a thick layer of adhesive that had to be scrubbed off before any finishing could begin. With everything cleaned up, the structure was ready for its second life.
Replacing the Cabinet Doors
The original doors were too damaged to repair, so Danny decided to replace them entirely with new panels made from ½-inch plywood. This change not only improved the look but also gave him the opportunity to create a better fit for the existing cabinet hardware.
Each door was measured and cut to size, with attention to hinge placement and edge alignment. The process involved a bit of trial and error, but Danny used it as an opportunity to refine his workflow and share some helpful insights for fellow DIYers tackling similar replacements.
Using a Concealed Hinge Jig
To drill precise hinge recesses, Danny turned to a concealed hinge jig. This tool allowed him to make consistent, accurate cuts for mounting the hardware, even though the new plywood was thinner than the cabinet’s original panels.
While the jig didn’t work perfectly on the first attempt, Danny adapted quickly and made the necessary tweaks to ensure a tight, clean fit. His willingness to adjust mid-build is part of what made the final result so polished.
Aligning the Doors and Fine-Tuning the Fit
Once the new doors were attached, the next step was getting the alignment right. Gaps, uneven spacing, or sagging can ruin the look of an otherwise well-built cabinet. With some hinge adjustments and careful checking, everything clicked into place and the doors closed smoothly.
These finishing steps brought the cabinet back to life as a working piece of furniture—not just a salvaged project, but something that could stand proudly in any room.
Paint and Finish Choices
To tie the cabinet into a larger garage renovation, Danny selected a paint color that complemented the space without overwhelming it. Instead of painting the entire piece, he left the interior with a natural wood finish for contrast and warmth.
This choice saved time and paint while giving the piece a more customized, two-tone appearance. It also made the cabinet feel more intentional—like something designed from scratch rather than pieced together from leftovers.
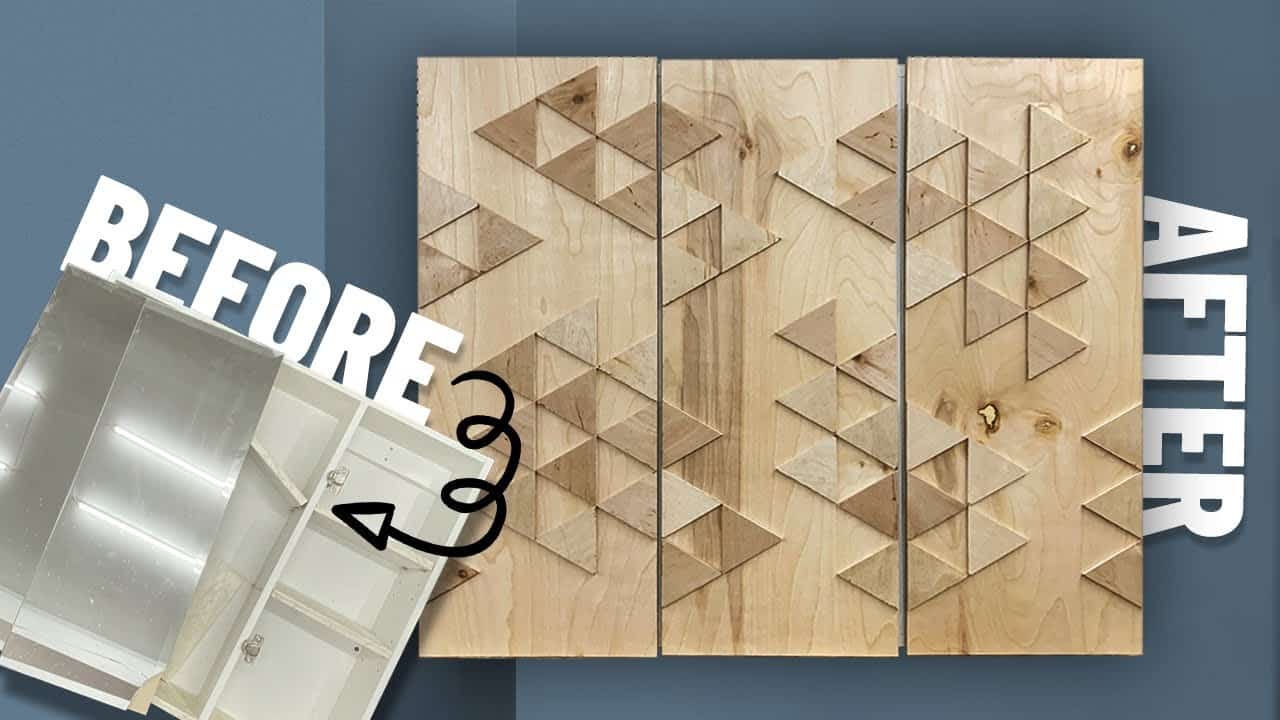
Adding a Decorative Geometric Detail
Looking to add a unique touch, Danny decided to create a plywood inlay design using equilateral triangles. These small shapes were cut from leftover material and glued to one of the cabinet panels to form a geometric pattern.
This detail wasn’t just decorative—it also served to cover small imperfections in the wood. Using hot glue allowed for quick adjustments and made the process fast and forgiving. The end result gave the cabinet a one-of-a-kind look that elevated it beyond just a utility piece.
From Garage Find to Bathroom Favorite
The upcycled cabinet came out so well that Danny’s wife asked to use it in the bathroom—a big promotion for something once headed to the landfill. The transformation proves how a little creative problem-solving can turn an eyesore into a showpiece.
More than just a woodworking project, this build is a case study in practical upcycling. It’s about recognizing potential in worn-out furniture and having the patience to bring it back better than before.
Watch the full video and subscribe to Danny’s channel:

Matt’s Take
These are my personal thoughts and tips based on my own experience in the shop. This section is not written, reviewed, or endorsed by the original creator of this project.
This kind of cabinet rescue hits close to home — there’s something deeply satisfying about giving new life to a piece that most people would see as hopeless. Danny’s approach of completely disassembling first is smart because it lets you really assess what you’re working with. That adhesive removal step is always a pain, but it’s worth mentioning that a hair dryer or heat gun can make those old stickers peel off much easier, especially the stubborn ones that have been baking on there for years.
The concealed hinge jig is a great tool for this type of work, though like Danny found, they sometimes need a little finessing when you’re working with different material thicknesses than the original. If you don’t have a jig, you can still get clean results by making a simple template from scrap plywood — just takes a bit more setup time. The key is getting those hinge mortises consistent so your doors hang properly.
That geometric triangle detail really makes the piece special. It’s a clever way to add visual interest while covering up any surface imperfections — kills two birds with one stone. Hot glue might seem unconventional for woodworking, but for lightweight decorative elements like this, it’s actually perfect because you can adjust things quickly if they’re not sitting quite right.
The biggest takeaway here is patience during the planning phase. Taking time to really think through each step, from door sizing to finish choices, is what separates a quick fix from a transformation that’ll last for years.