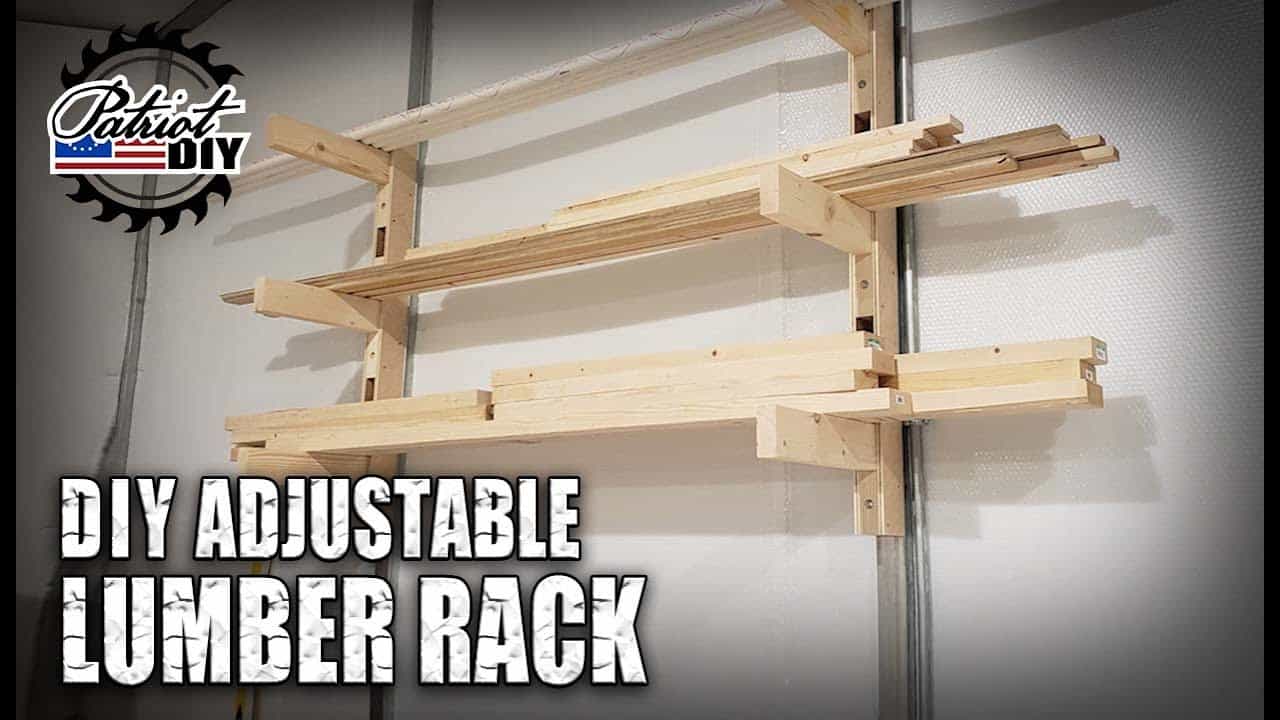
This project was built and designed by Jason from PatriotDIY. It’s a clean and practical solution to an issue every woodworker faces—how to store all that leftover lumber and scrap without letting it take over the shop.
With a clever wall-mounted design and adjustable arms, this project helps free up floor space while giving you full control over how you organize your materials. It’s simple to build and flexible enough to grow with your woodworking needs.
Watch the full video and subscribe to Jason’s channel:
Why Go Adjustable?
Scrap wood tends to pile up in corners, under benches, or wherever it fits. An adjustable lumber rack brings order to that chaos by giving you a designated spot to store boards vertically or horizontally.
Jason designed this system to be modular, meaning the arms can be repositioned depending on the size and quantity of wood you’re storing. Whether you have thin strips, long boards, or short offcuts, this setup adapts easily.
Planning the Rack System
Before starting the build, Jason walks through the planning phase. This includes evaluating how much lumber you usually keep on hand, and identifying the best open wall space in your shop.
The design can scale up or down based on your shop size. It can hold everything from plywood sheets to narrow trim boards, and the height of each tier can be adjusted after installation if needed.
Cutting the Rack Components
The base of the system is made from uniform blocks of two-by-fours. Jason cuts these using a stop block to ensure every piece is identical. Consistency here is key to making sure your rack sits level and looks clean once mounted.
Each block is pre-drilled using a drill press to keep everything straight. He then uses a Forstner bit to recess the screw heads, giving the blocks a flush, professional look when attached to the wall.
Building the Rack Arms
To support the lumber, Jason cuts down plywood into clean strips using a track saw and table saw. These strips are attached to the pre-cut two-by-four blocks, forming a strong base that will support the weight of the wood.
Scrap wood is used as spacers during the layout process, keeping the gaps between each block uniform. A layer of wood glue followed by strategically placed screws ensures a strong bond between each piece.
Smoothing and Shaping
After assembling the rack components, Jason uses a miter saw and table saw to clean up the edges for a polished appearance. This isn’t necessary for functionality, but it does improve the finished look—especially if your rack will be visible in your main workspace.
The entire surface is then sanded using an orbital sander to remove any rough edges or splinters. This step is important for safety and helps give the rack a professional-grade finish.
Mounting the Rack to the Wall
With the rack blocks and arms complete, Jason moves on to mounting them on the wall. Using a spacer board, he ensures that each support is mounted at an identical height, giving the system a clean and uniform look.
He uses self-tapping screws for secure mounting into studs or backing boards. The result is a rack that can handle the weight of full-size lumber without sagging or pulling away from the wall over time.
Installing and Adjusting the Arms
The arms of the rack are made from sanded two-by-fours cut to length. Each one is fitted into the corresponding slot in the rack blocks. Because of the spacing and pre-alignment, the arms slide in cleanly and can be adjusted to different heights depending on what you’re storing.
This flexibility allows you to reconfigure the rack anytime—whether you’re storing long 2x4s, short trim pieces, or wide boards stacked horizontally.
Loading Up and Reclaiming Space
Once the system is mounted and the arms are in place, it’s time to load it up. The impact is immediate: piles of scrap wood are off the floor, sorted by size or type, and easy to access for future projects.
It also opens up more working room in the shop and makes cleanup easier. When tools and materials have a dedicated place, the entire workspace becomes more efficient.
An Easy Shop Upgrade
Jason’s adjustable lumber rack is one of those rare projects that’s both simple to build and makes a major difference in how your shop functions. With basic materials, a drill, and a saw, this project can be completed in an afternoon and serve your shop for years.
The design is clean, functional, and easy to customize—everything you want in a woodworking storage solution. Whether you’re dealing with a small corner in a garage or setting up a full woodshop, this project fits right in.
Please support Jason by visiting his Etsy Store: https://www.etsy.com/shop/patriotdiy.

Matt’s Take
These are my personal thoughts and tips based on my own experience in the shop. This section is not written, reviewed, or endorsed by the original creator of this project.
This type of adjustable rack system really shines when you think about how much your lumber storage needs change over time. One week you might have a pile of long trim pieces, the next you’re dealing with short cutoffs from a cabinet project. Having that flexibility built right in saves you from constantly reorganizing or building new storage solutions.
The wall-mounted approach is smart from a safety standpoint too. Lumber stacked on the floor creates trip hazards and makes it harder to spot what you actually have in your inventory. When everything’s vertical and visible, you’re less likely to buy materials you already own, and you can grab what you need without moving three other boards first.
If you’re considering this build, pay attention to your wall structure. Even with the weight distributed across multiple mounting points, lumber adds up fast. Make sure you’re hitting solid framing or use appropriate wall anchors if you’re working with drywall only. It’s also worth thinking about the height placement—you want the lowest tier accessible but high enough that longer boards won’t hit the floor when you’re pulling them out.