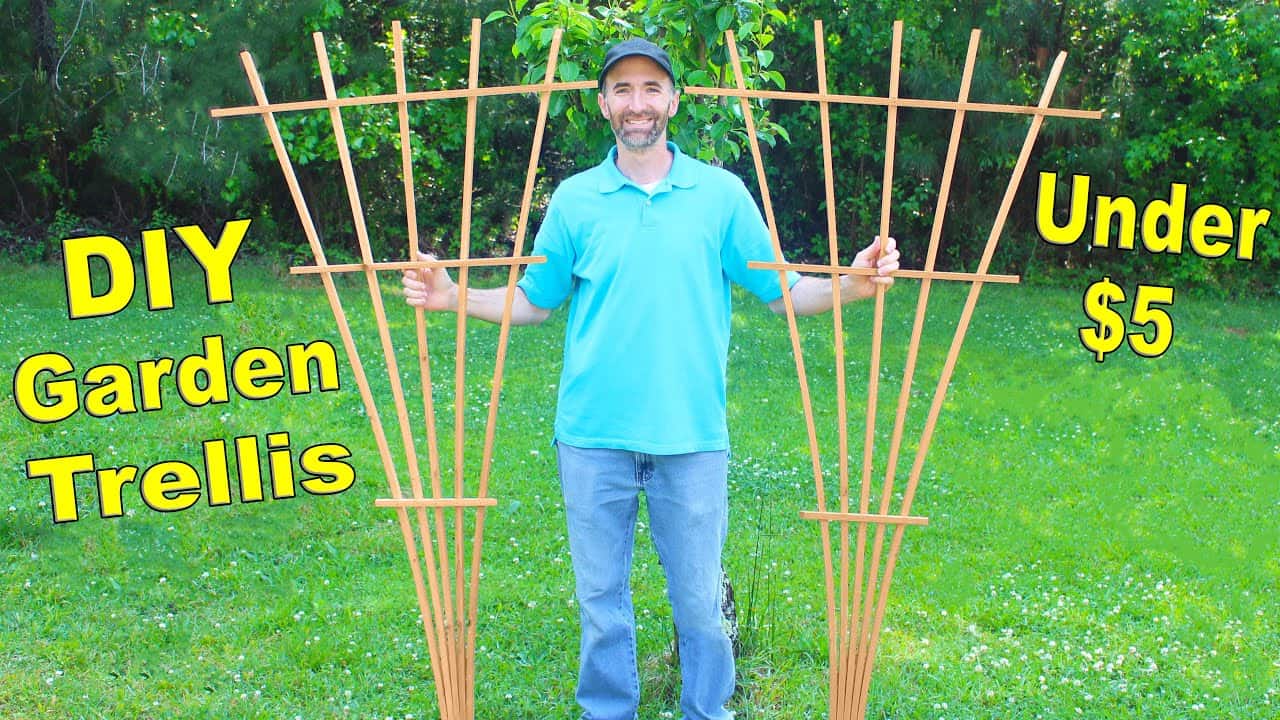
This project was built and designed by Clinton from Specific Love Creations. It’s a simple and affordable garden trellis made from a single cedar fence picket, perfect for climbing plants and a great fit for any outdoor space.
Designed with both form and function in mind, this fan-style trellis supports plant growth while adding a clean, structured visual element to your garden. It’s quick to build, requires minimal tools, and is budget-friendly—making it a solid project for beginners or anyone looking to produce items for resale.
Watch the full video and subscribe to Clinton’s channel:
Why a Fan Trellis Works
Fan trellises are excellent supports for vertical-growing plants like peas, beans, and flowering vines. The angled design allows the plant to spread naturally while still maintaining structure and direction.
Not only does this method help your plants grow more efficiently, but it also helps define garden areas, especially along fences, raised beds, or patio containers. Clinton’s version focuses on a symmetrical, fan-shaped layout that’s both effective and attractive.
Materials and Tools
The entire project is built from one cedar fence picket, which is around 6 feet long and 5.5 inches wide. Cedar is naturally rot-resistant, making it a great option for outdoor use without needing pressure treatment.
Additional materials include waterproof glue, a few small nails or a brad nailer, and clamps to hold everything together while drying. Tools like a circular saw or miter saw make cutting easier, but even a handsaw would work if needed.
Cutting the Strips
To begin, Clinton cuts the picket into long, thin strips. These pieces will form both the vertical frame and the angled fan supports.
Consistency matters, so it’s important to measure carefully and keep the cuts even. This helps ensure the final structure comes together neatly without gaps or misalignments.
Prepping the Layout
Once the strips are cut, the next step is to arrange them vertically. Clinton uses a straight edge to line them up and marks a reference line near the top of the pieces to help with positioning.
This mark keeps glue application and spacing controlled. Placing spacers—like small craft sticks—between the boards helps reduce glue squeeze-out and ensures an even gap between slats.
Gluing and Clamping
With everything lined up, Clinton applies waterproof glue just below the reference mark. Once glued, the strips are clamped together and left to dry. Clamping pressure is key to getting a clean bond and keeping the vertical base of the trellis square.
While the glue dries, he moves on to preparing the angled fan sections, which will be attached to the vertical frame in a spread pattern.
Attaching the Fan Arms
The angled pieces are cut to match the desired fan shape, then glued and secured to the vertical strips. Placement can vary depending on the flexibility of the wood, but the general spacing and angle remain consistent to maintain the trellis’s visual balance.
Clinton uses a brad nailer to pin the arms in place, but small nails or screws can also be used if needed. It’s important to double-check alignment as you go to keep the angles symmetrical.
Final Reinforcements
After everything is assembled and dried, Clinton checks for cracks or minor misalignments. Any small gaps are reinforced with additional glue and clamping to keep the structure strong.
He also recommends sealing the end grain of the wood with waterproof glue. This prevents moisture from being absorbed into exposed ends, which can weaken the structure over time—especially in outdoor conditions.
Budget-Friendly and Fast to Build
One of the most appealing aspects of this trellis is its cost: it can be built with about $5 worth of materials. The build takes roughly an hour, and once you’re comfortable with the process, you can produce multiple trellises even faster.
Clinton suggests making a jig if you plan to build several. This makes positioning and spacing easier and allows you to streamline the process for batch production—an especially helpful tip for those selling at craft fairs or garden centers.
A Great Garden Upgrade or Side Hustle
Not only is this project useful for your own garden, but it’s also a great product for selling locally. With minimal materials and a short build time, fan trellises like this can retail for $40 or more, depending on finish and customization.
It’s also a great introduction to basic woodworking skills like measuring, cutting, gluing, and assembling. If you’re looking for a quick win with real-world usefulness, this one’s a solid choice.
Watch the full video and subscribe to Clinton’s channel:

Matt’s Take
These are my personal thoughts and tips based on my own experience in the shop. This section is not written, reviewed, or endorsed by the original creator of this project.
The beauty of this design really lies in its simplicity—taking a single fence picket and transforming it into something genuinely useful shows how far basic woodworking skills can take you. Cedar is an excellent choice here since it naturally resists rot and insects, which means this trellis should hold up well through multiple growing seasons without any additional treatment.
When working with thin strips like this, I’d suggest taking your time with the cuts to keep them uniform. Even small variations can throw off the final assembly, and you’ll notice those inconsistencies more on a clean, geometric design like this fan pattern. A good sharp blade on your saw makes all the difference when ripping thin stock—it’ll give you cleaner edges and reduce tear-out.
The spacer trick Clinton uses is really smart for managing glue squeeze-out. Nothing’s worse than having your pieces stick together permanently where you don’t want them to. If you’re planning to make several of these, definitely consider that jig approach. Once you dial in the spacing and angles, you can knock these out pretty quickly.
At around $5 in materials and an hour of shop time, this hits that sweet spot where it’s affordable enough to experiment with but valuable enough to feel like a real accomplishment. Plus, your climbing plants will definitely appreciate having something this sturdy to grab onto as they grow.