This project was built and designed by Tim from Casual Builds. It’s a space-saving, mobile storage solution built to organize offcuts, full boards, and everything in between—ideal for small or cluttered shops.
Designed with function and simplicity in mind, the cart features a sturdy frame, multiple cubbies, angled supports, and lockable casters. Whether you’re dealing with piles of scrap wood or need a better system for storing sheet goods, this cart offers a smart way to bring order to your workspace.
Watch the full video and subscribe to Tim’s channel:
Why a Lumber Cart Makes Sense
Keeping lumber off the floor and organized is a constant challenge in any shop. A mobile cart like this lets you sort by size, type, or project while keeping materials easy to move and access.
Instead of spending time digging through stacks of mismatched wood, you’ll know exactly where everything is. It improves efficiency, saves floor space, and protects your wood from warping or damage.
Materials and Tools Overview
Tim doesn’t dive into exact measurements, but the general build includes 2x4s for the frame and plywood for the top and internal dividers. This balance of sturdy and lightweight materials keeps the cart strong without making it too heavy to move.
Essential tools include a miter saw, pocket hole jig, drill, clamps, and possibly a track saw for sheet breakdown. These are standard in most workshops and make the project straightforward for anyone with basic woodworking experience.
Starting with the Frame
The base of the cart begins with cutting 2x4s to form the rectangular structure. Tim drills pocket holes into the shorter crosspieces, then uses clamps to hold the parts square as everything comes together.
Assembly is kept simple and repeatable, making this a great weekend project or a quick build between larger tasks. With all four sides connected, the base provides a rigid platform to build on.
Creating the Top Work Surface
The top of the cart is made from a sheet of plywood trimmed to fit flush with the frame. A track saw helps with accurate, straight cuts, though a circular saw with a guide works just as well.
Once sized, the plywood is screwed into the frame, completing a smooth, strong surface that can double as a secondary workbench. This gives the cart added value beyond just storage.
Adding Casters for Easy Movement
Tim attaches casters to the bottom of the frame, turning the entire unit into a mobile platform. Choosing locking casters helps keep the cart stable when needed while still offering the flexibility to reposition it throughout the shop.
Shopping for casters online can save money and provide better options than local stores. It’s a small upgrade that makes a big difference in long-term usability.
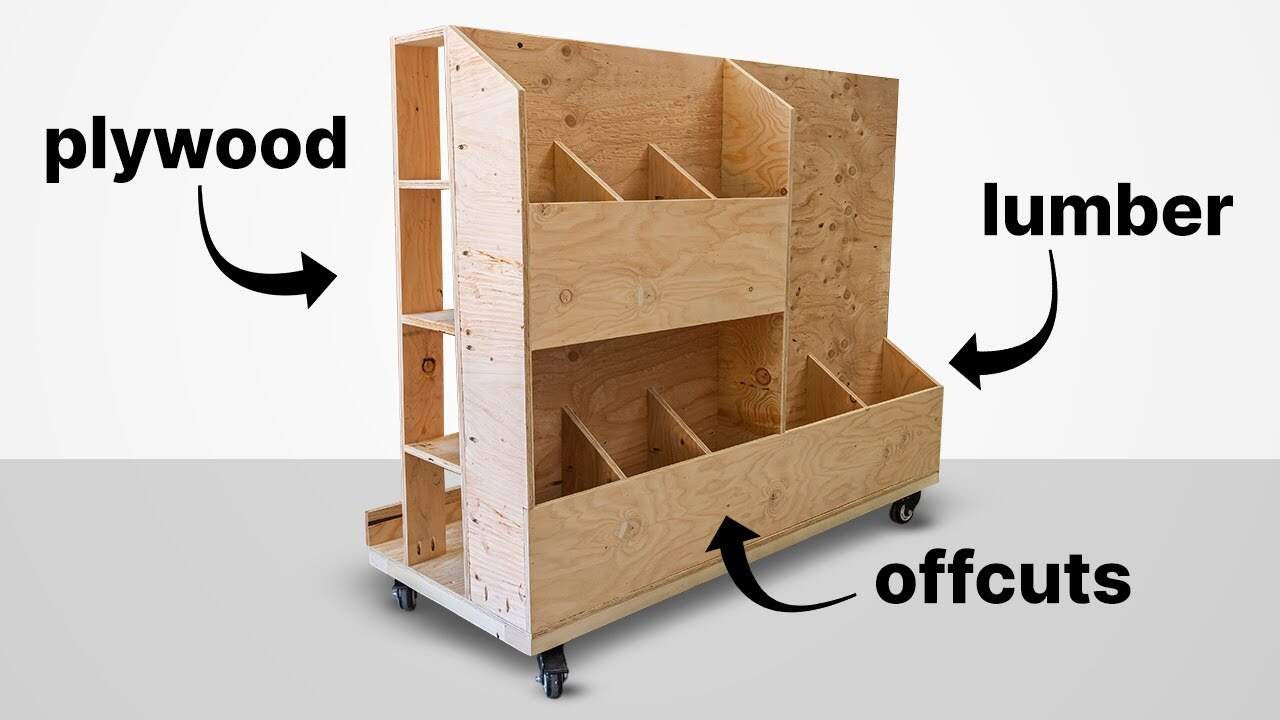
Internal Dividers and Shelving
Next, the cart’s interior layout is built using more plywood. Tim adds a center divider and several horizontal shelves to form cubbies of varying sizes.
These compartments are ideal for storing both offcuts and longer boards. Some sections are left open for full-length pieces, while others are smaller for short scraps and commonly used cuts.
Pocket Holes and Clamping Tips
Each divider and shelf is installed using pocket holes for a clean, strong connection. Tim relies on clamps to keep everything square during assembly, especially as the internal framework becomes more complex.
Varying the sizes of the cubbies allows you to store different types of material without wasted space. It also prevents overstacking, which can make it harder to access what you need.
Installing Angled Slats
A standout feature of the cart is the angled storage slats. These slightly tilted panels hold large sheet goods like plywood or MDF vertically, preventing them from tipping over.
This design makes it easy to slide panels in and out without lifting awkwardly or risking damage. It’s an efficient use of vertical space and one of the reasons this cart is especially useful in smaller shops.
Final Cleanup and Setup
Once all the panels are installed, the build is nearly complete. Tim sands any rough edges to avoid splinters and gives the entire cart a clean look.
After a quick cleanup, the cart is rolled into position and filled with various lumber. Whether you’re storing plywood, hardwood offcuts, or 2x4s, the design handles it all without issue.
A Practical Addition to Any Workshop
This storage cart is a no-frills, high-value build that instantly upgrades your shop’s organization. It keeps materials visible, accessible, and easy to transport—all with a footprint that works in tight spaces.
Built from standard materials and with common tools, it’s a perfect project for woodworkers looking to improve their workflow. The mobility and storage flexibility make it a great addition to just about any setup.
Please support Tim by visiting his website: https://www.casualbuilds.com/.

Matt’s Take
These are my personal thoughts and tips based on my own experience in the shop. This section is not written, reviewed, or endorsed by the original creator of this project.
Getting lumber organized and off the floor is one of those shop improvements that pays dividends immediately. I really like the angled slat design here – it’s such a simple solution for sheet goods storage that keeps everything accessible without the usual wrestling match. Plus, having those sheets stored vertically prevents warping and saves a ton of floor space.
The mix of 2×4 framing with plywood dividers is spot-on for this type of cart. You get the strength where you need it without adding unnecessary weight. When shopping for casters, I’d definitely spring for good quality ones with locks – cheap casters will frustrate you every time you try to move a loaded cart. Look for ones rated well above what you think you’ll need.
One thing I appreciate about this design is how the varied cubby sizes let you sort by both length and type. Having dedicated spots for different materials means you’re not constantly shuffling through piles to find what you need. It’s amazing how much time this kind of organization saves during a project.
For anyone building this, take your time with the pocket hole joints and keep everything square as you go. A cart like this will see heavy use, so solid joinery upfront means years of reliable service. The added bonus of having that plywood top as a mobile work surface makes this even more valuable in a small shop.