These three beginner woodworking projects were built and designed by Clinton from Specific Love Creations.
Using affordable 2×4 lumber and basic joinery methods, Clinton shows how to create functional and attractive benches without the need for advanced tools or experience.
Each design includes useful techniques that help beginners build confidence and develop shop habits that carry over into future projects.
Whether it’s for kids, porch seating, or a casual backyard setup, these 2×4 benches are a great place to start.
Watch the full video and subscribe to Clinton’s channel:
Why These Projects Work for Beginners
All three benches use standard construction lumber, which keeps costs low and materials easy to source. 2x4s are also more forgiving than hardwoods, making them ideal for those still building comfort with power tools.
The joinery is kept intentionally simple—mostly pocket screws, face screws, and glue-ups—with a focus on clean layout and stable construction.
Recurring tips like building mirror-image leg assemblies, spacing slats evenly, and pre-drilling to prevent splitting show up across each build and are great habits for beginners to adopt.
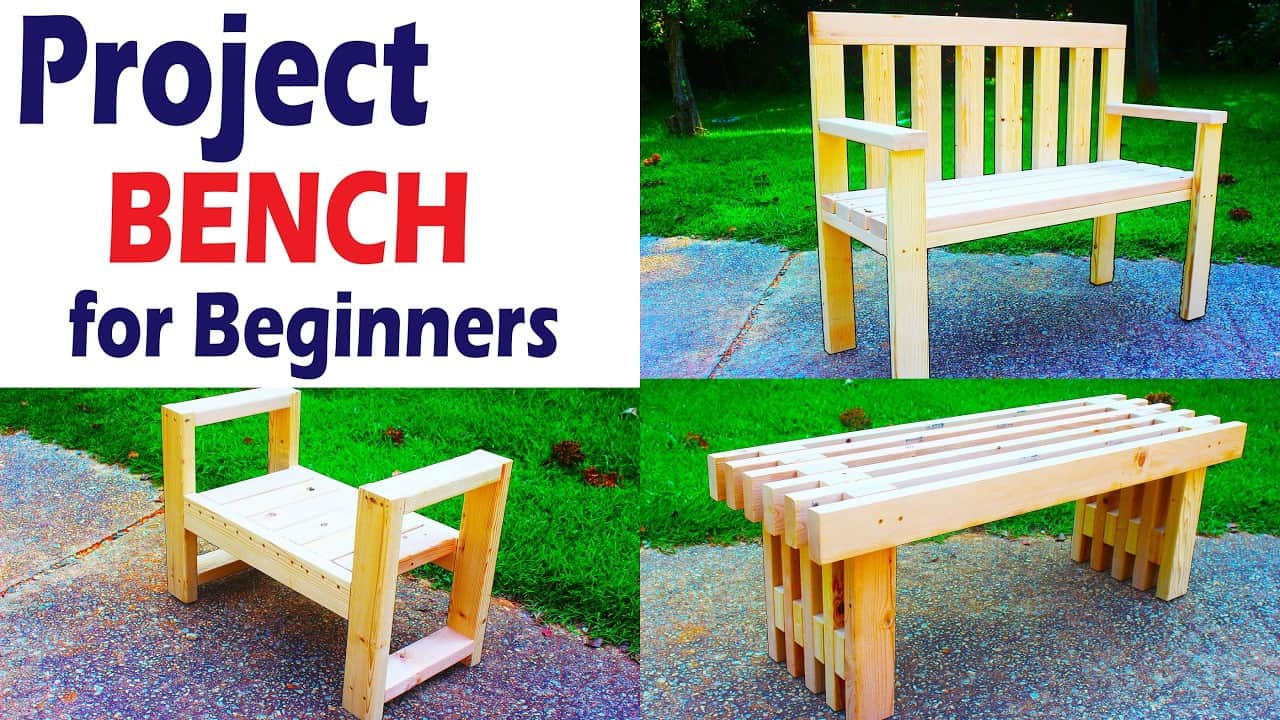
Project 1 – Compact Kids’ Bench
The first project is a small bench designed for young children. It’s made from just a few 2x4s and features two matching side assemblies connected by a top rail and several seat slats.
Build Highlights
Each side frame is built like a mini ladder, using two uprights and short horizontal stretchers. The slats sit on top and are secured across both side frames to create the seat.
Clinton recommends adding pocket holes on the underside of the top rail to hide hardware. Pre-drilling at the ends of each slat reduces splitting and improves long-term durability.
Start by building both side frames identically, then attach the top rail followed by the slats. To keep the structure square, attach all slats on one side before completing the opposite side.
After final assembly, sand thoroughly to remove sharp edges and apply a finish or paint that’s safe for children.
This is a quick win project that offers real-world use and hands-on learning.
Project 2 – Long Bench or Daybed Base
This second design scales up in length and surface area. It uses stacked 2x4s to create a bench or potential daybed frame with a clean, modular look.
Build Highlights
Instead of traditional legs, Clinton stacks horizontal boards and separates them with spacers to create ridge-like supports.
These modular stacks are then connected side-to-side with short boards to add rigidity.
A spacer block ensures consistent gaps between boards, and alternating screw placement helps prevent fasteners from hitting each other. Clinton adds glue between each layer and uses clamps to hold things tight until dry.
Working on a flat surface makes alignment easier, especially when building long components. This bench works well as-is or can be topped with a cushion for lounging. Despite its scale, the assembly remains approachable and repeatable.
Project 3 – Full Bench with Backrest
The third project includes a backrest and full-sized seat, giving it the look and feel of a complete piece of outdoor furniture.
It uses a traditional frame structure with added long slats across the seat and back.
Build Highlights
The bench begins with two matching leg and frame assemblies. Pocket holes are used on the seat and back rails, keeping screws hidden underneath or behind slats.
Clinton marks out reference lines on the legs to place horizontal rails accurately. Once the frame is built, long seat slats are spaced evenly and attached, followed by backrest boards in the same fashion.
Spacing the slats slightly apart allows for drainage and wood movement if the bench is used outdoors.
Choosing the best-looking boards for the front-facing areas helps improve the finished appearance without much extra effort.
Like the others, the project finishes with sanding all exposed edges and corners. A weather-resistant stain or exterior paint will extend the life of the bench outside.
Shared Build Tips
Clinton’s video and project breakdowns are filled with repeatable advice that applies to all three designs:
- Use a pocket hole jig to simplify joinery and hide screws.
- Pre-drill at board ends to prevent splitting—especially with slats.
- Clamps help align parts and make glue-ups more consistent.
- Trim pieces to fit as needed; perfect cuts aren’t always necessary.
- Take the time to sand every edge—especially for seating surfaces.
- Attach one side of repeating parts first, then complete the second side to stay square.
Finishing Suggestions
Each bench can be finished in a variety of ways depending on use. For indoors, a simple varnish or oil brings out the grain.
For outdoor seating, an exterior-grade stain or sealer protects against the elements.
For children’s furniture, always use a non-toxic, child-safe finish and double-check that all surfaces are smooth and splinter-free. Add cushions if desired to increase comfort and prolong wear.
Learn More from Clinton
These projects were designed and built by Clinton from Specific Love Creations.
His full video provides a step-by-step breakdown, including cutting guides, spacing tips, and visual examples of how everything fits together.
Watch the full video and subscribe to Clinton’s channel:

Matt’s Take
These are my personal thoughts and tips based on my own experience in the shop. This section is not written, reviewed, or endorsed by the original creator of this project.
What strikes me about these builds is how they demonstrate that good furniture doesn’t require fancy joinery or expensive materials. Construction lumber gets a bad rap sometimes, but for outdoor projects and beginner builds, it’s actually perfect. The wood moves predictably, it’s forgiving if you make small mistakes, and you can find decent boards if you take time to pick through the pile at the lumber yard.
The pocket hole approach Clinton uses is smart for beginners because it eliminates complex measuring and creates strong joints without visible hardware. If you’re just getting into pocket holes, start with some scrap pieces to get the hang of the depth settings—different lumber thicknesses need different setups, and it’s better to dial it in on throwaway wood first.
One safety point worth emphasizing: pre-drilling really is crucial with construction lumber, especially near the ends. 2x4s can have unpredictable grain patterns, and nothing ruins a project faster than a split board when you’re almost done. Keep a small drill bit handy and take the extra 30 seconds—it’ll save you frustration and material.
These projects also show the value of building jigs and using consistent spacing methods. That spacer block approach for the daybed design is the kind of simple shop trick that makes everything go smoother and look more professional. Once you get comfortable with these basics, you’ll find yourself using the same techniques on much more complex builds.