This project was built and designed by Nick from Rocky River Woodworks.
It’s a practical and approachable wall-mounted rack, designed to help organize coats, bags, leashes, and more just in time for the school year.
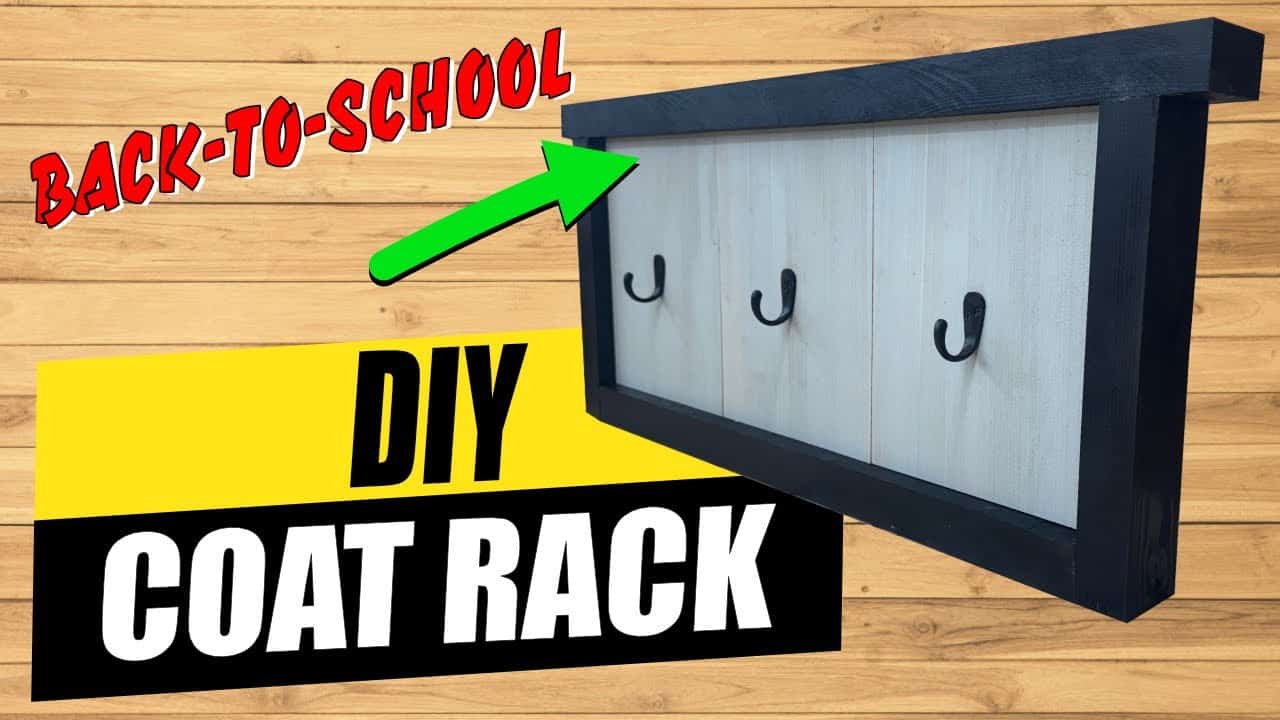
Built from construction-grade lumber with a clean, two-tone finish, this entryway organizer offers function without complexity.
It’s ideal for woodworkers looking to tackle a useful weekend build using pocket-hole joinery and affordable materials.
Watch the full video and subscribe to Nick’s channel:
A Simple and Effective Storage Solution
The organizer features a framed backboard with a shallow profile, making it a perfect fit for mudrooms, hallways, or entryways.
Several coat hooks are mounted to the face, providing a designated place for high-traffic items that often end up in a pile by the door.
Nick keeps the design straightforward, using mostly rectangular parts and relying on construction lumber that’s inexpensive and easy to find.
The final piece is sturdy, stylish, and functional—and the entire project is beginner-friendly.
Project Structure and Design
The assembly is built from three main parts: a backboard, a set of flush-mounted interior panels, and a painted outer band that wraps the front face with a slight overhang. Hooks are attached to the panel, and the whole unit is secured directly to wall studs.
Because the design uses mostly repeatable cuts, it’s ideal for batching out multiple units or using leftover materials from other projects. Nick avoids complex joinery and focuses on clean lines and strong, concealed fasteners.
Material Choices and Finishing Approach
Nick builds the entire organizer from construction-grade pine or similar softwood. Scrap boards work well too, and the final result still looks polished once painted.
He finishes the outer band in a dark tone and paints the inner panels a lighter color, creating contrast without using stain or fancy trim.
Painting the individual pieces before assembly makes the process cleaner and avoids awkward brushwork near joints or corners.
Hooks are mounted to the face panel and should be sturdy enough to hold backpacks, coats, or daily accessories. The final piece is anchored securely to wall studs with long screws for safety and durability.
Preparing the Wood and Making Accurate Cuts
Nick starts by trimming and squaring up all pieces. A miter saw, table saw, or circular saw with a square edge guide can all work for this task, depending on the tools available.
To keep parts consistent, he uses a stop block when cutting the repeating interior panels and outer frame. The backboard is cut first, and all other parts are trimmed to align flush against it for a clean assembly.
Edges are sanded lightly to soften corners and prep for paint. These small steps add up to a more professional-looking finish and help prevent splinters or damage from daily use.
Painting Before Assembly
Rather than finishing everything after assembly, Nick paints most pieces beforehand. This method makes painting easier, especially along edges and inside corners, and avoids masking off joined parts.
He sands lightly between coats to remove raised grain and applies paint evenly to all visible faces.
This strategy also keeps fasteners hidden—since most screws and nails are driven from behind or inside, the finished piece remains clean and free of visible hardware.
Assembly with Pocket Screws and Glue
Assembly starts with gluing and attaching the interior panels to the backboard. Nick uses a brad nailer from the back side to temporarily hold things in place without marring the painted faces.
Pocket-hole screws are driven through the rear of the organizer for strength. These hidden fasteners hold the outer band securely while preserving the clean front appearance.
The outer frame wraps the entire face with a slight overhang, giving the rack dimension and helping it stand out on the wall.
Long screws can be added through the top for extra support if needed, but most of the strength comes from glue and pocket screws.
Hook Placement and Mounting Tips
Hook layout is carefully measured and marked for even spacing. Nick recommends using centerlines to align the hooks both vertically and horizontally, ensuring a balanced, professional look.
He pre-drills pilot holes to avoid splitting and uses screws long enough to hold weight without working loose over time.
For safety, the entire organizer should be anchored directly into wall studs using long screws—not just light-duty wall anchors or picture hangers.
Ideas for Customization
Nick’s basic design is easy to modify. Builders can substitute hardwood or reclaimed lumber for a rustic or elevated look. Adding a second row of hooks or a small shelf for keys or mail turns the piece into a full-service command center.
A French cleat can also be added for easier removal if the organizer ever needs to be moved.
Nick keeps the plan open-ended so woodworkers can adapt it to fit their space or storage needs.
A Smart, Beginner-Friendly Build
This back-to-school organizer balances clean design with simple construction. It’s a perfect project for anyone looking to declutter their entryway while building woodworking skills.
Nick’s finishing method—painting before assembly—and his emphasis on hidden fasteners make the final piece feel more polished than the materials might suggest.
It’s a great example of how thoughtful design can elevate even scrap lumber into something useful and attractive.
Please support Nick by visiting his website here: https://www.rockyriverwoodworks.com/.

Matt’s Take
These are my personal thoughts and tips based on my own experience in the shop. This section is not written, reviewed, or endorsed by the original creator of this project.
What I really appreciate about this build is how Nick demonstrates that smart construction methods can make inexpensive materials look fantastic. The decision to paint components before assembly is a game-changer — it eliminates those tricky brush angles and gives you much cleaner results than trying to work around joints after everything’s together.
The pocket-hole approach here is perfect for beginners who want strong joints without fussy techniques. When you’re mounting something that’ll see daily use like this organizer, those hidden fasteners give you the holding power you need while keeping everything looking clean. Just make sure your pilot holes are sized right for your screws — construction lumber can be unpredictable, and you don’t want any splitting near the edges.
For the wall mounting, I can’t stress enough how important it is to hit those studs. An organizer loaded with winter coats and heavy bags puts real stress on the mounting system. Toggle bolts might seem sufficient, but finding at least two studs gives you the confidence that this thing will stay put for years. The slight overhang on the frame band is a nice touch too — it adds visual weight and helps the piece feel substantial rather than just flat against the wall.