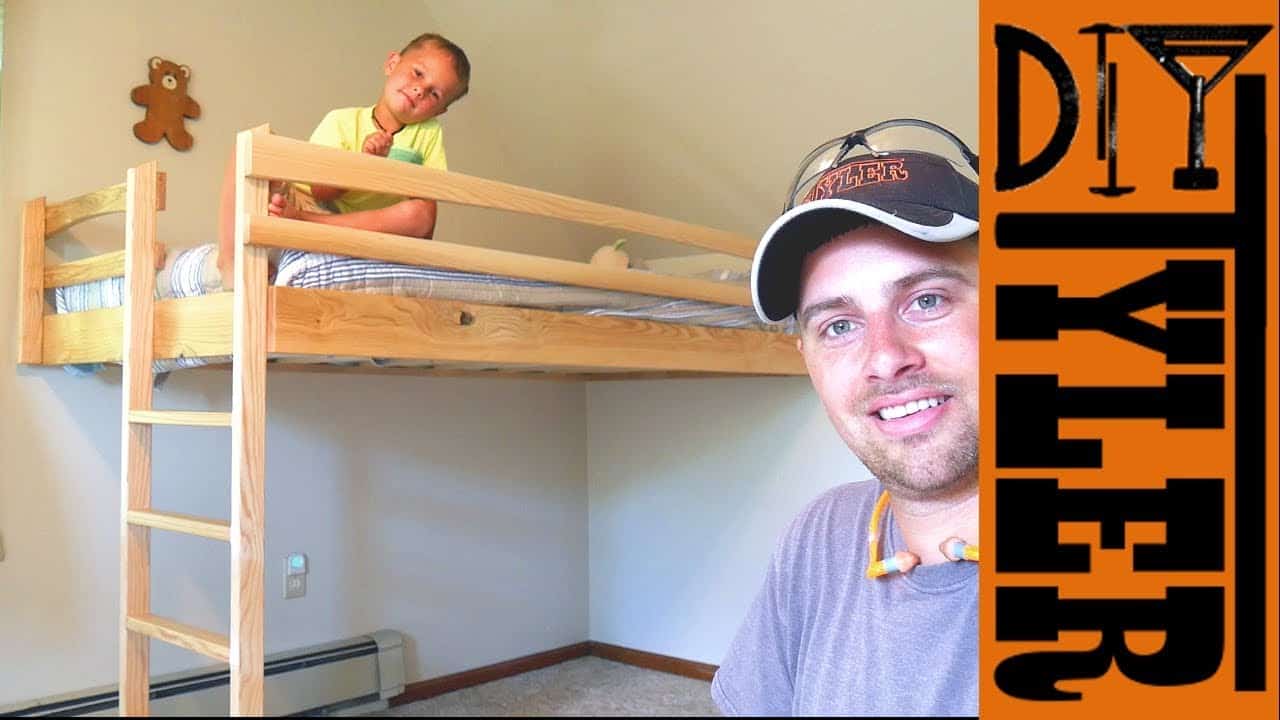
This project was built and designed by Tyler from DIYTyler. It’s a sturdy loft bed made from rough-cut ash, created for just $40 in materials—proving that saving money and space doesn’t mean compromising on quality or style.
Tyler walks through each step, from milling rough lumber to final installation, all while keeping the build accessible and budget-friendly. For families with limited space or sloped ceilings, this design offers flexibility without the bulk of a traditional bunk bed.
Watch the full video and subscribe to Tyler’s channel:
Why Loft Beds Make Sense in Smaller Spaces
Loft beds are ideal for maximizing room layout in homes where space is tight or architectural constraints—like sloped ceilings in Cape Cod-style homes—limit your options. By raising one bed off the ground, you create room below for another twin, a desk, or play space.
Tyler’s design supports a twin-size mattress below the loft, functioning as a flexible bunk bed alternative. This makes it perfect for shared kids’ rooms or spaces that evolve as your family grows.
Choosing Rough-Cut Ash Lumber
One of the standout features of this project is Tyler’s choice to use rough-cut ash lumber. At just $40 for all the material, this approach dramatically lowers the cost while still delivering a hardwood build.
Rough-cut wood does require more prep, but the trade-off is worthwhile. Ash is a strong, durable wood—excellent for furniture that needs to hold up over time. Local sawmills often carry species like this at prices far below surfaced lumber.
Milling the Wood for a Clean Build
The first step is milling the rough ash into usable pieces. Tyler uses a combination of tools—a miter saw, jointer, planer, and bandsaw—to break down, flatten, and square each board.
Rough cuts are made first to remove imperfections, followed by jointing the edges and planing everything to consistent thickness. After prepping the boards, Tyler allows the wood to acclimate to indoor humidity to prevent movement after assembly.
Repeatable Cuts and Smooth Curves
After milling, all pieces are cut to final dimensions using a stop block on the miter saw. This ensures accuracy and repeatability, which are especially important for structural components like rails and legs.
For a subtle design touch, the bottom of the safety rail is curved. Tyler marks this using a flexible piece of plywood, cuts it on the bandsaw, and smooths the edge with an oscillating spindle sander. It’s a small detail that adds both visual appeal and comfort.
Joining with Dowels and Screws
The loft bed is assembled in two main parts: the ladder and the frame. Tyler uses half-inch dowels along with wood screws for strong, reliable joints. A doweling jig helps align the holes perfectly.
He starts by assembling the ladder, checking for square by measuring diagonally. That attention to precision makes a big difference once everything comes together.
When moving to the bed frame, Tyler switches to a brad point bit to get clean, centered holes. This type of bit avoids wandering and results in better control during assembly.
Sanding and Finishing Like a Pro
Before applying any finish, the bed is thoroughly sanded. Tyler uses multiple grits and a sanding block to round sharp edges and prep for finishing. For the outer corners, he uses a large roundover bit to soften contact points—especially important for a kids’ bed.
For the finish, Tyler sprays on a semi-gloss polyurethane, applying multiple coats with light sanding in between. This step protects the ash while highlighting its natural grain patterns.
The result is a smooth, durable surface that looks professionally done—without the professional price tag.
Safe Installation and Final Setup
The finished bed is securely attached to the wall studs using long screws. Tyler uses a magnetic stud finder to mark anchor points, ensuring the frame is mounted safely and won’t shift over time.
The ladder is positioned and fastened in place to complete the structure. This step is especially important for safety, particularly if the bed will be used by kids.
A Practical Build with Serious Savings
This loft bed is a great example of how thoughtful planning and smart material choices can lead to big savings. By using rough-cut ash and doing the prep work himself, Tyler built a solid hardwood bed for under $50—far less than any store-bought option.
It’s functional, attractive, and built to last—everything you want from a DIY furniture project.
Please support Tyler by visiting his website here: diytyler.com

Matt’s Take
These are my personal thoughts and tips based on my own experience in the shop. This section is not written, reviewed, or endorsed by the original creator of this project.
This build really highlights the value of working with rough lumber when you’re trying to keep costs down. Ash is an excellent choice for furniture like this — it’s incredibly strong and has beautiful grain patterns that really pop under a clear finish. At $40 for the entire project, Tyler’s proving that quality hardwood furniture doesn’t have to break the bank if you’re willing to do the milling yourself.
The dowel and screw combination is smart joinery for a bed frame. Dowels handle the lateral forces while the screws provide the clamping strength you need for a rock-solid connection. That brad point bit switch is a nice touch too — those bits really do give you better control when you’re drilling into hardwood, especially when hole placement matters for structural integrity.
Safety-wise, that wall attachment step is crucial. A loft bed generates different forces than regular furniture, and you definitely want those long screws hitting solid wood framing, not just drywall anchors. The rounded edges are another thoughtful detail — taking the time to soften all those contact points makes a real difference in how the finished piece feels, especially for kids’ furniture.
The semi-gloss poly finish strikes a good balance here. You get durability and easy cleanup (important for kids’ rooms) while still letting that ash grain show through. Multiple light coats with sanding between always beats trying to lay on one heavy coat — patience pays off with a much smoother final result.