This project was built and designed by Jeff and Jon from TodaysCraftsmen.
The duo demonstrates how to add reeded glass panels to cabinet doors, turning ordinary shaker-style doors into elegant display pieces that showcase dishes while maintaining some visual privacy.
Watch the full video and subscribe to TodaysCraftsmen:

Preparing the Cabinet Doors
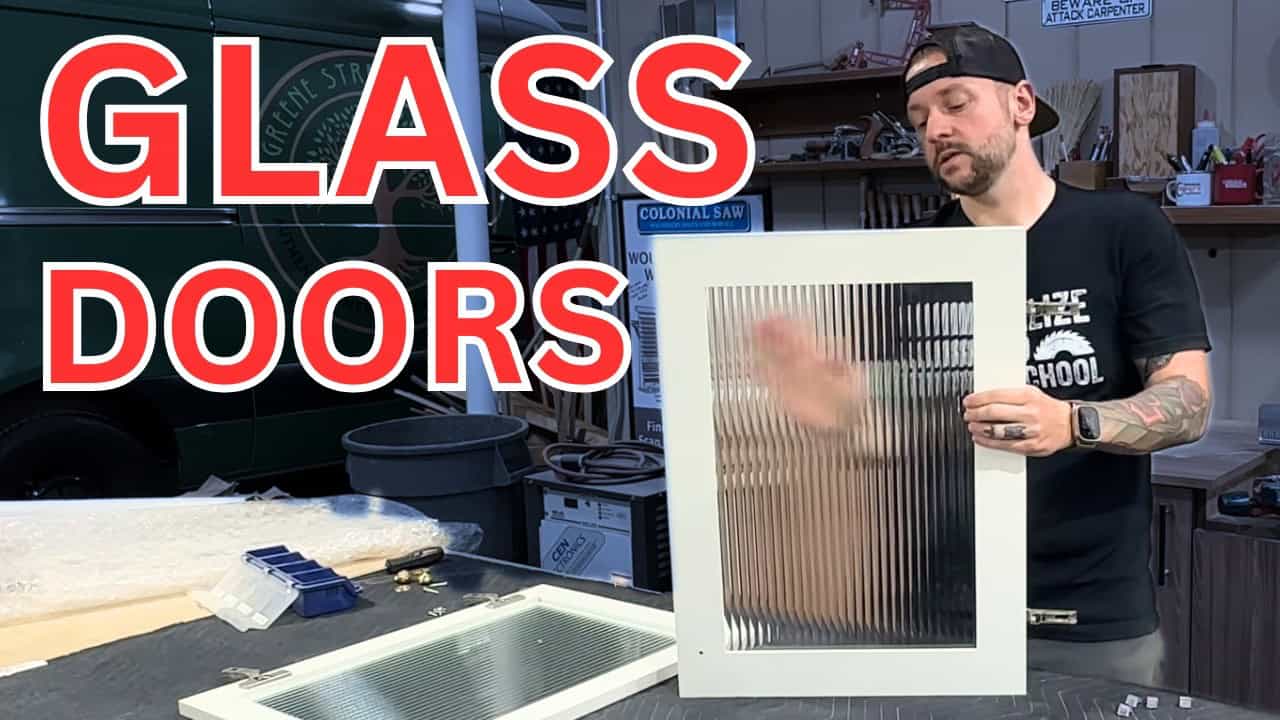
Jeff and Jon start with shaker-style cabinet doors that feature a rabbet cut on the back side. This rabbet creates a recessed area where the glass panel will sit securely.
The doors are laid face down on the work surface, and the brass hardware is temporarily removed to allow the doors to sit flat during the installation process. This simple preparation step makes the entire process much more manageable.
Glass Selection and Ordering
The project uses half-inch reeded glass, which provides an ideal balance between visibility and privacy. This textured glass allows light to pass through while obscuring the exact details of what’s stored inside the cabinets.
Rather than cutting the glass themselves, Jeff and Jon ordered pre-cut pieces sized specifically for their doors. This approach eliminates the need for specialized glass-cutting tools and ensures precise dimensions. When ordering, they recommend subtracting a small amount from the exact measurements to avoid an overly tight fit.
Installing the Glass Panels
The installation relies on specialized glass retainer clips that consist of two parts: the metal clip and a rubber spacer. These clips are designed to hold the glass securely in place without requiring permanent adhesive.
Jeff positions the clips at the corners of each door, using a spacer to ensure consistent placement. A self-centering drill bit helps create precise pilot holes, though this specialized bit isn’t absolutely necessary for the project.
The clips apply gentle but firm pressure to keep the glass panels stable within the rabbet. For these smaller doors, four clips provide adequate support, though larger or heavier glass panels would require additional clips for proper retention.
Finishing and Installation Options
The completed doors showcase how reeded glass transforms the appearance of standard cabinets. The textured surface creates visual interest while maintaining the clean lines of the shaker style.
Jeff and Jon deliberately avoid sealing the glass with silicone or other permanent adhesives. This approach allows for easy glass replacement in the future, giving homeowners the flexibility to change glass types or replace damaged panels.
They also mention an alternative installation method using custom wooden molding that could be mitered around the glass perimeter. While this approach offers a more traditional look, the clip system provides significantly easier installation and future maintenance.
This glass installation technique works equally well for updating existing cabinets or incorporating into new builds. The process demonstrates how small changes can dramatically enhance the visual appeal of kitchen storage while maintaining functionality. The clip system makes this upgrade accessible to woodworkers of various skill levels without requiring specialized glazing experience.
Watch the full video and subscribe to TodaysCraftsmen:

Matt’s Take
These are my personal thoughts and tips based on my own experience in the shop. This section is not written, reviewed, or endorsed by the original creator of this project.
The clip system Jeff and Jon demonstrate here is a game-changer for anyone intimidated by traditional glazing methods. I’ve always appreciated how these retainer clips eliminate the mess and permanence of glazing compound while still providing a secure hold. The rubber spacers are key — they distribute pressure evenly and prevent stress cracks that can happen when metal contacts glass directly.
When working with glass panels, I always keep a few extra clips on hand since they’re inexpensive and occasionally one will crack during installation. That self-centering bit they mention really does make a difference for consistent placement, but a regular bit with careful marking works fine too. The key is keeping your pilot holes shallow enough that you don’t blow through the door face.
Reeded glass is an excellent choice for this application. The texture hides dust and fingerprints better than clear glass while still letting you see general shapes and colors inside. If you’re ordering glass, definitely follow their advice about undersizing slightly — I typically go 1/8 inch smaller than the opening on each dimension. Glass expands and contracts with temperature changes, and you want that wiggle room.
This reversible approach is smart thinking. Cabinet trends change, and being able to swap out glass types without rebuilding doors gives you flexibility down the road. Whether you want to go back to solid panels or try frosted glass later, those clips make it a simple afternoon project.