This project was built and designed by Steve from JKM Woodworking. It’s a custom-built sled made specifically for cutting precise 45-degree bevels on a table saw—ideal for frames, angled joinery, and other mitered assemblies.
Unlike standard 90-degree sleds, this design is tailored for consistent and repeatable angled cuts. It’s a practical addition to any workshop and a solid upgrade for woodworkers looking to increase accuracy while improving safety.
Watch the full video and subscribe to Steve’s channel:
Why a 45-Degree Sled?
A typical crosscut sled is great for straight cuts, but angled work can still be a challenge. This project addresses that by building a sled that aligns specifically with a 45-degree blade tilt, ensuring perfect bevels every time.
Steve revisits the fundamentals of sled construction while focusing on how to maintain accuracy when dealing with angled geometry. This makes the project especially useful for those who frequently build boxes, frames, or decorative trim with mitered corners.
Materials and Basic Setup
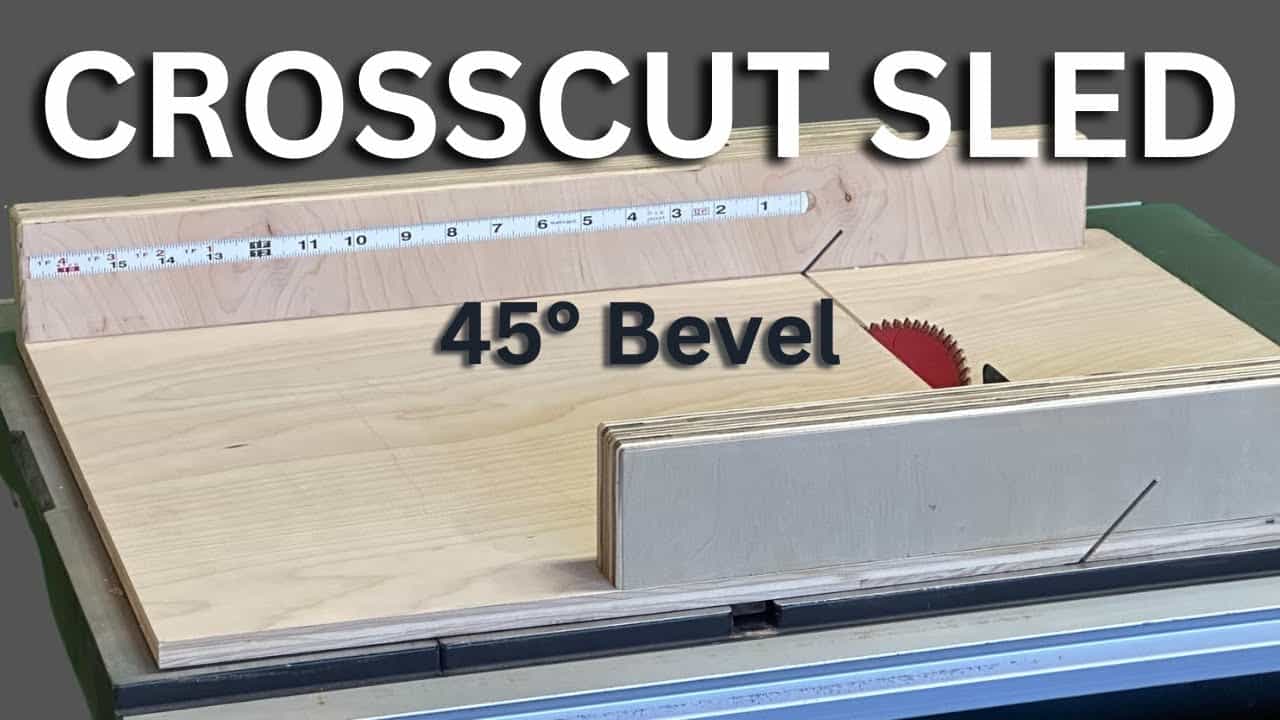
The sled uses half-inch plywood for the base to keep it lightweight, but still rigid enough for stable cutting. Three-quarter-inch plywood is used for the fences, providing enough height and strength to guide the workpieces safely.
For the runners, hardwood is the material of choice. It’s more resistant to wear than plywood and provides smooth movement inside the miter slots. Each piece is sized carefully to prevent slop or sticking during use.
Building the Base and Fences
Construction begins by cutting the plywood base to size—large enough to support a variety of projects, but compact enough for comfortable handling. Steve ensures clean edges for reliable reference points during fence installation.
The front and back fences are glued together from multiple layers of plywood. Once dry, they are trimmed square and mounted to the base using screws. Care is taken to avoid screw placement in the blade path to prevent future hazards.
Sizing and Attaching the Runners
The runners are milled down to a snug fit in the saw’s miter slots. Steve uses a combination of table saw passes and light planer adjustments to dial in the fit, ensuring smooth glide without excessive play.
To secure them to the sled, CA glue provides quick tack while countersunk screws deliver long-term hold. This combination helps keep everything locked in place and aligned with the table saw’s travel path.
Making the Initial Cut
Before fully locking in the front fence, an initial cut is made through the sled’s base. This establishes a clean kerf line that acts as a visual reference for future alignment.
Steve then uses that kerf to align the front fence precisely for 45-degree cuts. Making small adjustments here ensures that the sled will deliver accurate miters without needing constant recalibration.
Dialing In the Accuracy
With the fence attached, Steve performs a series of test cuts to check for squareness and bevel consistency. Measuring opposite diagonals helps identify any misalignment, and small tweaks can be made to correct the angle.
Accuracy is confirmed by comparing cuts from both sides and checking how well they meet at the mitered corner. Once things line up perfectly, additional screws are added to lock down the fence.
Helpful Add-Ons
To make the sled more functional, Steve adds a stick-on measuring tape to the front fence. This provides a quick reference when making repeatable cuts and helps speed up layout work without relying solely on a ruler.
Another addition is a sacrificial block on the front fence, which acts as a blade stop and safety barrier. This simple feature helps prevent accidental contact with the spinning blade and reminds users to keep their hands safely away from the cut zone.
Differences From a 90-Degree Sled
Steve highlights how using a 45-degree sled changes the workflow compared to a typical crosscut sled. Because the blade is tilted, lining up the workpiece to a marked cut line takes more care, as the bevel shifts the blade’s cutting point.
Once you’re used to the setup, though, this type of sled can save time and provide more control for projects that involve repeated angle work. It’s a great companion to the standard sled rather than a replacement.
Maintenance and Final Details
Before using the sled regularly, Steve applies a light coat of wax to the underside. This helps reduce friction and keeps it moving smoothly across the saw table.
He also recommends checking the sled periodically to make sure the runners are still snug and the fences haven’t shifted. With occasional maintenance, the sled will stay accurate and reliable over time.
A Useful Shop Upgrade
This 45-degree bevel sled adds versatility to any woodworking setup, particularly for those who do trim, frame, or box-making work. It offers precise angles, smoother cuts, and safer handling compared to cutting bevels freehand or with just a miter gauge.
Steve’s build strikes a balance between simplicity and precision, making it a project well worth replicating.
Watch the full video and subscribe to Steve’s channel:

Matt’s Take
These are my personal thoughts and tips based on my own experience in the shop. This section is not written, reviewed, or endorsed by the original creator of this project.
The devil’s in the details with angled sleds, and Steve nails the key points here. That initial kerf cut through the base is absolutely critical — it’s your north star for everything that follows. I always tell folks to take their time with this step because any misalignment here gets magnified in every subsequent cut. The CA glue and screw combo for the runners is smart too. That instant tack from the CA keeps everything from shifting while you drive the screws home.
One thing I really appreciate about this build is the attention to runner fit. Getting that sweet spot between too loose and too tight makes all the difference in how the sled feels in use. A sticky runner turns what should be a smooth operation into a wrestling match, while too much play kills your accuracy. Taking the time to dial this in with test fits and light passes is time well spent.
The sacrificial fence block is a nice touch that serves double duty — blade protection and a visual reminder to keep your fingers clear. I’ve seen too many people get comfortable with sleds and forget that there’s still a spinning blade doing the work. That little block helps maintain good habits and keeps you thinking about hand placement throughout the cut.