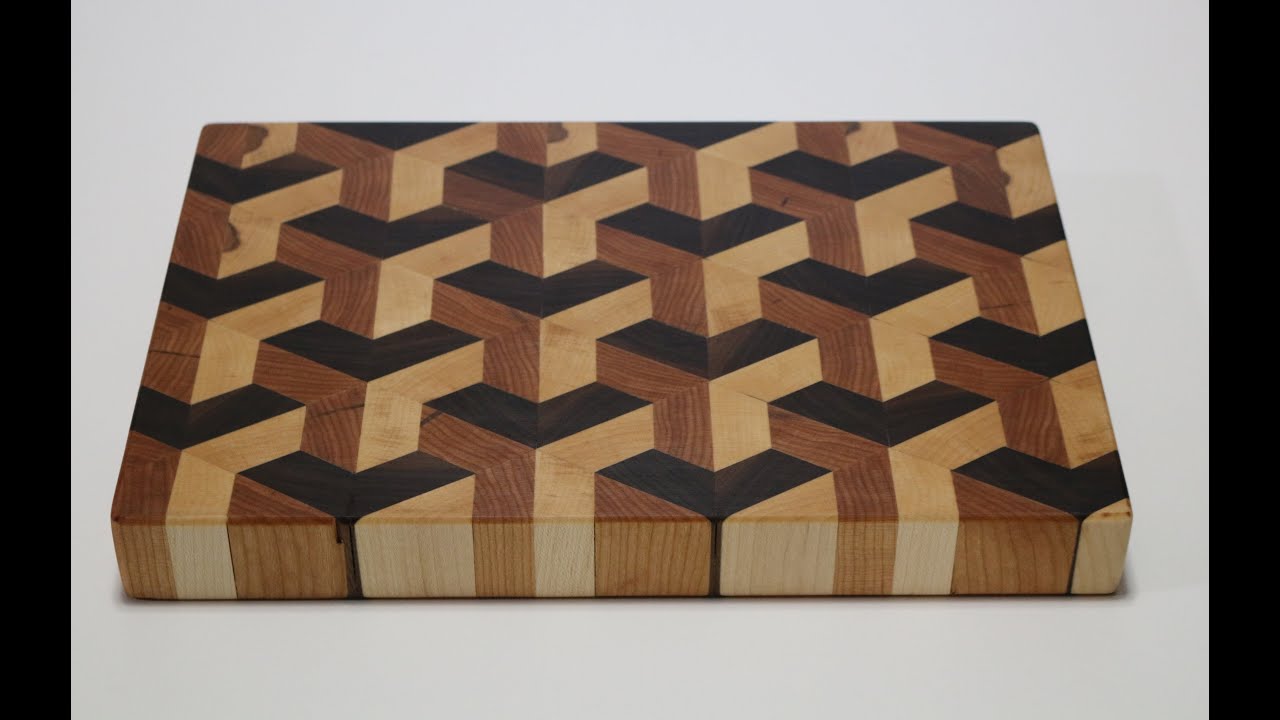
This project was built and designed by Caleb from Caleb’s Fine Woodworking. It features a stunning 3D hexagon design made from cherry, walnut, and maple—blending precision, creativity, and craftsmanship into one visually striking cutting board.
This is more than just a kitchen tool. The build demonstrates key woodworking techniques like angled cuts, pattern layouts, and proper glue-up strategies, making it an ideal project for anyone looking to challenge their skills and produce a standout piece.
Watch the full video and subscribe to Caleb’s channel:
Choosing the Right Woods
Caleb selects cherry, walnut, and maple for their contrasting tones and durable end grain properties. This trio of hardwoods not only looks great together but also performs well under heavy use.
Each species brings something unique to the table—walnut’s deep tones, maple’s light grain, and cherry’s warm midrange combine to form the intricate 3D illusion. These woods are also excellent choices for end grain applications, holding up to knives and repeated sanding.
Milling and Prep Work
The boards are cut to around 40 inches in length before being planed down to a consistent thickness of 20 millimeters. Consistency at this stage is key, especially for a pattern that depends on tight-fitting geometric shapes.
One edge of each board, especially the walnut, is jointed to create a perfectly straight line. This makes the upcoming angled cuts much easier to line up cleanly on the table saw.
Cutting for the 3D Illusion
The key to this design is a 60-degree rip cut on each board. Caleb adjusts the table saw blade to this angle, then rips the boards in half down the center, producing two pieces per board with a consistent slope.
The fence is fine-tuned to ensure the top edges of the resulting trapezoids are uniform. Even slight misalignment would throw off the pattern later, so extra care is taken to check each cut before moving on.
Creating the Hexagon Patterns
Using combinations of the different woods, Caleb assembles several repeating hexagon groups. Some are cherry and walnut, others are cherry and maple, and some are walnut and maple. This adds variety while keeping the visual pattern cohesive.
Due to the high number of small parts and limited clamps, patience is required. Each section is glued carefully and clamped in batches, allowing time for each to cure before the next step.
Slicing for the Final Layout
Once cured, the hexagon panels are sliced into strips, each roughly one and three-quarter inches wide. Caleb uses a bandsaw to minimize material waste, though a table saw could also be used with a sharp blade.
Each strip is grouped based on wood combinations to keep the layout organized. This extra step makes the final assembly more efficient and helps prevent visual repetition in the board’s pattern.
Assembly and Glue-Up
Before applying any glue, Caleb lays out all the strips to finalize the design and orientation. A common mistake at this stage is flipping a strip the wrong way, which breaks the visual flow of the 3D illusion.
Clamping pressure is distributed evenly using scrap blocks on each side of the board. This ensures the end grain pieces glue up flat and remain aligned across the full panel. After the glue sets, the board is run through a drum sander to even out the surface.
Finishing and Edge Work
Once the surface is flattened, any uneven edges are trimmed for a clean outline. The board is then sanded progressively up to 320 grit for a silky finish that’s pleasant to the touch and easy to clean.
Caleb rounds over the top edges slightly and does some final hand sanding to remove any sharpness. These subtle finishing touches give the board a polished, professional look.
The last step is applying mineral oil, which enhances the wood’s natural contrast and protects the surface. It also brings the 3D pattern to life, highlighting the geometry and clean lines.
A Cutting Board That Stands Out
This project is a great way to explore how geometry, wood choice, and accurate joinery can turn a common kitchen item into something exceptional. Caleb’s step-by-step approach makes the process manageable even for intermediate woodworkers.
It’s a rewarding challenge with a big visual payoff—ideal for gifting, selling, or keeping as a showpiece in your own kitchen.
Please support Caleb by visiting his website: https://www.calebscustomwoodworks.com/.