


Stand in your kitchen for a second. Open a cabinet. Close it.
That hollow slam, the sticky brass knob, the yellowed oak that hasn’t looked fresh since the Clinton administration — none of it means your cabinets are done.
New cabinets run $8,000 to $30,000 and up once you factor in demo, install, and the countertop you’ll crack pulling the old ones out. That’s a used car. For a room that mostly needs to look different, not be different.
The boxes are usually fine. It’s the surface, the hardware, and the way they open that read as tired.
Here are 22 ways to update your kitchen cabinets for a fraction of the cost of tearing them out — some for the price of a pizza, some for a serious weekend of work.
1. Swap the Knobs and Pulls

Start here. Always.
Hardware is jewelry for your cabinets, and swapping it is the cheapest visible win there is — roughly $2 to $15 a piece. Move from dated shiny brass to matte black, brushed brass, or brushed nickel and the whole kitchen reads new.
A hundred bucks does it on most kitchens. Under an hour of work.
The one trap is spacing. If your old pulls used two screws, measure the hole centers before you buy — the industry calls it the center-to-center measurement, and getting it wrong means drilling new holes. A simple hardware jig makes lining up new handles foolproof.
2. Paint the Cabinets

The single biggest change per dollar you’ll ever make in a kitchen.
DIY paint runs $200 to $650 in materials against $8,000-plus to replace. That’s saving 70 to 85 percent for a weekend-plus of your time.
But paint punishes shortcuts, and oak punishes them worse. The open grain telegraphs through thin paint, so the prep is the whole job. Degrease every surface — kitchen cabinets carry a decade of cooking film you can’t see. Then scuff-sand, prime, and let each coat cure hard before you rehang.
Use a cabinet-grade enamel, not wall paint. Wall paint stays soft and shows every fingerprint. The Home Depot walks through the full sequence if you want the order of operations spelled out.
Label every door and its hinge cup as you take them off. You’ll thank yourself at reassembly.
Not sure on color? A pile of kitchen cabinet colors people can’t stop talking about will narrow it fast.
3. Gel-Stain Over the Old Finish
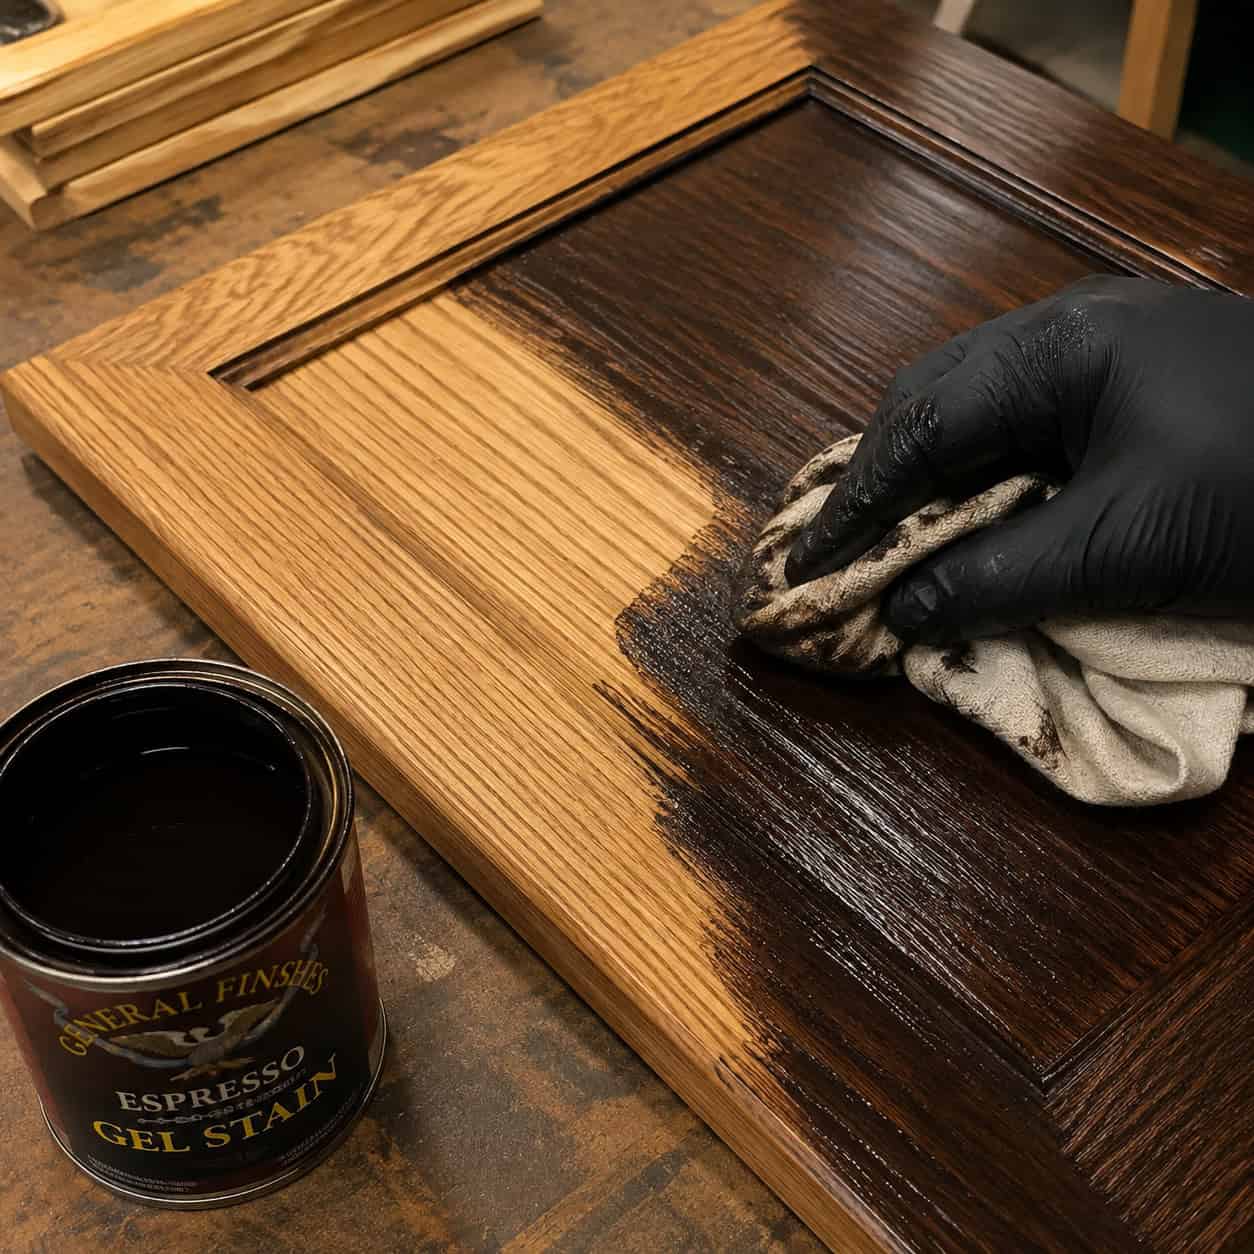
Love wood grain? Don’t paint over it.
Gel stain is thick — closer to pudding than liquid — so it sits on top of the existing finish instead of soaking in. That means no stripping and no heavy sanding. A full color change for under $80 in product.
Wipe it on, wipe most of it back off, let it dry, topcoat it. The grain shows through darker and richer.
One hard rule: gel stain only goes darker. You can take honey oak to espresso. You cannot take espresso to honey. Plan the direction before you open the can.
4. Restore the Original Wood Finish

Sometimes cabinets aren’t dated. They’re just tired.
Solid-wood boxes with a decade of grease haze and a few worn spots don’t need color at all — they need a deep clean and a fresh topcoat. This is the lowest-commitment option on the list for wood worth keeping.
Degrease hard. Light-sand to knock down the gloss and give the new finish something to grip. Then flow on a coat of wiping varnish and let it cure.
Dull oak comes back to life. University extension guides like Oregon State’s furniture refinishing bulletin lay out the clean-sand-recoat sequence if you want to do it by the book. If you’re fuzzy on which product does what, sort out the finishes that get confused but behave very differently before you buy.
5. Apply Peel-and-Stick Veneer or Film

Renting? This one’s for you.
Peel-and-stick veneer and vinyl film re-skin cabinet fronts in a new color or wood look, and the whole point is that it comes back off. Fully reversible. Your deposit stays intact.
The trick is a clean, degreased, bone-dry surface and a plastic smoothing card to chase out every bubble. Wrap the edges tight so nothing catches a fingernail.
It’s not permanent, and it doesn’t pretend to be. That’s the selling point.
6. Add Shaker Trim to Flat Doors

The woodworker’s move.
Plain slab doors read cheap. Shaker doors read current. You can fake the second from the first with four strips of trim.
Cut 2 to 2.5-inch MDF or plywood strips, glue and brad-nail them in a rectangle around the face of each flat door, then caulk the seams and paint the whole thing. Twenty to forty dollars covers a full kitchen’s worth of strips.
The frame catches light and shadow the way a real rail-and-stile door does. Painted, nobody can tell. If you’d rather build the genuine article, here’s how Shaker-style cabinet doors go together.
7. Reface the Doors and Drawer Fronts

This is the big middle ground between paint and replacement.
Refacing keeps your existing boxes, swaps in all-new doors and drawer fronts, and skins the visible frame faces with matching veneer or laminate. You get a genuinely new-looking kitchen — new door style, new color, new hardware — for typically 30 to 50 percent less than tearout and replacement. Figure $900 on the low DIY end to $6,000 for a pro job on a larger kitchen.
Here’s the part most articles skip. Refacing only works if the boxes underneath are sound. Skin a bad box and you’ve spent good money wrapping a problem.
So inspect first, honestly. Pull every drawer and shine a light into the corners. You’re looking for three failure modes.
Water damage is the big one. Cabinets under and beside the sink take the brunt of every slow supply-line drip and every dishwasher that wept for a year before anyone noticed. Swollen particleboard, a soft spongy floor in the sink base, a tide line up the back panel, or a musty smell when you open the door — those aren’t cosmetic. That’s a box that’s already coming apart, and often a moisture problem behind it that a new door front won’t fix. Chronic dampness invites mold, and per the EPA, hidden moisture is exactly what feeds it. Find and fix the leak, dry the cavity out completely, and confirm the box is solid before you spend a dime on refacing.
Second, check for racking — whether the box still sits square. Push on a face frame. If it flexes or the door gaps unevenly top to bottom, the box has twisted, usually from a settling floor or a bad original install. A racked box needs to be re-squared and re-anchored, not decorated.
Third, tug the joints. Old staple-and-glue boxes let go over time. If a corner wiggles, it needs glue and screws before anything gets skinned to it.
Pass all three and refacing is one of the best-value updates going. Fail any of them and you’ve just found the real project — and it’s the kind of repair worth doing right, because a compromised sink base is how small leaks turn into subfloor and framing damage. Angi has a solid rundown on where the reface-versus-replace line actually falls once you know the box condition.
8. Cut Glass Inserts Into Upper Doors

Take one or two upper doors. Replace the wood panel with glass.
Suddenly the door reflects light, the kitchen feels airier, and a plain box becomes a showpiece. You don’t do the whole run — just the doors flanking a window or a range make the accent land.
On a rail-and-stile door you pop the panel out from behind, drop in glass, and secure it with retainer strips. It’s more approachable than it sounds, and adding glass to cabinet doors is simpler than most people expect.
Frosted or reeded glass hides a messy shelf. Clear glass means you now have to keep those dishes tidy — fair warning.
9. Pull the Upper Doors for Open Shelving

Free. An afternoon.
Take the doors off your uppers — or remove a whole upper cabinet and mount a bracketed shelf in its place — and the kitchen instantly feels bigger and more custom. Open shelving doubles as a display for the dishes and glassware you actually like.
If you keep the box and just lose the doors, sand and paint or line the interior so it looks intentional. Fill the old hinge holes.
The honest tradeoff: everything on those shelves collects dust and grease. This works best for the stuff you use often enough that it never sits long.
10. Crown the Cabinets With Molding

The classic looks-expensive-isn’t move.
Builder-grade uppers usually stop with a flat, naked top edge. Run crown molding along it and the cabinets suddenly look built-in and finished, bridging the awkward gap toward the ceiling.
You’ll cut inside and outside miters, nail into a mounting strip along the top, then fill and paint. A day’s work and the cost of the molding.
It’s the detail that separates a kitchen that looks assembled from one that looks designed. Same boxes. Better hat.
11. Panel the Cabinet Ends With Beadboard

Look at the exposed side of your end cabinet. It’s probably the ugliest surface in the room — a flat sheet of laminate or unfinished particleboard nobody ever meant you to stare at.
Glue and nail a beadboard skin over it. The panel hides every imperfection and adds cottage texture for the price of a sheet of paneling.
Cut it to fit, construction-adhesive the back, brad-nail the edges, caulk the seams, paint to match. Done in an hour.
Base cabinet ends and island sides take it especially well.
12. Add Furniture Feet and Legs

Base cabinets sit flat on a toe-kick. Furniture stands on legs. Add legs and your cabinets read as furniture.
Decorative feet under an island or a run of base cabinets give the whole thing a freestanding, custom look. Real cabinet feet cost real money.
The budget hack: cut-down wooden curtain finials from the hardware store stand in beautifully. Paint or stain them to match, screw them up into the base, and nobody’s the wiser.
Pair it with the toe-kick trick further down and the furniture illusion is complete.
13. Extend the Cabinets to the Ceiling

That dead gap above your uppers does two things: collects grease-fuzzed dust and makes standard cabinets look short.
Close it. Build a simple framed box-out on top of each cabinet, face it with matching panel, and cap the whole run with stacked trim up to the ceiling.
The uppers instantly look taller and custom, like they were specified for the room instead of ordered from a catalog. This is a strong one in older homes with nine and ten-foot ceilings, where the gap is cavernous.
Match your paint and the seam disappears.
14. Install Soft-Close Hinges and Dampers

Changes nothing you can see. Changes everything you feel.
Soft-close hinges and little push-in drawer dampers catch the door in the last inch and ease it shut instead of letting it slam. It’s the difference between a kitchen that feels builder-grade and one that feels expensive, every single time you close a cabinet.
Many standard European hinges swap straight across for a soft-close version — unclip, unscrew, replace. Drawer dampers just clip or screw to the cabinet. A drill is all you need.
Cheap, invisible, and you notice it a dozen times a day.
15. Retrofit Roll-Out Shelves

Deep base cabinets are black holes. Whatever slides to the back is gone until spring cleaning.
Roll-out shelves fix that. They’re trays on drawer slides that bolt into your existing box, so the whole shelf pulls out to you — no more crawling in headfirst. Figure $45 to $60 per shelf and a screwdriver.
It’s a bespoke, custom-cabinet feature you’re adding to boxes you already own. Measure the interior width carefully and account for the slide thickness on each side.
Ambitious? You can build your own simple slide-out trays for cabinet storage for even less.
16. Fix the Dead Corner Cabinet

Every kitchen has one. The blind corner cabinet — that awkward black hole where the two runs meet and half the space is unreachable.
A pull-out corner organizer or a swing-out unit can reclaim up to 50 percent more usable space back there. The mechanism pivots the shelving out and around so what was buried comes to the door.
It’s a two-to-four-hour retrofit into the cabinet you already have. Suddenly the worst storage in the kitchen works like it was designed by someone who cooks.
Measure the opening precisely first — corner units are fussy about clearance.
17. Add Under-Cabinet Lighting

A strip of LED lighting tucked under the uppers changes a kitchen overnight.
It lights the counter where you actually work and throws a warm glow that makes even dated cabinets feel current after dark. Function and mood in one cheap upgrade.
Plug-in puck lights or adhesive LED tape are the no-wiring route — stick, plug in, done. Hardwired strips look cleaner but mean pulling a bit of low-voltage wire.
Aim the light toward the backsplash, not out at your eyes, and hide the strip behind the cabinet’s front lip.
18. Wallpaper the Cabinet Interiors

A designer trick for a few dollars.
Line the backs of glass-front cabinets or open shelving with peel-and-stick wallpaper and you get a surprise punch of pattern every time the door opens. It frames the dishes like a little stage set.
Peel-and-stick means no paste and no commitment — it comes right back off. Cut it to the back panel, smooth it flat, and let the door do the reveal.
Small detail. Reads custom. Costs almost nothing.
19. Paint the Island a Contrasting Color

Keep the perimeter cabinets as they are. Paint just the island a bold or deep shade.
Two-tone kitchens are everywhere in design magazines right now, and you can get the exact look with a single quart of paint and a weekend. Navy, forest green, and charcoal islands all anchor a room of white or wood uppers.
Because it’s one contained piece, the prep is manageable and the payoff is loud. The island becomes the intentional centerpiece instead of a matching afterthought.
Tie the island hardware to your new perimeter hardware so the two tones still read as one kitchen.
20. Replace Just the Drawer Boxes and Slides

Drawers take the most abuse in any kitchen. They’re the parts that rack, sag, and stop closing right.
You don’t have to touch the cabinet to fix them. Swap tired wooden runners or worn drawers for smooth ball-bearing slides and, if the box itself is shot, drop in a new box behind the original front.
It’s the middle step between refacing and replacing — targeted at the one component that actually failed. A drawer that glides silently on full-extension slides feels like a brand-new kitchen from the one spot you touch most.
Building your own boxes? Rabbet-and-dado plywood drawers hold up for decades.
21. Add a Light Rail or Valance Under the Uppers

The bottom edge of your upper cabinets is usually just a raw line. A light rail finishes it.
It’s a strip of trim run along the underside of the uppers, dropping down an inch or two. It hides the under-cabinet lighting from step 17 and gives the bottom of the run the same built-in look the crown gives the top.
Cut it, nail it up, paint or stain to match. Cheap trim, big finish.
Pair it with LED strips and the wiring vanishes behind a clean, deliberate edge.
22. Refresh the Toe-Kick With New Molding

The recessed strip at the floor — the toe-kick — is the most beat-up, scuffed, mop-splattered part of your cabinets, and nobody ever thinks to fix it.
Cover it. A fresh cut-to-fit piece of trim, beadboard, or even a stained wood strip along the base ties the whole thing together, especially if you added furniture feet up above.
It’s cheap, it’s cut-to-fit, and it’s the finishing detail that separates a project that looks 90 percent done from one that looks complete.
Peel-and-stick vinyl base works too, and it shrugs off the mop.
The Takeaway
Most kitchens don’t need new cabinets. They need new hardware, a better finish, and a way to open that doesn’t feel like 1994.
Start with the cheapest visible win — the knobs — and see how far that carries you before you commit to anything bigger. You can stack most of these projects one weekend at a time.
The boxes on your wall are probably solid wood or solid ply, built better than half of what’s for sale now. Don’t send them to the landfill because the surface got tired.
Fix the surface. Keep the money.