Jeff and Jon from Today’s Craftsmen shared the woodworking tip featured in this video.
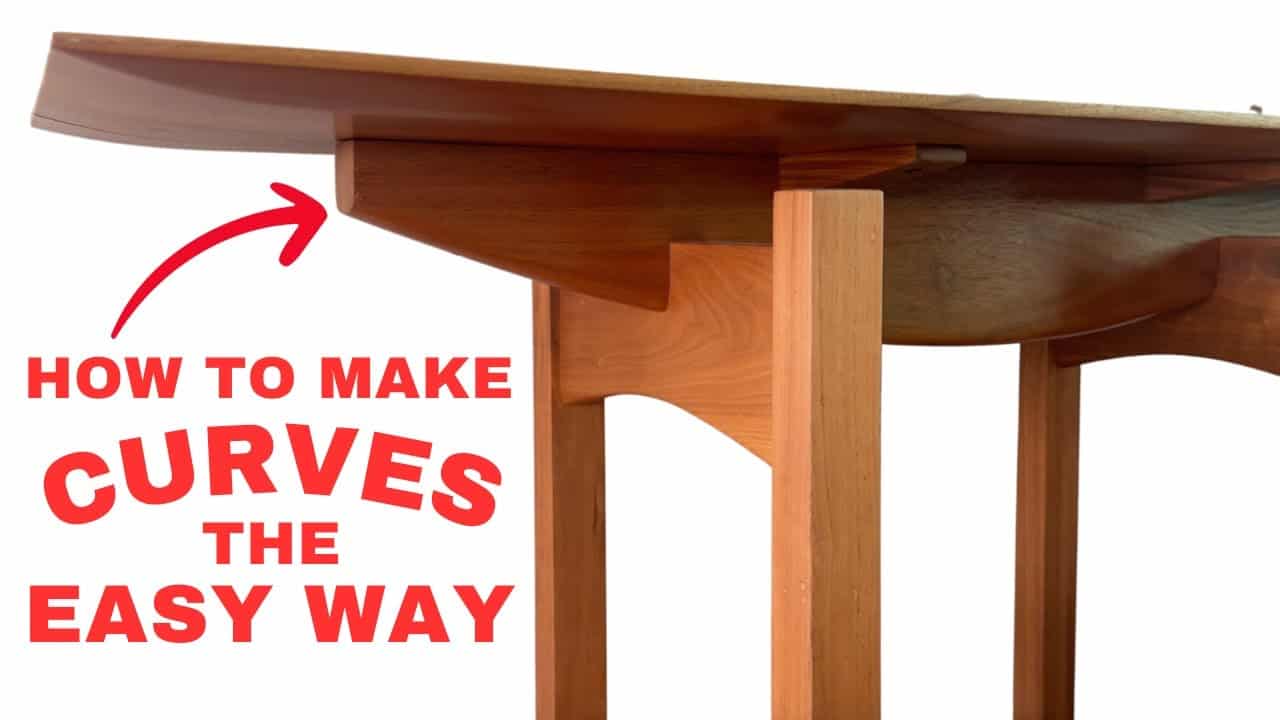
This short demonstration shows a simple workflow for laying out, templating, and trimming a gentle curve in a table apron or similar part without complex jigs.
The method relies on a temporary thin template glued to the workpiece, rough cutting, and then flush-trimming with a bearing-guided router bit.
Watch the full video and subscribe to Today’s Craftsmen:

Planning the Curve
Start by deciding how pronounced the curve should be and where the apex will sit on the part; simple layout marks are enough to establish the shape. Jeff suggests tools like a drawing bow for adjustable radii, but a freehand or measured layout works perfectly for many furniture-style curves.
Making and Attaching a Temporary Template
The technique uses a thin piece of MDF temporarily glued to the face of the workpiece to serve as the router guide rather than cutting directly from finished stock.
Jeff secures the template with small dabs of CA glue for instant tack and a little hot glue on the back to reinforce the hold while keeping cleanup manageable.
Rough Cutting and Router Trimming
After the template is attached, the profile is rough-cut on a bandsaw leaving a small allowance for trimming to the template line. The final cleanup is done with a bearing-guided router bit that references the template edge and produces a smooth, even curve.
Workholding and Bit Selection
Good workholding matters: small routers and bits can be tipped when heavy material is trimmed, so use a stiffer setup or a larger-diameter cutter if you are removing a lot of waste.
Jeff points out a practical alternative is to cut a thin template first, then use that template to trim the final material so the router only removes a small amount at the end.
Cleanup and Finishing Touches
Removing the template may require a chisel or light sanding depending on the adhesive and template material, and surfers of rough spots can be smoothed quickly with an orbital or palm sander. The approach yields an even, fair curve that requires minimal hand work once the routing is properly executed.
Why This Method Helps
This workflow is fast, repeatable, and adaptable for aprons, rails, and other parts where a subtle bow improves the design language of a piece.
It also makes batch work easier since a single template can be reused for multiple parts, and the basic idea scales whether working in hardwoods or more delicate materials.
Practical Tips and Adaptations
Consider making the template from a material that trims easily if you plan to use it repeatedly, and always leave a small margin when rough-cutting to avoid overloading your router bit.
If precision is critical, improve clamps or use a larger router and bit to reduce deflection during trimming.
The method demonstrated by Jeff and Jon is a reliable, low-complexity way to cut smooth, fair curves without elaborate tooling, and it can be adapted to many furniture projects where subtle shaping makes a big visual difference.
For a visual walkthrough and to subscribe, watch the full video and subscribe to Today’s Craftsmen:

Matt’s Take
These are my personal thoughts and tips based on my own experience in the shop. This section is not written, reviewed, or endorsed by the original creator of this project.
This template approach is one of those techniques that seems almost too simple until you try it—then it becomes a go-to method. The CA glue and hot glue combo is clever because it gives you immediate hold without the commitment of stronger adhesives that can tear out wood fibers when removed.
One thing I really appreciate about this workflow is how it takes the pressure off that initial bandsaw cut. You’re not trying to nail the final line perfectly; you’re just removing bulk material and letting the router do the precision work. That said, don’t get too aggressive with your rough cut—staying about 1/8″ proud of your template line gives the bearing-guided bit something to work with without overloading it.
The workholding point is spot-on. Light routers can definitely chatter or tip when dealing with deeper cuts, especially on harder woods. If you’re seeing any deflection or rough cuts, slow down your feed rate or consider taking multiple passes rather than trying to remove everything in one go. A sharp bit makes all the difference too—dull cutters will tear out and leave you with more cleanup work than necessary.
For anyone hesitant about this technique, start with some scrap pine or poplar to get the feel for how the bearing follows the template. Once you’ve got the rhythm down, it’s a method you’ll reach for again and again.