Rob from Let’s Make Things shared the woodworking tip featured in this video.
Most woodworkers know how to cut concave coves, but creating a smooth convex shape without fighting bending or inconsistent results is a different challenge—this build solves it with a dedicated router jig that pivots a cradle through light passes.
Watch the full video and subscribe to Rob’s channel:
Why Convex Curves Are Tricky (and What the Jig Fixes)
Concave curves are straightforward because common saw setups naturally remove material in a way that “opens up” a channel. Convex curves are harder because the desired surface is an outward arc, and the toolpath needs to stay controlled while removing material evenly.
This jig addresses the key problem: maintaining a consistent arc while routing, so the curve doesn’t wander or turn into a set of uneven facets. Instead of bending wood, it uses controlled rotation and repeatable positioning.
The Core Concept: Pivoting the Board in Small Increments
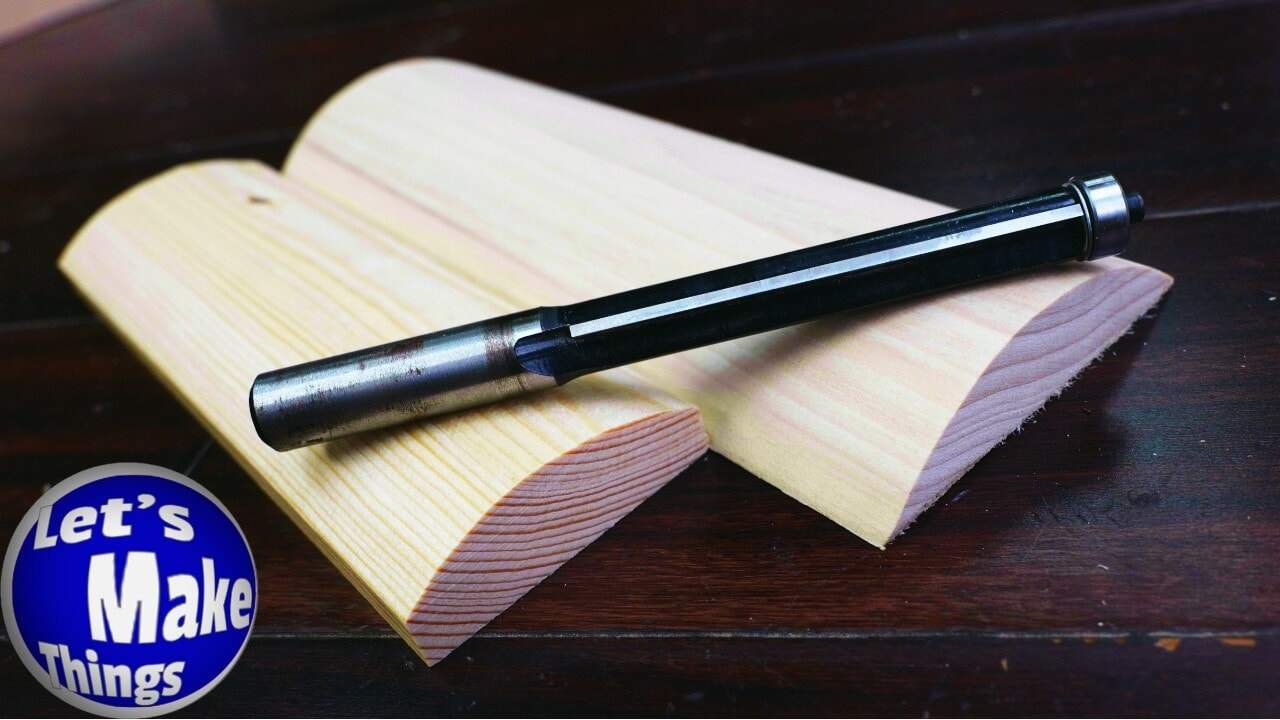
The heart of the system is a pivoting cradle mounted to a sled base. A flush-trim router bit rides against a guided fixture so the cut stays stable as the board rotates around the pivot point.
Material is removed gradually. The board swings to the next position, light passes are made, and the process repeats until the full arc appears smoothly across the workpiece.
Sled Base Setup for Alignment and Repeatability
The sled base is built to keep everything tracking straight and centered. A guided channel and a stabilizing reference bar help the sliding parts return to the same locations, which is essential for getting a uniform curve from one pass to the next.
Attention to flatness matters here. If the sled base or tracking surfaces aren’t true, the router will follow that error and the arc will look lopsided.
Pivot Blocks and Friction Brakes for Controlled Rotation
The pivot blocks are machined and positioned so the cradle sits at the correct relationship to the router bit. Because the pivot determines the radius of the arc, even a small setup mismatch can change how the curve lands on the face of the board.
To keep the system from drifting during cutting, friction brakes are added. This prevents unwanted rotation while the router is engaged, turning a “moving target” into a controlled, repeatable motion.
Cradle Blocks and the Way the Board Gets Located
Cradle blocks provide a stable platform for the board while still allowing the pivot action. The inside corners and seating surfaces are shaped so the board sits securely without rocking or shifting.
The fixture uses a clamp-style location to hold the board in the same place every time. That consistency is what lets convex curves come out smooth rather than slightly off-center or uneven from side to side.
Router Fixture and Bit Guidance: Preventing Chatter and Wander
A flush-trim router bit with a bearing is used to keep cutting forces from deflecting the bit. The bearing rides within the jig’s track, which helps control flexing and reduces the chance of chatter ruining the surface.
The router fence reference is extended so the jig can pass cleanly while still leaving the bit exposed enough to cut. This is one of those “small detail, big outcome” adjustments that makes the whole method behave predictably.
Example Use: How the Pivot Point Becomes the Curve
To start a cut, the pivot point on the workpiece is established so the jig rotates around the correct center. Marking the centerline from the chosen face helps ensure the arc appears where it’s intended.
During cutting, the jig is swung into position and locked, then light passes remove material until the reference fully engages. Once the curve is established on one side, the pivot is removed and the opposite side is routed the same way.
Shaping Nuance: Board Width Changes How Much Curve You See
One subtle behavior of this method is that the width of the board affects the visible arc. On narrower boards, the router only touches part of the intended circle, so the curve looks more subtle.
On wider boards, more of the arc is revealed, and the curve can reach down to the lower edges of the panel. This makes the jig feel “responsive” to stock choice, which is useful when planning how dramatic the final profile should be.
Spacers for Bigger Radii (and Why That Matters)
If a larger curve radius is desired, spacers can be added between the pivot and the cradle. Moving the board farther from the cutter increases the radius, producing a gentler outward arc across the face.
This approach is also easier to adapt than redesigning the whole jig. By swapping spacer thicknesses and adjusting the pivot relationship, the same core hardware can generate a range of curve effects.
Lessons Learned and Potential Improvements
Even with a strong guide system, there can be minor concerns like racking on wider spans. Ensuring both sides are evenly spaced before locking down helps keep the arc true.
An improvement idea is to relocate the central track and add a second opposing track. That would better support longer boards and further reduce any chance of twist during routing.
Overall Takeaways: A Practical Way to Make Convex Surfaces
This router jig turns a difficult geometric shape into a repeatable motion problem. The pivoting cradle, guided flush-trim bit, and controlled locking make it possible to generate a smooth convex profile without bending wood or relying on unpredictable freehand routing.
For projects like rounded lids, curved box sides, or panel edges, this method offers a reliable route to consistent arcs. It also teaches a transferable lesson: when you need a specific curve, controlling the toolpath and the reference surfaces often matters more than the horsepower behind the cutter.
Read Rob’s blog post: https://makethingswithrob.com/convex-curves-made-from-a-router/.

Matt’s Take
These are my personal thoughts and tips based on my own experience in the shop. This section is not written, reviewed, or endorsed by the original creator of this project.
The beauty of this jig is how it turns a challenging freehand operation into a mechanical process. When you’re routing convex curves by hand, it’s easy to get inconsistent results or even dangerous kickback as the bit tries to grab the wood. Having that pivot point locked down and the router following a guided path takes all the guesswork out of it.
One thing I really appreciate about this design is the attention to friction control. Those brake blocks might seem like a small detail, but they’re what prevent the whole setup from rotating unexpectedly when the router bit engages. I’ve seen too many jigs where everything looks great until you fire up the router and the workpiece starts dancing around. The controlled incremental movement here is key to getting smooth results.
For anyone thinking about building this, pay close attention to the sled base alignment. Even a small twist or bow in that foundation will telegraph directly into your finished curve. Take the time to get it dead flat and square before you start cutting your first piece. Also, don’t rush the light passes – it’s tempting to try to hog off material quickly, but the incremental approach is what gives you that glass-smooth finish.
This is the kind of jig that really opens up design possibilities. Once you have reliable convex curves in your toolkit, you start seeing applications everywhere – cabinet door panels, box lids, even architectural trim work. The spacer system for different radii is particularly clever since it lets you adapt the same setup for various projects without rebuilding everything from scratch.