This tip video is by Norman Pirollo of WoodSkills.
It’s a minimalist, hand-tool-based method for cutting board ends square using a homemade saw guide and a Japanese pull saw—ideal for woodworkers who want accuracy without machinery.
Norman demonstrates how a small, purpose-built fixture can replace table saws and miter saws in many trimming tasks.
The result is cleaner cuts, greater control, and a surprising level of precision using only hand tools.
Watch the full video and subscribe to Norman’s channel:
Why Square Ends Matter in Woodworking
When boards aren’t square on both the face and edge, joinery suffers. Whether you’re fitting a butt joint, lap, or miter, an uneven end can throw off alignment and weaken the final product.
Machines can square up cuts quickly, but not every shop has the space—or need—for a miter saw or shooting board.
Norman’s approach gives hand-tool users a reliable way to get square ends with minimal setup.
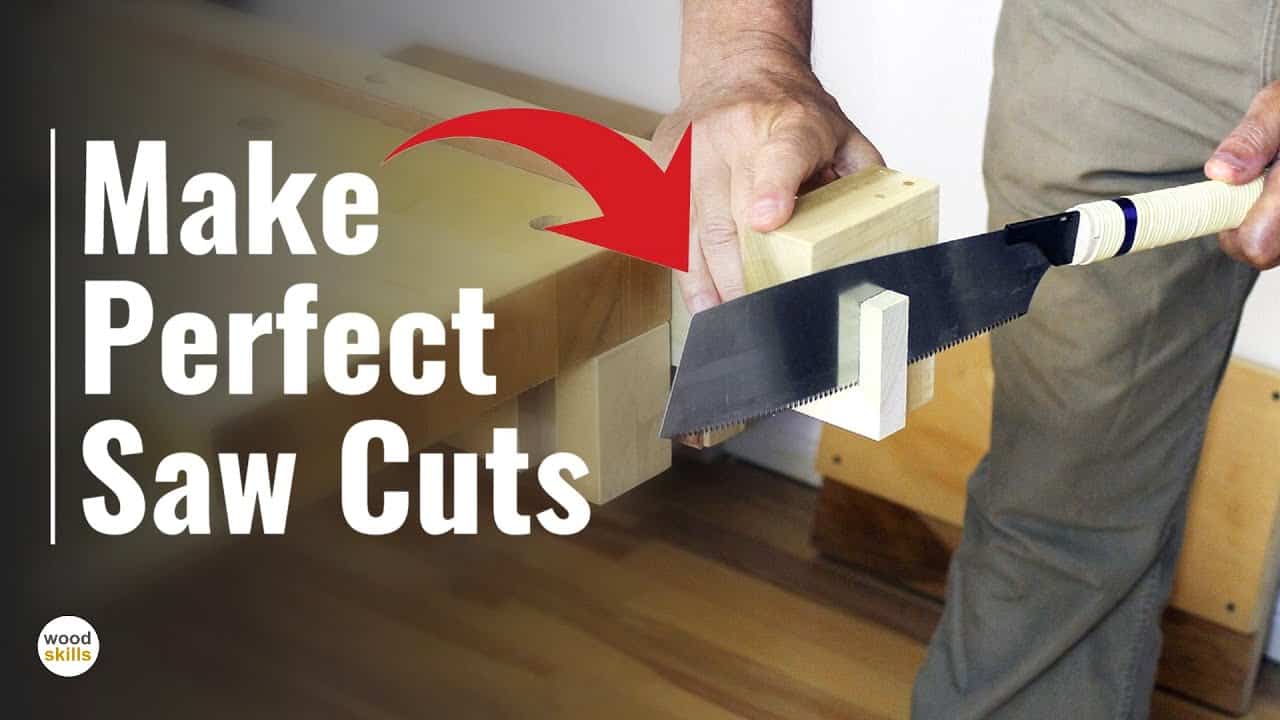
The Saw Guide Concept
At the core of this method is a simple, L-shaped saw guide made from two wooden boards fastened at a right angle. One side registers against the face of the workpiece, and the shorter leg rides along the edge.
The hand saw runs against the inside corner of the guide, making it nearly impossible to drift. This creates a cut that’s both square across the face and true to the reference edge—all in one pass.
A Low-Tech, High-Precision Fixture
There’s nothing complex about the build: just two stable boards joined at 90 degrees and reinforced to stay square. For added grip, Norman applies a thin abrasive strip inside the guide faces.
This keeps the guide from slipping when held by hand. The fixture can also be clamped to the board for more stability, depending on the situation.
Why Use a Japanese Pull Saw?
Norman prefers Japanese saws for their control and precision. These tools cut on the pull stroke, which naturally reduces binding and produces cleaner edges.
They also tend to have thinner blades with finer teeth, which means less effort and smoother results.
For this system, Norman suggests using either a single-sided crosscut saw or a dual-edge saw that handles both rip and crosscut tasks.
How to Use the Guide
There are two ways to use the saw guide: hand-held or clamped. Both methods are effective and depend on the scale of the cut and your comfort level.
For small workpieces or quick trims, holding the guide firmly by hand works well. The abrasive lining helps maintain grip, and the saw follows the corner without needing clamps.
For larger or longer boards, clamping the guide provides added stability. Once locked in place, both hands are free to control the saw with more precision.
Key Cutting Techniques
The most important tip when using this guide is to apply minimal lateral pressure on the blade. Let the saw do the work—especially with Japanese blades, which are designed to track with light force.
Start with a shallow scoring cut, then continue with smooth, controlled strokes.
The thin kerf makes it easy to follow the guide, and most cuts come out clean enough to go straight into a joint without additional trimming.
What Makes This Method So Effective
The biggest advantage is that the saw tracks square in two planes at once. Unlike machine setups that might require two separate tools or jigs, this approach gets it done in one pass.
The resulting cut is usually so clean that no shooting board or sanding is required. For woodworkers who make repeat parts or small batches of components, this saves time and increases consistency.
How to Make the Saw Guide
The build is simple: use stable, straight wood for both faces and fasten them at a right angle. Reinforce the joint with screws, dowels, or glue blocks so the corner stays perfectly square.
Add a narrow strip of grip tape or sandpaper to the inside faces if you plan to use the guide freehand.
Consider making a few versions in different sizes to suit your typical projects.
Troubleshooting Tips
If the guide slips during the cut, clamp it to the board or improve the grip lining. If the blade starts to wander, make sure you’re not pushing sideways or overdriving the stroke.
For best results, check that the guide itself is square and that your starting edge is flat. Any error in the guide will show up in the cut.
When to Use This Instead of Machines
This method is perfect for small shops, portable setups, or anyone who prefers hand tools. It’s also ideal for fine joinery, where the clean edge left by a pull saw often beats what comes off a miter saw.
While power tools are faster for batch cutting large stock, Norman’s guide shines in precision trimming, on-site work, or furniture projects where accuracy and finish are top priorities.
Small Jig, Big Results
Norman’s technique is a reminder that woodworking doesn’t always require machines.
A well-made guide, paired with a sharp pull saw, can deliver clean, square cuts with little setup and almost no footprint in your shop.
It’s a thoughtful system that encourages control, repeatability, and simplicity—all hallmarks of skilled hand-tool woodworking.
Support Norman by visiting his website: https://www.woodskills.com/

Matt’s Take
These are my personal thoughts and tips based on my own experience in the shop. This section is not written, reviewed, or endorsed by the original creator of this project.
I really appreciate how this simple jig solves a common problem without requiring any power tools or complex setups. The beauty of Norman’s approach is that it addresses both planes of squareness simultaneously — something that can be tricky to achieve consistently by hand. Japanese pull saws are fantastic for this type of work because they naturally want to track straight, and that thin kerf means less material removal and cleaner edges.
One thing I’d add from a shop perspective is that the quality of your initial reference edge matters enormously here. If the edge you’re registering against isn’t straight and square to the face, that error will transfer to your end cut. It’s worth taking a moment to check your reference edge with a straightedge before making the cut. Also, when building the guide itself, take your time getting that 90-degree corner perfect — any deviation will show up in every cut you make.
This method really shines for smaller stock and precision work where you want that hand-tool finish. While I reach for power tools for production work, there’s something satisfying about the control you get with a well-tuned hand saw and a solid guide. Plus, the minimal setup time means you can grab this guide for quick one-off cuts without firing up the whole shop.