This project was built and documented by Jason from PatriotDIY.
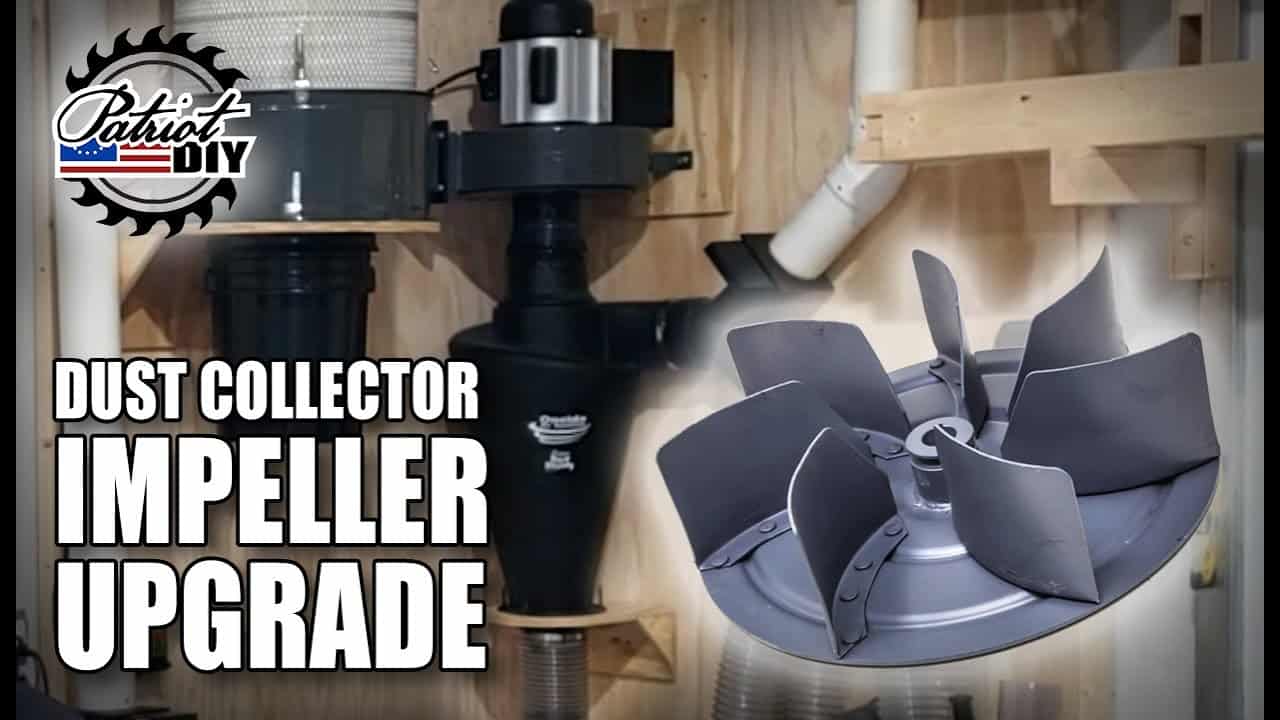
It’s a detailed impeller swap on a Harbor Freight dust collector, upgrading from the stock 10-inch fan to a larger 12-inch aftermarket model for noticeably improved airflow and suction.
If you’ve added more ducting or tool drops to your dust collection system, this kind of upgrade can be a cost-effective way to restore or boost performance—without replacing the entire unit.
Watch the full video and subscribe to Jason’s channel:
Why Upgrade the Impeller?
Jason had already converted his single-stage Harbor Freight collector into a two-stage system with a cyclone, better filters, and expanded ductwork.
But after planning to add a dedicated table saw drop and extend lines to a CNC, he realized the stock impeller might not keep up.
Instead of upgrading the motor or buying a new collector, he sourced a 12-inch impeller from WIN Tools. A larger impeller increases cubic feet per minute (CFM), improving suction and airflow throughout the system—especially at longer runs or heavily branched setups.
Setup Overview
The original system was modest: a single-stage unit with basic filter bags. Jason had already made several upgrades including a cyclone separator and improved filtration, which cut down on debris reaching the collector.
The impeller upgrade was the next logical step. More air movement would help overcome the resistance added by long ducts, blast gates, and new tool drops.
The Upgrade Process
Swapping the impeller is a mechanical job—no electrical rewiring involved. The main steps include:
- Accessing the lower housing
- Removing the original impeller
- Installing the new fan
- Reassembling the housing and testing
Tools involved include socket wrenches, a puller tool, screwdrivers, a dead-blow mallet, and soft wood blocks. Jason emphasizes that the process is doable with standard tools, but having the right puller can make or break the removal step.
Mechanical Tips and Details
Removing the original impeller is often the most difficult part. In Jason’s case, the old fan was frozen to the shaft and took multiple attempts to remove cleanly. Here are a few key takeaways:
- Expect a tight fit. Years of use can cause impellers to seize onto the motor shaft.
- Use a robust puller. Jason tried a smaller puller that failed, then succeeded with a heavy-duty model that could grip the impeller’s outer rim.
- Go slow. Turn the puller gradually and apply even pressure. Sudden force risks bending the blades.
- Watch for alignment keys. Small metal bars may sit in the shaft’s keyway—don’t lose them.
Installing the New Fan
Once the original impeller was removed, the larger fan slipped into place with help from a soft block and mallet. Jason took care to align the impeller squarely and reinstall the alignment key and washer before tightening the retaining screw.
A few reminders for this step:
- Seat the fan evenly—any wobble will cause vibration and reduce performance.
- Use soft tools—wood blocks and dead-blow hammers avoid damaging the blades.
- Confirm the fastener thread direction—some may be reverse-threaded.
After reassembly, the housing was reattached and the system was reconnected to the ductwork and cyclone.
Testing and Performance
Jason tested the upgraded collector at the new table saw drop. While he didn’t publish exact CFM numbers, the difference was easy to see. Suction at the nozzle improved, and airflow across longer duct runs felt noticeably stronger.
This kind of upgrade doesn’t just improve pickup at the tool—it also improves debris travel through separators, filters, and bends in the system.
What to Consider Before Upgrading
A larger impeller is a smart upgrade, but it’s not the right fit for every system. A few important considerations:
- Motor load: The larger fan requires more torque. Most Harbor Freight motors can handle a 12-inch upgrade, but it’s smart to confirm yours isn’t overtaxed.
- Noise and vibration: Bigger fans can shift the sound profile. Careful alignment helps minimize this.
- Fitment: Impellers come in different shaft sizes and keyway patterns. Double-check compatibility before ordering.
- Alternatives: Improving duct layout, using larger duct sizes, or sealing leaks can also improve performance without mechanical changes.
Helpful Tips for the Swap
Jason’s experience highlights a few practical suggestions:
- Take photos of the alignment key and fastener orientation before disassembly.
- Use a quality puller—don’t rely on the cheapest option.
- Label and organize removed hardware to speed up reassembly.
- Test in stages—watch for vibration or rubbing before reconnecting tools.
A Smart Way to Boost Dust Collection
For woodworkers running a mid-sized shop with growing demands, this upgrade hits a sweet spot between cost and performance. It reuses the existing motor and housing while giving your system the boost it needs to handle more tools or longer duct runs.
Jason’s walkthrough shows that the most time-consuming part is removing the old impeller—once that’s out, the rest is straightforward.
If you’ve already optimized your duct layout and filtration, this is a smart next step.
Please support Jason by visiting his Etsy Store: https://www.etsy.com/shop/patriotdiy.

Matt’s Take
These are my personal thoughts and tips based on my own experience in the shop. This section is not written, reviewed, or endorsed by the original creator of this project.
Impeller upgrades are one of those modifications that can really transform how your dust collection performs, especially if you’ve been gradually adding more tools and ductwork to your system. The math is pretty straightforward — a larger diameter fan moves more air at the same RPM, which translates to better suction at your tools and improved debris transport through longer duct runs.
The removal process Jason shows here is spot-on, and that frozen impeller situation is more common than you’d think. I always keep a good gear puller in the shop specifically for jobs like this. The cheap pullers will let you down when you need them most, and trying to force things with the wrong tools usually ends up damaging something. Taking your time with gradual pressure is the way to go, even if it means multiple attempts.
One thing worth noting is that motor load consideration. Most single-stage collectors can handle the step up to a 12-inch impeller without issue, but it’s smart to keep an eye on how hard your motor is working after the upgrade. You’ll hear it if it’s struggling. The performance gains are typically worth the slight increase in power draw, especially when you’re dealing with multiple blast gates and longer duct runs like Jason’s setup.
This kind of upgrade really shines when you’ve already done the groundwork — proper ductwork sizing, good cyclone separator, quality filtration. It’s that final piece that takes a decent system and makes it genuinely effective at keeping your shop clean.