This video is by Izzy Swan.
Izzy demonstrates a quick way to turn a circular saw into a compact table saw using a simple plywood top, a slot for the blade, and an auxiliary fence.
The setup is designed for basic ripping and crosscutting on a job site or in a small shop where a full table saw isn’t available.
Watch the full video and subscribe to Izzy Swan:
Design
The approach relies on a simple tabletop with a blade slot and a removable fence to recreate basic table saw functions. Izzy keeps the design minimal so the jig can be made quickly and adapted for different cuts and jigs later on.
Top and Fence Preparation
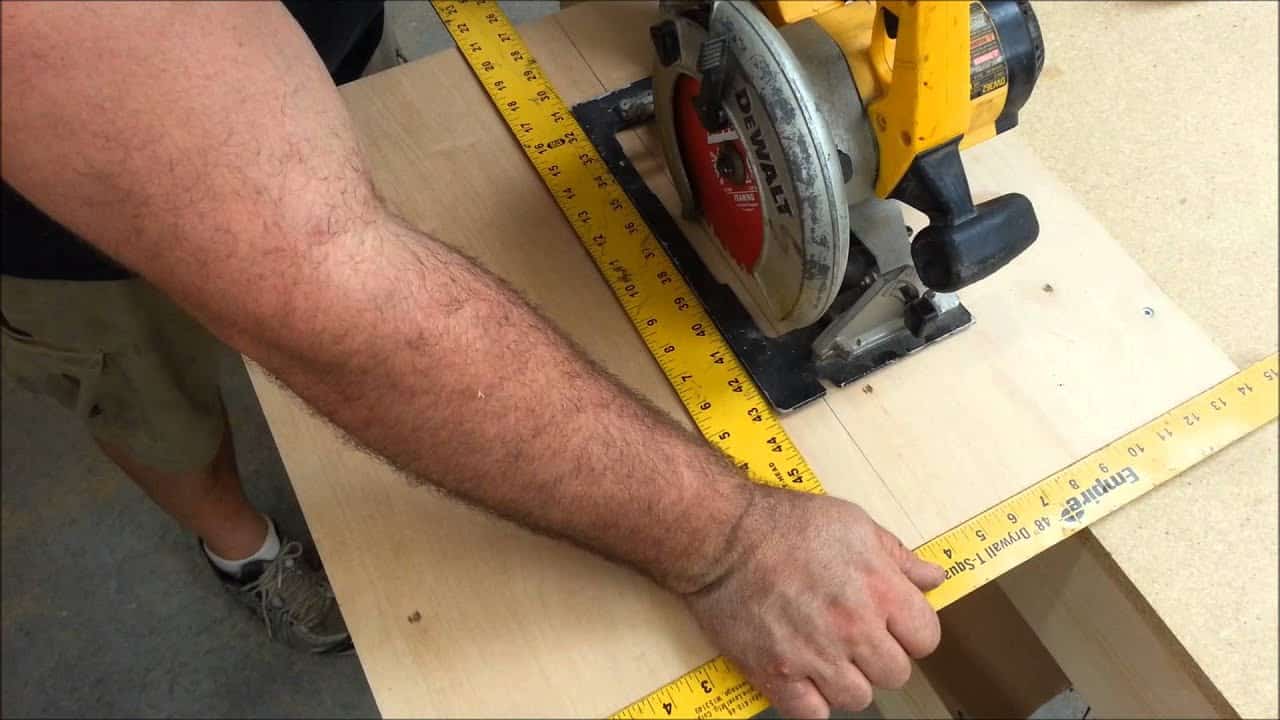
The tabletop starts as a flat panel with an L-shaped auxiliary fence glued and screwed to one edge for a consistent reference.
Careful layout and squaring are emphasized so the blade aligns with the fence for accurate cuts.
Mounting and Alignment
Mounting is handled by drilling through the panel and fastening the circular saw underneath so the blade protrudes through the slot and lines up with the fence.
Izzy stresses checking that the blade sits at a true 90° to the tabletop edge to allow future jigs and fences to register properly.
Practical Safety Tips
Practical solutions—such as using a zip tie to lock the trigger and a power strip as an on/off control—make the setup easier to manage on site while acknowledging limitations.
Fastener ends that protrude can be dressed with basic grinding or filing, and the whole assembly should be firmly secured to a stable work surface or clamped to saw horses to avoid movement during cutting.
Using and Adapting the Setup
The makeshift table saw handles straightforward ripping and crosscutting and serves as a platform for additional auxiliary tables and guides.
Izzy also points out that combining this jig with other simple circular-saw jigs expands capabilities without adding complex machinery.
Why This Makes Sense
This method highlights the value of repurposing a common tool to fill a practical need when space or budget is limited.
The project emphasizes good layout, squaring, and safe mounting—skills that translate to many other shop jigs and setups.
Please support Izzy by visiting his website: https://www.izzyswan.com/.

Matt’s Take
These are my personal thoughts and tips based on my own experience in the shop. This section is not written, reviewed, or endorsed by the original creator of this project.
This type of circular saw table setup is a classic problem-solver that’s saved many projects when shop space or budget is tight. The beauty is in the simplicity — just good layout work and careful mounting can give you surprisingly accurate cuts. I particularly appreciate how Izzy emphasizes getting that blade perfectly square to the fence from the start, because everything else depends on that foundation.
Safety-wise, that zip tie trigger solution is clever, but I’d add that having a clearly marked power switch within easy reach is crucial. You want to be able to kill power instantly if something goes sideways. Also worth noting that even though this gives you table saw functionality, you’re still working with an exposed blade underneath, so keeping your hands well clear of the cut line is even more important than usual.
The real value here goes beyond just making cuts — it’s about understanding how to create reference surfaces and fences that work together. Once you grasp these alignment principles, you can apply them to all sorts of shop jigs. A setup like this often becomes the gateway to building more sophisticated jigs and fixtures, even after you eventually get a “real” table saw.