
I winced as I noticed every single stroke and drip of polyurethane that I’d carefully applied to my DIY shelving using a rag. It looked like a first-grader’s art project rather than a polished finish!
Before you kick over that can of poly in defeat, take a breath. Let me walk you through my tried-and-true technique for flawlessly applying polyurethane with rags – no brushes allowed. Soon, you’ll be laying down glass-smooth finishes worthy of the DIY halls of fame.
QUICK ANSWER:
Yes, you can apply polyurethane with a rag. This method offers a smooth, even finish without brush strokes. Using a lint-free cloth like an old t-shirt ensures controlled application, making it cost-effective and efficient!
Why Choose To Apply Polyurethane with a Rag?
Ever wondered why so many folks swear by the rag method for polyurethane? Well, here’s the scoop on why it’s such a game-changer:
- Smooth Finish: Rags provide an even coat without brush strokes for a flawless look.
- Control: Easily regulate polyurethane amounts to avoid over-application.
- Cost-Effective: Use repurposed lint-free clothes like old t-shirts instead of pricey brushes.
- Versatility: Rags excel in tight corners and intricate designs for uniform coverage.
- Large Areas: Quickly finish surfaces like tabletops without brush marks.
- Detailed Work: Rags are ideal for detailed designs due to their flexibility.
- Refinishing: Gently revive vintage pieces while preserving their charm.
- Vertical Surfaces: Rags ensure drip-free application, unlike brushes or rollers.
Essential Materials
Here’s your toolkit to get that perfect finish with a rag:
- Rags: Lint-free options like microfiber or old cotton t-shirts are ideal.
- Polyurethane: Decide between water-based (clear finish, dries faster) or oil-based (warm, amber hue).
- Sandpaper: Fine grit for wood surface preparation.
- Mineral Spirits: For cleaning and potential thinning of oil-based polyurethane.
Optional Materials
- Tack Cloth: Removes dust post-sanding.
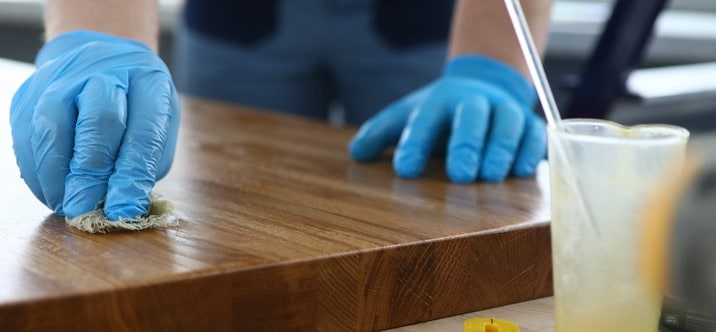
- Gloves: For clean, spill-free hands.
- Respirator: Safety first, especially in enclosed spaces.
- Wood Conditioner: For even absorption on softwoods.
Step-by-Step Guide to Perfect Polyurethane Application with a Rag
1. Workspace Setup:
- Choose a well-ventilated area to work in, free from dust and debris.
- Lay down drop cloths or newspapers to protect the floor and surrounding areas from spills.
2. Wood Surface Preparation:
- Cleaning: Wipe the wood surface with a damp cloth to remove any dirt or grime. For oil-based polyurethane, use mineral spirits for a thorough clean.
- Sanding: Use fine-grit sandpaper to smooth the wood. This not only preps the surface but also ensures better adhesion of the polyurethane.
- Dust Removal: Post-sanding, use a tack cloth to remove any residual dust, ensuring a clean surface.
3. Selecting Materials:
- Choose a lint-free rag, like microfiber or old cotton t-shirts.
- Decide on the type of polyurethane: water-based for a clear finish or oil-based for a warmer hue.
4. Application Process:
- Pour a small amount of polyurethane onto the rag. Avoid soaking it; a damp rag ensures controlled application.
- Begin applying in the direction of the wood grain, ensuring even coverage.
- Use smooth, consistent strokes, overlapping slightly to avoid streaks or missed spots.
Expert Tips for a Flawless Finish
Let’s dive a bit deeper than the basics:
- Pressure is Key: Apply with a gentle hand. Too much pressure can cause pooling or streaks, while too little might leave areas under-coated. Remember, it’s easier to add another coat than to fix an over-applied one.
- Vertical Surfaces: When working on vertical surfaces, start from the top and move downwards. This technique helps in catching and smoothing out any drips that form. Use long, continuous strokes to prevent buildup at any point.
- Intricate Designs and Details: For detailed woodwork or carved designs, consider using a smaller piece of rag to get into the nooks and crannies. Ensure every crevice and corner is covered, but be cautious of over-applying in these areas, as it can lead to drips or pooling.
- Multiple Thin Coats vs. One Thick Coat: It’s always better to apply multiple thin coats rather than one thick one. This ensures even coverage, faster drying times, and a smoother finish.
- Patience Pays Off: Allow ample drying time between coats. Rushing this process can lead to tacky finishes or trapped moisture.
Comparing Application Methods
There are a bunch of ways to get that poly on your project. Let’s see how our trusty rag stacks up against the rest:
| Method | Pros | Cons |
|---|---|---|
| Brush |
|
|
| Roller |
|
|
| Sprayer |
|
|
| Rag |
|
|
Why the Rag Method Stands Out
The rag method, as seen from the chart, offers a unique blend of benefits. It eliminates the common issues of brush strokes from brushes and the texture from rollers.
While sprayers can provide a smooth finish, they come with the challenges of equipment and potential overspray. The rag method, on the other hand, is simple, economical, and offers a controlled application.
Caring for Your Finish
You’ve put in the hard work, so let’s make sure that shine lasts for ages:
- Regular Dusting: Use a soft cloth to remove dust, preventing scratches or dullness.
- Avoid Harsh Cleaners: Stick to mild soapy water for cleaning. Rinse and dry thoroughly.
- Addressing Issues:
- For minor scratches, lightly sand the area and reapply a thin coat of polyurethane.
- For stains or discoloration, clean the area and consider a fresh coat if needed.
Using a rag to apply polyurethane offers a blend of simplicity and effectiveness, as demonstrated in this video:
With the right precautions, like wearing gloves and following the essential steps, you can achieve a flawless finish. The rag method ensures your hard work is complemented by a protective and impeccable finish.