This project was built and designed by Clinton from Specific Love Creations. It’s a clever way to turn scrap wood into a functional scoop using only a bandsaw and some basic shop tools.
Whether you’re scooping coffee, pet food, or just want a fun weekend project, this build is a great way to practice shaping, cutting, and finishing techniques. It also makes a useful gift or shop-made item that can be used around the house.
Watch the full video and subscribe to Clinton’s channel:


Starting with the Right Wood
Clinton begins the project by selecting a solid block of Douglas fir. This species is known for being easy to work with while still offering strength and durability.
After choosing a clean piece from his leftover material pile, he squares one edge on the miter saw. This step ensures that all future cuts are accurate and helps establish a flat reference surface for the bandsaw work that follows.
Sketching and Planning the Scoop
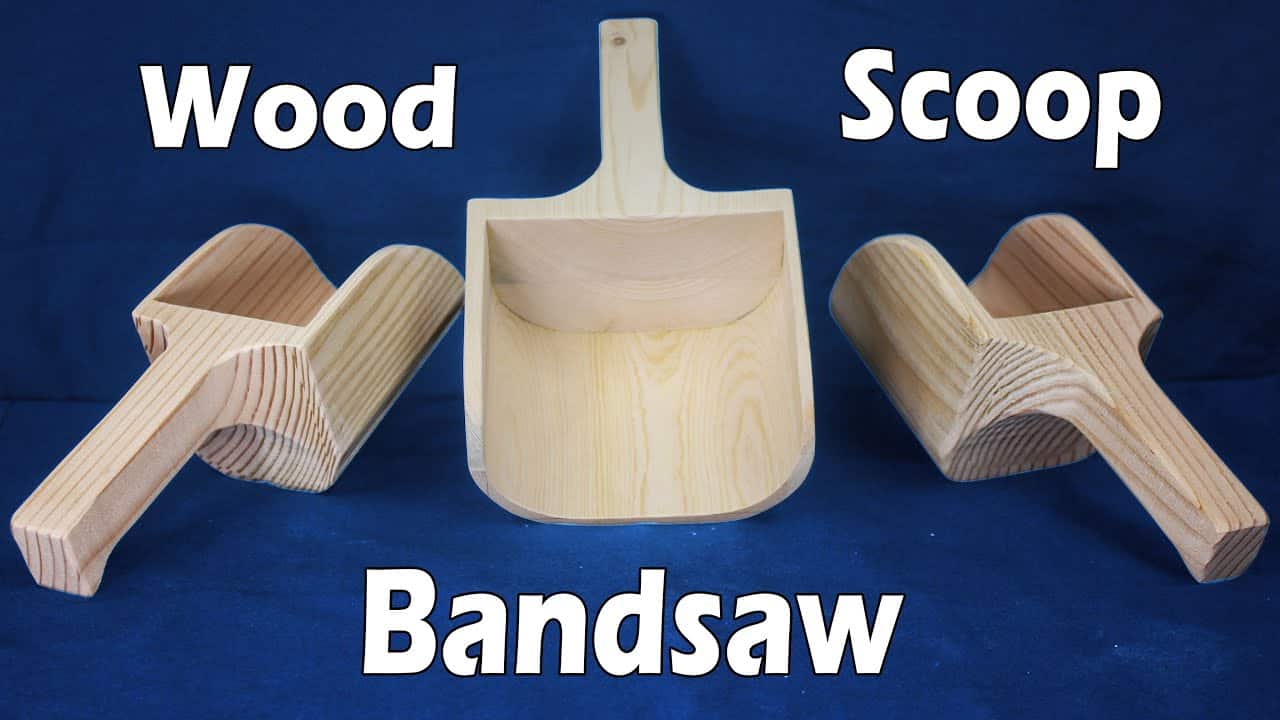
The scoop’s shape can be modified to suit your needs, but Clinton goes with a design about five inches wide. To mark consistent curves, he uses a two-inch washer as a guide for the corners. This helps create a smooth transition around the edges and keeps the scoop both ergonomic and good-looking.
If you don’t have a washer handy, freehanding the shape works fine—just keep a quarter-inch margin from the edge and aim for symmetry. The goal is a scoop that feels balanced and comfortable to hold.
Bandsawing the Shape
Once the shape is drawn, Clinton moves over to the bandsaw. He uses a quarter-inch blade with six teeth per inch for tight curves and clean lines. Larger scoops benefit from a full-size bandsaw, but a benchtop model works as well if the design is scaled down.
The outer shape is cut first, leaving a bit of extra material to hold onto safely. Next, the inner scoop cavity is cut, but Clinton advises leaving about an inch of wood at the bottom to keep the two halves attached temporarily. This makes gluing easier in the next step.
Prepping for Glue-Up
Before applying glue, Clinton sands the inside faces to remove blade marks and improve adhesion. He also marks both halves to avoid confusion during reassembly.
Glue is applied evenly to the interior faces, and the pieces are clamped tightly. Excess glue is wiped off with a damp rag, and everything is left to dry thoroughly before the next step.
Trying a Wider Scoop Variation
While the first scoop dries, Clinton experiments with a second design using laminated two-by-sixes. This wider version creates more scooping capacity and shows how flexible the concept can be.
The process remains the same—cut the blank, trace the shape, cut the cavity, and prepare for glue-up. With laminated boards, alignment during clamping is even more important, but the result is a sturdier, broader scoop that still fits comfortably in hand.
Shaping the Front and Handle
After the glue dries, Clinton rounds the front edge of the scoop using a roll of tape as a curve template. This gives the scoop a cleaner appearance and a smoother pour when in use.
For the handle, the shape is traced onto the back portion of the blank, taking care to leave enough thickness for strength. Taping the handle pieces back into position helps stabilize them for cutting.
Sanding and Smoothing
Once the handle is cut, a belt sander removes any leftover lips or uneven edges. Clinton rounds the edges and checks the grip for comfort, ensuring the handle is smooth without being too thin.
All corners and transitions are sanded with fine grit to eliminate sharp edges and splinters. A slight bevel on the scoop’s edge makes it more practical for scooping loose materials, but care is taken not to weaken the rim.
Final Touches and Results
With everything shaped and sanded, Clinton assesses both versions of the scoop. The original design has a more compact profile, ideal for smaller tasks like scooping coffee or rice. The wider scoop handles bulkier items and offers more room for larger hands.
Both designs are practical, attractive, and made entirely from leftover wood. Clinton’s project is a great reminder that simple tools and thoughtful design can produce useful, long-lasting items.
Watch the full video and subscribe to Clinton’s channel:

Matt’s Take
These are my personal thoughts and tips based on my own experience in the shop. This section is not written, reviewed, or endorsed by the original creator of this project.
This is exactly the kind of project that makes great use of shop scraps while teaching some valuable bandsaw skills. The technique of cutting the cavity while keeping the halves connected is clever—it prevents the pieces from shifting during glue-up and gives you better registration when clamping. Just make sure your bandsaw blade is sharp and your table is properly adjusted before starting, as those curved cuts require smooth, consistent movement.
Douglas fir is a solid choice for this build. It’s forgiving to work with and has enough density to hold up to regular use without being overly hard on your tools. When sanding the interior surfaces before glue-up, pay attention to getting them truly flat—any high spots will create gaps that weaken the joint. A sanding block helps keep things even, especially in the curved areas.
The belt sander approach for final shaping works well, but take light passes to avoid removing too much material too quickly. Hand sanding with 220 grit afterward will smooth out any belt marks and give you better control over the final contours. For food-safe finishing, consider a few coats of mineral oil or a dedicated salad bowl finish—it’ll protect the wood and make cleanup easier.