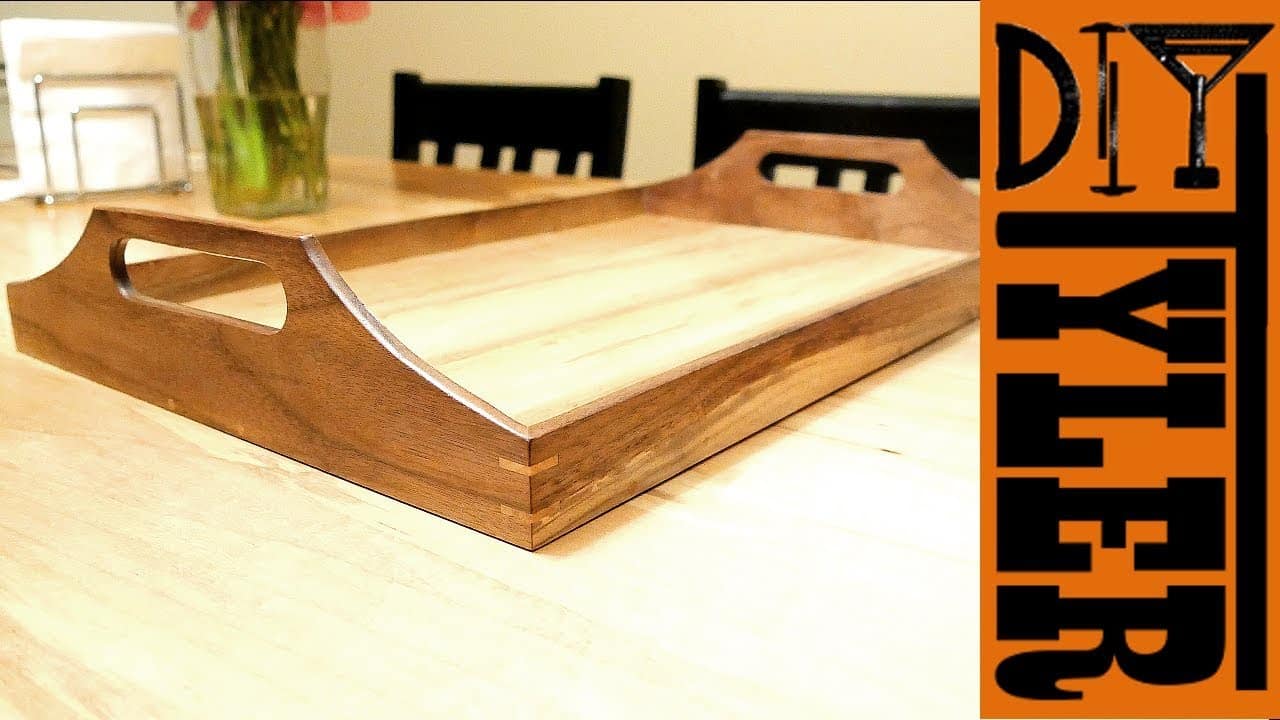
This project was built and designed by Tyler from DIYTyler. It’s a practical and stylish wooden grill caddy that keeps grilling tools, sauces, and gear organized while adding a touch of elegance to your outdoor setup.
Tyler uses a mix of maple and walnut for this project, combining durability with beautiful natural grain. The result is a functional piece that looks just as good as it performs.
Watch the full video and subscribe to Tyler’s channel:
Why a Grill Caddy Comes in Handy
Grilling often means juggling sauces, tongs, brushes, and plates—all at once. A dedicated caddy makes it easier to carry everything from the kitchen to the grill in one trip.
It also helps keep your outdoor cooking area tidy and organized. With compartments and handles built in, it’s both practical and good-looking.
Getting Started with Materials
Tyler begins by gathering scrap maple left over from a previous project. Reusing high-quality hardwood helps reduce waste and adds a premium touch to the final build.
He also pulls some walnut boards from storage to use for the trim and handles. Choosing contrasting woods enhances the look of the caddy without complicating the build.
Preparing and Breaking Down the Wood
The maple and walnut are cut to rough lengths using a miter saw. This step makes the pieces easier to handle and more efficient to process.
Next, Tyler uses a bandsaw to resaw the boards to a workable thickness. The focus is on minimizing waste while revealing as much beautiful grain as possible.
Jointing and Planing
Once the boards are broken down, Tyler joints and planes them to create flat, square edges. Watching rough stock turn into smooth boards is a satisfying part of the process.
This step also ensures all pieces will fit together properly during assembly. A little extra care here saves time later when everything comes together.
Building the Base
The base of the caddy is made from spalted maple, which adds unique character to the design. The boards are glued up and clamped carefully to avoid bowing.
Keeping even pressure on the clamps ensures a flat and secure bond. After the glue dries, the panel is ready to be trimmed to final size.
Framing with Walnut
The side pieces and ends are made from walnut, offering a rich contrast to the maple base. Tyler cuts the miters precisely, dry-fitting everything before assembly.
The walnut frame wraps around the base with a clean, modern look. A careful layout ensures tight joints and smooth corners.
Crafting the Handle
To shape the handle, Tyler starts with a paper template. He transfers the shape to the wood and roughs it out with a bandsaw.
The edges are smoothed using a spindle sander for a comfortable grip. The result is a sturdy, well-proportioned handle that’s easy to carry.
Reinforcing the Frame
To strengthen the miter joints, Tyler cuts small splines into each corner. These not only improve durability but also add a subtle design detail.
He also drills for dowels through the sides of the caddy. This extra reinforcement helps the caddy hold up to regular use and heavier items.
Sanding and Finishing
Once assembled, the entire caddy is sanded thoroughly. A slight roundover on the edges gives the piece a polished and user-friendly feel.
Tyler finishes it with three coats of Arm-R-Seal in a semi-gloss sheen. The finish brings out the rich tones in both woods while protecting the surface from moisture and wear.
Putting It to Use
With the finish cured, the caddy is ready for outdoor use. Tyler loads it up with sauces, utensils, and seasoning blends for a backyard grilling session.
It makes transporting supplies quick and easy, freeing up your hands and keeping things neat. Plus, it looks great sitting on the patio or outdoor table.
Want to See the Full Build?
Please support Tyler by visiting his website here: diytyler.com

Matt’s Take
These are my personal thoughts and tips based on my own experience in the shop. This section is not written, reviewed, or endorsed by the original creator of this project.
The mix of maple and walnut is a smart choice for outdoor use — both species hold up well to humidity changes and the walnut provides that rich contrast that makes the grain in both woods really pop. When you’re working with contrasting species like this, it’s worth noting that they can move at slightly different rates with seasonal changes, but in a project this size it’s rarely an issue.
That spline reinforcement at the miters is solid thinking. Outdoor pieces take more of a beating than furniture that stays inside, so those extra mechanical connections really pay off over time. The dowel reinforcement through the sides is another nice touch that turns what could be a delicate piece into something that’ll handle years of hauling grilling gear around.
Arm-R-Seal is a great finish choice for something like this — it builds up nicely and gives you that durability you need for outdoor use without being too glossy. Three coats should give good protection, though you might want to plan on a light refresh every year or two depending on how much UV exposure it gets on your deck or patio.
The template approach for the handle is worth noting too. Taking time to get that curve comfortable in your hand makes all the difference when you’re carrying a loaded caddy. A poorly shaped handle turns a helpful tool into something you don’t want to use.