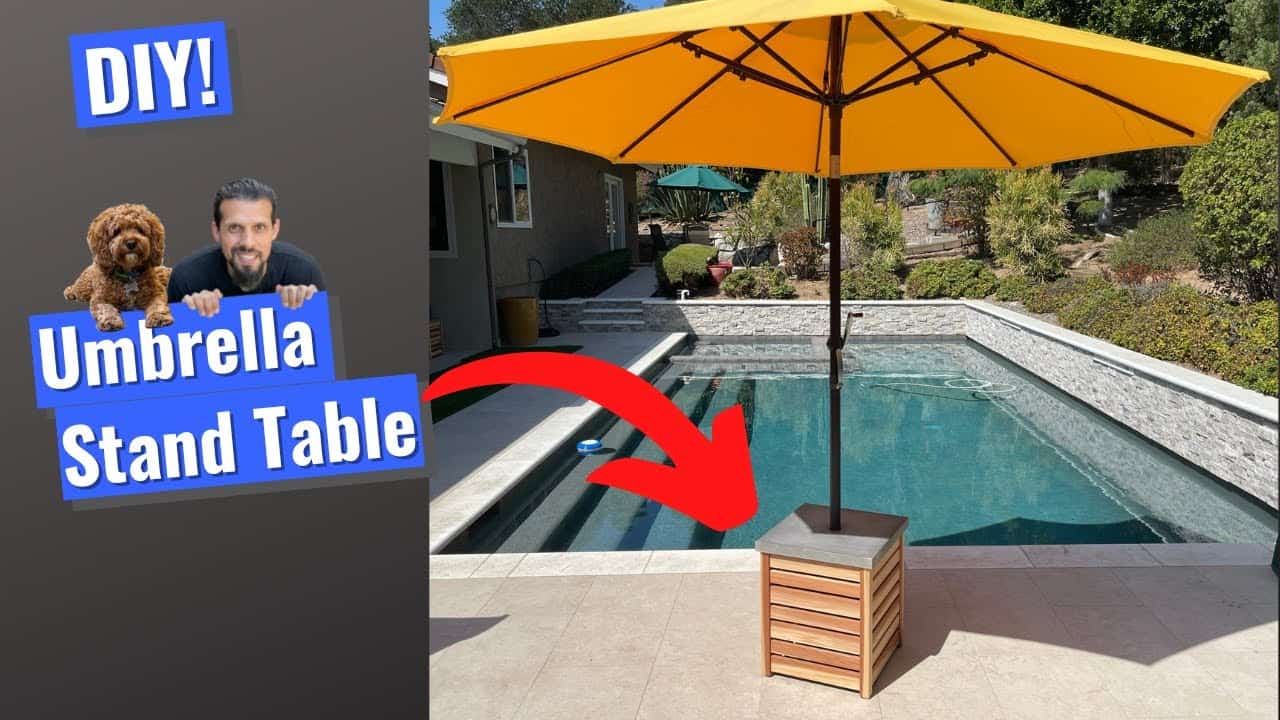
This project was built and designed by Anthony from Wood Pack DIY, with help from his trusty assistant, Bob Barker. It’s a smart and stylish umbrella stand table that doubles as outdoor décor while hiding the weight base of your umbrella.
This build combines solid joinery, a concrete top, and practical functionality to create a piece that’s both attractive and durable. If you’ve upgraded your patio recently and need a finishing touch, this is a perfect weekend project.
Watch the full video and subscribe to Anthony’s channel:
Why Build Your Own Umbrella Stand Table?
Store-bought umbrella tables can be expensive and often lack the personality or quality of a handmade piece. Anthony’s design provides a better option—one that you can tailor to your backyard style and build using basic tools.
Instead of leaving heavy umbrella weights exposed, this project encloses them in a clean, wood-framed table. The bonus? It also gives you a convenient surface for drinks, snacks, or small planters while you relax outside.
Starting with the Right Material
Anthony chooses redwood for this project because of its natural resistance to moisture and insects. It’s a strong, lightweight wood that holds up well outdoors and offers a clean, finished look with minimal effort.
He starts by cutting all the pieces to size—mostly legs and slats that will form the table’s base. A miter saw makes quick work of the repetitive cuts, while Bob Barker stands by to supervise and keep the vibes relaxed in the shop.
Building the Table Base
The table’s base is made up of slatted panels with a staggered thickness pattern for visual interest. Alternating the thickness of the slats gives the design texture and depth, turning a functional object into a conversation piece.
Anthony uses pocket holes for the joinery. This keeps things simple and secure, allowing the base panels to be assembled quickly without visible hardware. Each panel is clamped flat while pocket screws are driven in carefully to prevent splitting.
Assembling the Panels
With all slats cut and prepped, the panels come together on the workbench. Clamps help hold everything in place while final adjustments are made. Anthony checks frequently for level alignment and makes minor tweaks to keep things square.
Woodworking always comes with a bit of trial and error, and this project is no different. A couple of adjustments along the way help everything come together just right—and show the importance of staying flexible during a build.
Creating the Concrete Top
The concrete tabletop is what sets this build apart from traditional wood-only designs. Anthony creates molds from melamine board to pour the concrete into, shaping the top to fit snugly over the base.
To match the rest of the patio furniture, concrete colorant is added during mixing. Though working with concrete was new for Anthony, he shares a few key lessons from the process—especially how rewarding it is to try something outside your comfort zone.
Pouring and Curing the Concrete
Once the mold is set up, the concrete is poured evenly and leveled out with a trowel. Wire mesh reinforcement can be added if extra strength is needed, though this table’s size may not require it.
The slab is left to cure fully before it’s removed from the mold. Once set, the edges are sanded to remove any sharp corners and create a smooth surface that’s safe to touch and easy to clean.
Finishing the Wood Components
The redwood base is given a final sanding to prepare it for finish. Anthony uses spar urethane to seal and protect the wood, which is ideal for outdoor use due to its flexibility and resistance to UV damage.
Rubber feet are added to the bottom of each leg to lift the table slightly off the ground and prevent direct moisture contact. Bob Barker approves of the final design, occasionally checking under the table for quality control (or dropped treats).
Final Assembly and Setup
To join the concrete top to the wood base, Anthony uses silicone caulk. This adhesive holds the concrete in place securely while also creating a clean visual seam that blends in with the rest of the build.
The final piece looks great, functions perfectly, and ties in beautifully with the other furniture in Anthony’s patio series. It’s a subtle but meaningful improvement to any outdoor setup.
Functional, Stylish, and Built to Last
This umbrella stand table solves a common problem with a creative and good-looking solution. It offers both form and function—concealing the umbrella base while adding useful surface space.
Anthony’s easygoing style and practical building tips make this an approachable project, even if you’ve never worked with concrete before. With some redwood, a bag of mix, and a weekend of shop time, you’ll have a great-looking table that’s built to last.
Please support Anthony (and Bob Barker) by visiting their website (he sells awesome plans): https://www.woodpackdiy.com/.

Matt’s Take
These are my personal thoughts and tips based on my own experience in the shop. This section is not written, reviewed, or endorsed by the original creator of this project.
This build really showcases how mixing materials can create something special. The concrete and wood combination gives you the best of both worlds — the durability and clean modern look of concrete with the warmth and workability of wood. Redwood is an excellent choice here since it naturally handles moisture well, though you could also consider cedar or pressure-treated lumber if redwood isn’t available in your area.
The pocket screw joinery keeps things simple and strong, which is perfect for outdoor furniture that needs to handle weather and movement. When working with pocket screws in softer woods like redwood, take your time with the drilling to avoid blowout — the wood can tear out more easily than harder species. A sharp bit and steady pressure usually do the trick.
Working with concrete for the first time can feel intimidating, but it’s actually pretty forgiving once you understand the basics. The key is getting your proportions right and working at a steady pace once you start mixing. Having everything prepped beforehand makes the pour much smoother. That spar urethane finish Anthony uses is solid gold for outdoor projects — it flexes with the wood movement and holds up to UV rays much better than regular polyurethane.
The rubber feet detail is one of those small touches that makes a big difference in longevity. Keeping wood off direct ground contact prevents moisture wicking and extends the life of any outdoor project significantly.