This project was built by Zach at Bear Mountain Builds. If you need a smart way to store lumber in your workshop, Zach’s engineered cantilever lumber rack is a game-changer. Check out his channel for more woodworking videos and project ideas.
Watch the full video and subscribe to Zach’s channel:
Why a Lumber Rack?
Workshop space is valuable, and lumber storage can quickly become a challenge. Zach originally used a mobile lumber cart to keep materials organized, but over time, he needed a more permanent and space-efficient solution.
A cantilever-style rack allows lumber to be stored off the floor while still being easily accessible. This type of rack is strong, versatile, and maximizes wall space without taking up precious floor area.
Materials and Preparation
For this build, Zach works with sturdy 2×6 boards, ensuring the structure can handle a significant load. While planing isn’t required, he planes the boards for a smoother finish before cutting them to size.
After planing, he cleans up the edges using a table saw and then trims everything to length with a miter saw. Even if some boards have slight imperfections, the assembly process ensures they remain strong and stable.
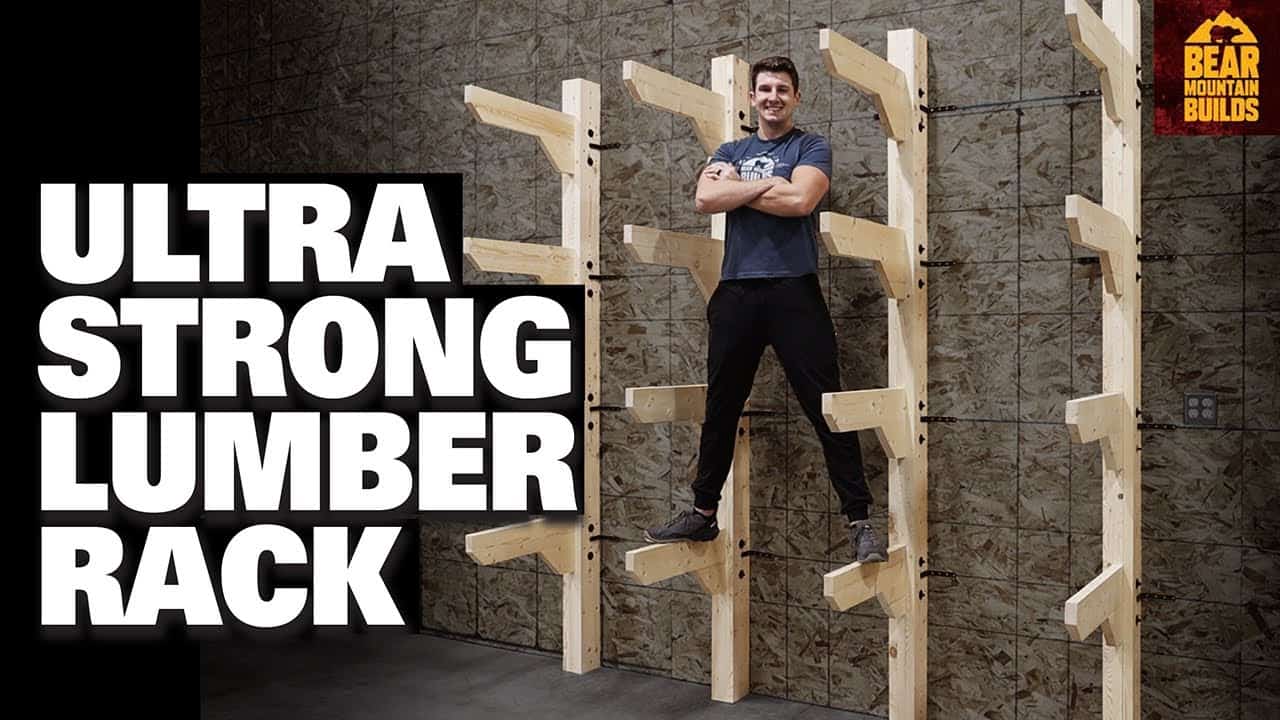
Assembling the Cantilever Rack
The build consists of cantilever arms, gussets for reinforcement, and spacers to maintain even spacing. To strengthen the structure, Zach sandwiches the arms between additional boards.
Each piece is secured with glue and structural screws, creating a strong bond for load transfer. He allows the glue to fully dry before unclamping to prevent shifting. For consistency, he standardizes screw placement, making it easier to attach the long support boards later in the build.
Once assembled, he squares off the ends of the racks to ensure everything is even. To enhance stability, he drills 3/8-inch holes with a portable drill guide, ensuring precision for a secure final installation.
Mounting the Rack
For installation, Zach uses heavy-duty L brackets and lag screws, ensuring the racks are firmly anchored to the wall. Positioning them so they touch the floor helps distribute weight and improve stability.
The cantilever design requires careful mounting to counteract the torque from heavy lumber. By securing the brackets higher on the wall, Zach increases leverage and minimizes strain on the structure. He also spaces the racks appropriately to accommodate different board sizes.
To prevent sagging over time, Zach reinforces the design with braces and bolts. This added support ensures the racks can handle significant weight without bending or weakening.
Final Thoughts and Design Insights
Once installed, Zach tests the strength of the racks by applying pressure, confirming they hold up without any signs of movement. The design proves to be a sturdy and reliable storage solution.
For those with smaller shops or garages, he suggests using 2x4s instead of 2x6s for a more compact version. The plans include both options, making it easy to customize the rack based on available space and storage needs.

Matt’s Take
These are my personal thoughts and tips based on my own experience in the shop. This section is not written, reviewed, or endorsed by the original creator of this project.
The cantilever design is brilliant for lumber storage because it eliminates the need for vertical supports at the ends, giving you full access to slide boards in and out. The key to success with any cantilever rack is understanding that most of the stress concentrates at the wall connection point. That’s why Zach’s approach of using heavy-duty L brackets and lag screws is so important — you’re essentially creating a lever arm, and the wall anchor becomes your fulcrum.
One thing I always emphasize with wall-mounted storage is finding the studs. A rack like this loaded with lumber can easily exceed 200+ pounds, and drywall anchors just won’t cut it. If your studs don’t line up perfectly with your desired spacing, consider running a horizontal cleat across multiple studs first, then mounting your brackets to that. It distributes the load much better than trying to force your design to match stud spacing.
The spacing between arms is crucial too. I’ve found that 24 inches works well for most lumber lengths, but if you primarily work with shorter stock, you can go tighter. Just remember that closer spacing means more cutting and hardware, but better support for shorter pieces. The beauty of this design is that you can always add more arms later as your lumber collection grows.